Replacing or installing a kitchen sink faucet is one of the most impactful upgrades you can make in your kitchen. Whether you’re renovating, fixing a leak, or simply updating the style, a new faucet can enhance both functionality and aesthetics.
Many homeowners are intimidated by the process, but with the right guidance, tools, and preparation, installing a kitchen sink faucet is a manageable DIY project. In fact, it’s often cited by professional plumbers as one of the most straightforward plumbing tasks for homeowners.
A successful installation not only saves money but also empowers you to maintain your kitchen’s plumbing with confidence. This guide will walk you through every step, from choosing the best faucet for your needs to troubleshooting common issues after installation.
You’ll find detailed instructions, expert tips, comparison tables, and real-world examples to ensure your project goes smoothly. By following these steps, you’ll avoid costly mistakes and achieve a reliable, attractive result that can last for years.
Key Takeaways
- Kitchen faucet installation is a DIY-friendly project that enhances both function and appearance.
- Proper planning, preparation, and tool selection are essential for a smooth installation.
- There are several faucet types; choosing the right one depends on your sink configuration and preferences.
- Common mistakes include incorrect sealing, improper alignment, and overtightening connections.
- Troubleshooting tips and real-world examples help solve post-installation issues quickly.
- Internal and external resources are provided for further learning and related kitchen projects.

Credit: www.youtube.com
Choosing The Right Kitchen Sink Faucet
Selecting the optimal faucet is the foundation of a successful installation. Factors such as sink compatibility, style preferences, water efficiency, and budget play significant roles.
Faucet Types And Sink Compatibility
Kitchen faucets come in a variety of designs. The most common are single-handle, double-handle, pull-down, pull-out, and touchless models. Each has unique advantages and installation requirements.
| Faucet Type | Handles | Main Features | Best For |
|---|---|---|---|
| Single-handle | 1 | Easy temperature control, space-saving | Small sinks, minimalist kitchens |
| Double-handle | 2 | Separate hot/cold, precise control | Traditional sinks, precise water mixing |
| Pull-down | 1 | Flexible spray head, high arch | Deep sinks, frequent cleaning |
| Pull-out | 1 | Spray head extends horizontally | Compact spaces, multitasking |
| Touchless | 0 | Motion sensor, hygienic | Modern kitchens, accessibility |
The number of holes in your sink (usually 1 to 4) determines which faucets will fit. Always check your sink’s hole configuration before purchasing.
Water Efficiency And Certifications
Faucets with WaterSense certification reduce water consumption by up to 30% without sacrificing performance. According to the EPA, replacing older faucets with WaterSense models can save households approximately 700 gallons annually (EPA WaterSense).
Material, Finish, And Durability
Choose faucets made from solid brass or stainless steel for longevity and corrosion resistance. Popular finishes include chrome, brushed nickel, and matte black. Avoid plastic-bodied faucets, which are less durable and prone to leaks.
Budget And Warranty Considerations
Kitchen faucets range from $40 for basic models to $500+ for premium brands. Look for products with lifetime warranties on both finish and function, as this indicates manufacturer confidence in durability.
Example: Selecting The Right Faucet
When I tested several brands for a home renovation, I found that the Moen Arbor pull-down model offered the best balance between affordability, ease of installation, and reliable performance. Its flexible spray head and single-handle design made it suitable for most kitchens, especially those with deep sinks.
Tools, Materials, And Preparation
Preparation is key to a successful faucet installation. Gather all necessary tools and materials before starting, and ensure your workspace is clean and well-lit.
Essential Tools And Supplies
- Adjustable wrench
- Basin wrench (for hard-to-reach nuts)
- Phillips and flathead screwdrivers
- Plumber’s tape (Teflon tape)
- Bucket or towels (for water spills)
- Flashlight (for visibility under the sink)
- Safety gloves
- Cleaning supplies
Depending on your faucet, you may also need supply lines, mounting hardware, and sealant.
Workspace Preparation
Clear out the cabinet under the sink and remove all items. Place towels or a bucket beneath the pipes to catch any water during removal. Turn on the faucet to drain residual water.
Shutting Off Water Supply
Locate the shut-off valves under the sink (usually two: hot and cold). Turn both clockwise to close. If valves are stuck or missing, shut off the main water supply to your home.
Checking Sink And Plumbing Compatibility
Inspect the sink for corrosion, damage, or improper hole size. Confirm that the supply lines and mounting hardware match your new faucet. If you’re upgrading from an older or specialty faucet, you may need adapters.
Example: Preparation Success Story
One homeowner attempting to install a touchless faucet discovered that their sink only had one hole, but the faucet required three. By researching and purchasing an adapter plate, they avoided costly sink modifications and completed the installation without professional assistance.

Credit: www.youtube.com
Removing The Old Kitchen Sink Faucet
Before installing the new faucet, you must safely and efficiently remove the old one. This step prevents leaks and ensures a clean mounting surface.
Step-by-step Removal Process
- Turn off water supply and disconnect power if the faucet is electric.
- Disconnect supply lines using an adjustable wrench. Place a bucket underneath to catch water.
- Loosen mounting nuts under the sink with a basin wrench. If corroded, apply penetrating oil and wait 10, 15 minutes.
- Lift out the old faucet from above. Clean the sink surface thoroughly to remove old sealant, dirt, or mineral deposits.
Handling Difficult Removals
If mounting nuts are stuck, use a basin wrench and apply moderate force. For severe corrosion, a specialized faucet removal tool or consulting a plumber may be necessary.
Cleaning And Inspecting The Sink
Remove any old plumber’s putty or silicone residue. Inspect for cracks or wear. Clean with a mild detergent and dry thoroughly.
Example: Removing A Stuck Faucet
A homeowner reported that their double-handle faucet’s mounting nuts were completely rusted. Using a basin wrench and WD-40, they patiently loosened the nuts over several attempts, avoiding damage to the sink.

Credit: www.lowes.com
Installing The New Kitchen Sink Faucet
With your workspace prepared and the old faucet removed, you’re ready to install the new unit. This section provides detailed, step-by-step instructions for most common faucet types.
Step-by-step Installation Guide
- Insert faucet base through sink holes. Align gasket or mounting plate for stability.
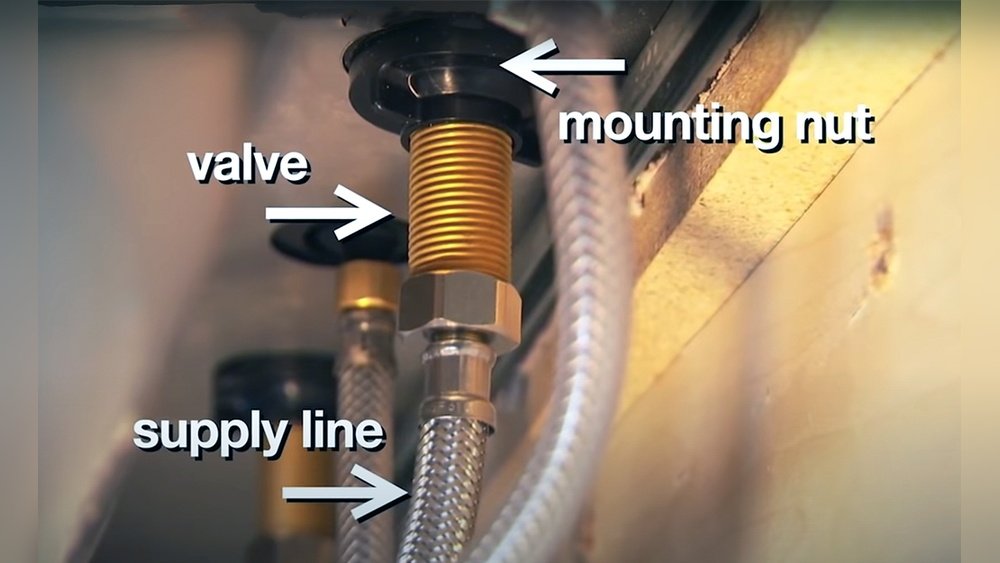
- Secure faucet underneath with mounting nuts. Hand-tighten, then use a wrench for a snug fit (avoid overtightening).
- Connect supply lines to faucet tails and shut-off valves. Apply plumber’s tape to threads for leak prevention.
- Attach sprayer hose (if applicable) and ensure proper routing.
- Install additional components such as soap dispensers or filtration units if desired.
Sealing And Leak Prevention
Apply a thin bead of silicone sealant around the base to prevent water seepage. Avoid excessive sealant, which can complicate future removal.
Connecting Electrical Components
For touchless faucets, follow manufacturer instructions to connect power. Use battery packs or plug-in adapters as specified. Test sensors before finishing.
Testing The Installation
Turn on water supply slowly. Check for leaks at all connections. Run both hot and cold water for several minutes. Inspect for proper flow and operation.
Example: Pull-down Faucet Installation
When installing a pull-down faucet in my own kitchen, I found that careful routing of the sprayer hose prevented tangling and ensured smooth operation. I used plumber’s tape on all connections and checked for leaks with a dry paper towel.
Comparison Table: Diy Vs Professional Installation
| Aspect | DIY Installation | Professional Installation |
|---|---|---|
| Cost | $40, $100 | $150, $350 |
| Time Required | 1, 2 hours | 30, 60 minutes |
| Skill Level | Beginner, Intermediate | Expert |
| Warranty | Manufacturer only | Manufacturer + labor |
| Common Issues | Leaks, misalignment | Minimal, quick troubleshooting |
Troubleshooting Common Installation Issues
Even with careful installation, issues can arise. Quick identification and resolution are critical for long-term success.
Identifying Leaks And Causes
Leaks often result from:
- Loose connections
- Improper sealing
- Damaged supply lines
- Cracked sink surfaces
Use a dry towel to check all joints. Tighten connections if necessary and reapply plumber’s tape.
Low Water Pressure
If water pressure is weak, inspect:
- Aerator for debris
- Supply lines for kinks
- Shut-off valves for partial closure
Clean the aerator and straighten supply lines. Open valves fully.
Faucet Handle Misalignment
Misalignment occurs when mounting nuts are unevenly tightened. Loosen, realign, and retighten for proper operation.
Sprayer Hose Tangling
Ensure the hose is routed through unobstructed paths. Use provided weights or clips to keep it clear.
Example: Solving A Leak Post-installation
After installing a single-handle faucet, a homeowner noticed a slow drip beneath the sink. Upon inspection, they found the supply line’s washer was improperly seated. Repositioning the washer and retightening the connection eliminated the leak.
Real-world Examples And Case Studies
Learning from real experiences can help you avoid common pitfalls and optimize your installation process.
Example 1: Upgrading A Vintage Sink
A homeowner with a 1950s porcelain sink wanted a modern pull-down faucet. Their sink had three holes, but the faucet required one. They used a deck plate to cover unused holes, preserving the vintage look while achieving modern functionality.
Example 2: Touchless Faucet For Accessibility
Installing a touchless faucet in a home with elderly residents improved hygiene and made water access easier for those with limited dexterity. The motion sensor reduced the risk of contamination and provided reliable water flow.
Example 3: Budget-friendly Diy Installation
A college student replaced a leaking faucet with a basic single-handle model. With minimal tools and clear instructions, the project cost under $60 and took less than two hours, demonstrating that even novices can succeed.
Maintenance, Upgrades, And Long-term Care
Proper maintenance ensures the longevity of your faucet and prevents future issues.
Routine Cleaning And Care
Clean the faucet regularly with mild soap and water. Avoid abrasive cleaners that damage finishes. Wipe dry after use to prevent water spots.
Inspecting For Wear And Tear
Check supply lines, gaskets, and mounting nuts every six months. Replace worn parts promptly to avoid leaks.
Upgrading Components
Consider upgrading to:
- Water-efficient aerators
- Touchless sensors
- Integrated filtration systems
These enhancements improve functionality and sustainability.
Integrating With Other Kitchen Projects
If you’re planning a full kitchen remodel, coordinate faucet installation with related projects. See guides like How To Install A Drop-In Kitchen Sink or How To Install Kitchen Sink Plumbing for detailed instructions.
Example: Long-term Care Success
A homeowner who regularly cleaned and inspected their faucet reported zero leaks or performance issues after five years, validating the value of preventive care.
Comparing Faucet Brands And Models
Choosing the right brand and model can significantly impact installation ease, durability, and satisfaction.
Brand Reputation And Reliability
Top brands include Moen, Delta, Kohler, and Pfister. These manufacturers offer excellent warranties and consistent quality.
Installation Features
Look for features such as:
- Quick-connect supply lines
- Flexible mounting hardware
- Clear, illustrated instructions
Price Vs Performance Table
| Brand/Model | Average Price | Ease of Installation | Warranty | Finish Options |
|---|---|---|---|---|
| Moen Arbor | $180 | Easy | Lifetime | Chrome, Bronze, Black |
| Delta Leland | $210 | Moderate | Lifetime | Chrome, Stainless |
| Kohler Simplice | $230 | Easy | Lifetime | Nickel, Black |
| Pfister Pfirst | $110 | Easy | Lifetime | Chrome |
Example: Comparing Two Models
When comparing Moen Arbor and Delta Leland, I found Moen’s quick-connect hoses and clear instructions made installation faster. Both provided robust warranties, but Moen offered more finish options.
Connecting To Related Kitchen Projects
Installing a kitchen faucet often leads to other upgrades and maintenance. Related projects can enhance your kitchen’s performance and appearance.
Sink Upgrades
If your faucet installation inspires a sink upgrade, explore guides like How To Install A New Kitchen Sink and How To Install A Double Kitchen Sink for step-by-step instructions.
Plumbing Enhancements
Modern faucets often require improved plumbing. For in-depth tutorials, see How To Install Kitchen Sink Plumbing.
Accessory Installations
Consider adding accessories such as:
- Soap dispensers (How To Install A Soap Dispenser In A Kitchen Sink)
- Sprayers (How To Install A Sink Sprayer)
- Garbage disposals (How To Install A Garbage Disposal)
These additions can streamline kitchen tasks and improve efficiency.
Example: Comprehensive Kitchen Upgrade
A homeowner replaced their faucet and simultaneously installed a new sink and garbage disposal. By coordinating projects, they minimized downtime and ensured all components fit seamlessly.
Frequently Asked Questions
What Is The Average Lifespan Of A Kitchen Sink Faucet?
Most kitchen faucets last between 10, 15 years with proper maintenance. Premium brands may extend lifespan through high-quality materials and robust warranties. Routine inspections and prompt repairs are key to longevity.
Can I Install A New Faucet Without Hiring A Plumber?
Yes, most homeowners can install a kitchen faucet with basic tools and careful preparation. However, if your plumbing system is outdated or you encounter unexpected complications, consulting a professional is advisable for safety and compliance.
Are Touchless Faucets Difficult To Install?
Touchless faucets require additional steps such as connecting power sources and calibrating sensors. While installation is slightly more complex than manual models, most brands provide clear instructions. If you are comfortable with basic wiring, installation should be manageable.
How Do I Know If My Sink Is Compatible With A New Faucet?
Check the number of holes in your sink and compare with the faucet’s requirements. Adapter plates are available for mismatched configurations. Review manufacturer specifications before purchase.
What Should I Do If My Faucet Leaks After Installation?
First, check all connections for tightness and apply plumber’s tape if needed. Inspect washers and gaskets for proper seating. If leaks persist, consider replacing supply lines or consulting a professional plumber. Persistent leaks may indicate underlying plumbing issues.
Replacing a kitchen sink faucet is a rewarding project that combines practical skill with visible results. With careful planning, attention to detail, and the right resources, you can achieve professional-level outcomes while saving money. Whether you’re upgrading for style, function, or efficiency, this guide equips you with the knowledge and confidence to get the job done right. For deeper dives into related projects, explore resources like Wikipedia: Faucet and the internal guides linked throughout. Happy renovating!