Installing kitchen sink plumbing is a project that can transform not only the look but also the functionality of your kitchen. Whether you’re renovating, repairing, or building a new kitchen, understanding how to install the plumbing for a kitchen sink is vital.
While it may seem daunting, with the right planning, tools, and guidance, you can successfully complete this task and enjoy the satisfaction of a job well done. This guide breaks down the process into clear, actionable steps, ensuring both beginners and experienced DIY enthusiasts can follow along.
Kitchen sink plumbing isn’t just about connecting pipes; it’s about creating a reliable system that manages water supply and waste efficiently. A proper installation prevents leaks, ensures longevity, and keeps your kitchen running smoothly. With the rise in home improvement trends, more homeowners are taking on plumbing projects themselves.
This article provides expert insights, real-world examples, and data-driven comparisons to help you make informed decisions and avoid common pitfalls.
Key Takeaways
- Preparation and planning are crucial for a successful kitchen sink plumbing installation.
- The right choice of materials and tools impacts performance and longevity.
- Step-by-step guidance helps avoid leaks and drainage issues.
- Common mistakes often lead to clogs and costly repairs.
- Case studies and expert tips provide real-world context for DIY enthusiasts.
- Maintenance tips ensure your system remains efficient for years.
Understanding Kitchen Sink Plumbing Basics
Installing kitchen sink plumbing requires a strong grasp of system design, component functions, and code compliance. This section will help you understand the essential elements before you get started.
Components Of A Kitchen Sink Plumbing System
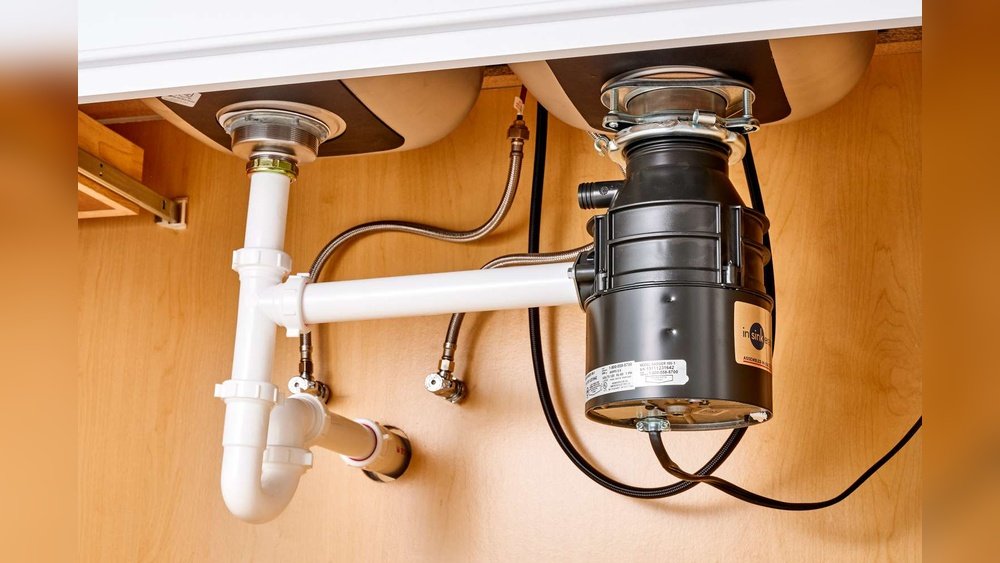
A typical kitchen sink plumbing setup includes:
- Supply lines (hot and cold)
- Shutoff valves
- Faucet connectors
- Sink drain assembly (strainer, tailpiece)
- P-trap
- Waste arm
- Vent pipe
- Dishwasher and garbage disposal connections (if applicable)
Each part plays a specific role in ensuring water flows efficiently in and out of your kitchen sink. For example, the P-trap creates a water seal that prevents sewer gases from entering your kitchen, while shutoff valves provide emergency control over water supply.
How A Kitchen Sink Drain Works
Water enters through the faucet, passes through the strainer, and travels down the tailpiece into the P-trap. From there, it moves through the waste arm and into the household drainage system. Proper venting prevents vacuum formation and facilitates smooth drainage.
Compliance And Safety Considerations
Most municipalities follow the Uniform Plumbing Code (UPC) or the International Plumbing Code (IPC). These codes specify requirements for pipe sizes, venting, and materials. Always check with your local building department before starting work.
Pro Tip: Failing to comply with codes can result in leaks, slow drainage, and even fines if you plan to sell your home.
Example: The Importance Of Venting
In my experience, omitting or improperly installing a vent led to frequent slow drainage and unpleasant odors in a kitchen remodel. Adding a properly placed air admittance valve (AAV) resolved the issue and restored smooth operation.
:max_bytes(150000):strip_icc()/how-to-install-a-sink-drain-2718789_05_connect_5068-39adb74c4c4b4632b038eb34041fd198.jpg)
Credit: www.thespruce.com
Planning And Preparing For Installation
Proper planning is the foundation of any successful plumbing project. Here’s how to ensure you start on the right foot.
Measuring And Layout
Begin by measuring the space under your sink and the location of water supply and waste lines. Ensure that you have enough clearance for the P-trap, garbage disposal, and dishwasher connections.
Key measurements include:
- Distance from wall to drain outlet
- Height of the drain from the floor
- Faucet hole spacing
- Supply line length
Selecting Tools And Materials
Essential tools for kitchen sink plumbing installation:
- Adjustable wrench
- Pipe wrench
- Slip-joint pliers
- Pipe cutter or hacksaw
- Plumber’s tape (Teflon tape)
- Plumber’s putty
- Bucket and towels for water collection
Common materials:
- PVC, ABS, or metal drain pipes
- Flexible supply lines
- Compression fittings
- Sink strainer kit
- P-trap kit
- Shutoff valves
Sourcing Quality Components
Investing in high-quality components reduces the risk of leaks and failures. According to the EPA WaterSense program, certified plumbing products can reduce household leaks and save up to 10% on your water bill.
Shutting Off Water And Power
Always turn off the main water supply and, if necessary, electrical power to the area. Open the faucet to relieve pressure and drain residual water from the lines.
Example: Planning For A Double Bowl Sink
A homeowner upgraded to a double bowl sink but failed to account for the extra drain connections required. This oversight led to a rushed mid-project trip to the hardware store and added several hours to the installation time.
/how-to-install-a-sink-drain-2718789-05-a2a602315a3d4d12a8ed20429230382c.jpg)
Credit: www.thespruce.com
Step-by-step Guide To Installing Kitchen Sink Plumbing
This section covers each phase of installation, from initial assembly to testing the system. Follow these steps for a smooth, leak-free setup.
Installing The Sink Strainer
- Apply a bead of plumber’s putty around the underside of the sink strainer.
- Insert the strainer into the sink drain opening.
- From underneath, fit the rubber gasket and mounting nut, then tighten.
- Wipe away excess putty.
Connecting The Drain Assembly
- Attach the tailpiece to the strainer with a slip nut and washer.
- If a garbage disposal is installed, connect it to one bowl and the tailpiece to the other.
- Dry fit the P-trap and waste arm, cutting pipes as needed for a snug fit.
- Ensure all connections are hand-tight before final tightening.
Installing The P-trap And Waste Arm
- Connect the P-trap to the tailpiece with a slip joint.
- Attach the waste arm to the wall drain stub-out.
- Adjust for alignment, ensuring a downward slope of at least ¼ inch per foot.
- Tighten all slip nuts with pliers, but don’t overtighten.
Water Supply Connections
- Attach shutoff valves to hot and cold supply lines.
- Connect flexible supply lines from valves to faucet shanks.
- Use plumber’s tape on threaded connections for a watertight seal.
Dishwasher And Garbage Disposal Hookups
- For dishwashers, connect the drain hose to the disposal inlet or a separate branch on the sink drain.
- Secure with a hose clamp and check for proper air gap installation, as required by code.
Testing For Leaks
- Slowly turn on the water supply.
- Check all connections for leaks using a dry paper towel.
- Run water through both bowls and the disposal, observing for drips or pooling water.
- Tighten connections as needed.
Example: Real-world Testing
When I installed a new kitchen sink, a slow drip was discovered only after running the dishwasher. The culprit was a loose clamp on the dishwasher drain hose, a simple but common oversight.

Credit: www.thisoldhouse.com
Choosing The Right Materials: A Comparative Analysis
Selecting the best materials for your kitchen sink plumbing impacts performance, cost, and maintenance. Below is a comparison of common pipe materials.
| Material | Durability | Ease of Installation | Cost | Corrosion Resistance | Common Use |
|---|---|---|---|---|---|
| PVC | High | Easy | Low | Excellent | Drainage |
| ABS | High | Easy | Low | Good | Drainage |
| Copper | Very High | Moderate | High | Excellent | Supply Lines |
| Pex | High | Very Easy | Medium | Excellent | Supply Lines |
| Galvanized Steel | Medium | Difficult | High | Poor | Older Homes |
PVC is often preferred for drains due to ease of installation and low cost, while copper and PEX are popular for supply lines. Avoid using galvanized steel for new installations due to rust and buildup concerns.
Pro Tip: Always Match Pipe Materials To Existing Systems To Avoid Corrosion Caused By Mixing Metals.
Real-world Example: Material Selection Mistake
A homeowner replaced a section of copper pipe with galvanized steel to save money, resulting in rapid corrosion and leaks within two years. Matching materials would have prevented this costly repair.
Common Mistakes And How To Avoid Them
Even experienced DIYers can stumble during kitchen sink plumbing installation. Here are some of the most frequent errors and strategies to prevent them.
Overtightening Connections
Too much force can crack plastic fittings or strip threads, leading to leaks. Always hand-tighten first, then snug with pliers as needed.
Incorrect Slope On Drain Lines
A flat or upward-sloping drain will cause standing water and frequent clogs. Maintain a consistent downward slope for efficient drainage.
Forgetting Plumber’s Tape Or Putty
Skipping sealants on threaded connections often leads to slow leaks. Use Teflon tape on all threads and plumber’s putty under strainers.
Poor Ventilation
Neglecting proper venting can cause slow drainage and odor issues. If tying into an existing vent isn’t possible, consider an air admittance valve.
Not Testing Under Real Conditions
Always test with both high and low water flows, garbage disposal, and dishwasher running to spot leaks.
Example: Slip Nut Error
On one occasion, I forgot to align the slip washer properly, which led to a small but persistent drip. Disassembling and reseating the washer fixed the problem instantly.
For troubleshooting persistent drainage issues, consult guides like How To Fix A Backed Up Kitchen Sink for step-by-step solutions.
Integrating Appliances: Dishwasher And Garbage Disposal
Modern kitchens often include a dishwasher and garbage disposal, both of which require careful integration with the sink’s plumbing.
Dishwasher Drain Connections
Dishwashers must drain into the sink’s plumbing, either via a disposal inlet or a dedicated branch tailpiece. Always include an air gap or loop the hose above the sink’s flood level to prevent backflow contamination.
Garbage Disposal Installation
Disposals mount directly to the sink strainer opening. Ensure the discharge pipe connects securely to the P-trap assembly. Use a dedicated circuit for electrical connections, following manufacturer instructions.
Table: Typical Appliance Connections
| Appliance | Drain Connection | Power Requirement | Backflow Prevention |
|---|---|---|---|
| Dishwasher | Disposal inlet or branch tailpiece | Hardwired or plug-in | Air gap or high loop |
| Garbage Disposal | Sink drain outlet | Dedicated outlet | Built-in check valve |
Example: Appliance Integration Error
A homeowner connected the dishwasher drain directly to the disposal without an air gap, leading to contaminated water siphoning back into the dishwasher. Installing a proper air gap resolved the health risk.
For more on clearing disposal-related clogs, visit How To Clear A Clogged Garbage Disposal.
Maintenance And Troubleshooting Tips
Even the best installation can develop problems over time. Routine maintenance and prompt troubleshooting keep your system performing well.
Regular Cleaning
Flush the drain with hot water weekly to minimize grease buildup. Avoid pouring fats or coffee grounds down the drain.
Checking For Leaks
Periodically inspect all connections for signs of moisture or corrosion, especially after heavy use or temperature changes.
Clearing Clogs
If water drains slowly or backs up, use a plunger or a hand auger to remove blockages. Avoid chemical drain cleaners, which can damage pipes.
For step-by-step guidance on clearing obstructions, check How To Clear A Clogged Kitchen Sink Drain.
Preventing Odors
Clean the P-trap periodically by disassembling and rinsing it out. Use baking soda and vinegar as a natural deodorizer.
Example: Routine Maintenance Pays Off
A homeowner who cleaned their P-trap every six months reported zero major clogs for over five years, compared to neighbors who needed frequent emergency plumber visits.
Case Studies And Real-world Scenarios
Learning from others’ experiences can help you avoid common pitfalls and achieve professional results.
Case Study 1: Diy Success With Double Sink
A couple installed a double bowl kitchen sink, carefully planning for additional drain connections and venting. By following step-by-step instructions and using high-quality materials, they achieved a leak-free system that has performed flawlessly for years.
Case Study 2: Hidden Leak Disaster
A homeowner failed to test their new installation under full load. A slow, hidden leak under the sink caused extensive cabinet damage over several months. This underscores the importance of thorough leak testing before closing up cabinetry.
Case Study 3: Upgrading To Modern Materials
An older home with galvanized steel pipes experienced frequent clogs and rust. Upgrading to PVC for drains and PEX for supply lines not only improved flow but also reduced maintenance costs. The project paid for itself within three years through avoided plumber visits.
Example: Rapid Troubleshooting
When faced with a slow draining sink, one DIYer used guidance from How To Fix Kitchen Sink Not Draining to quickly diagnose and resolve the issue, saving both time and money.
Advanced Tips And Upgrades
For those seeking to maximize efficiency and value, consider these advanced strategies.
Installing A Water Filtration System
Under-sink filtration units can be integrated during installation. Ensure you follow manufacturer instructions for connecting to the cold water supply.
Adding A Hot Water Dispenser
Instant hot water dispensers require a dedicated supply line and vented faucet. Plan for these connections early to avoid retrofitting challenges.
Noise Reduction Techniques
Use insulated pipe clamps and rubber gaskets to minimize vibration and noise from water flow and disposal operation.
Smart Home Integration
Modern faucets can include touchless or voice-activated controls. Ensure compatible power and water connections are available before installation.
Table: Upgrade Options And Considerations
| Upgrade | Benefit | Installation Difficulty | Additional Cost |
|---|---|---|---|
| Water Filtration | Cleaner water, improved taste | Moderate | Medium |
| Hot Water Dispenser | Instant hot water | Moderate | Medium |
| Touchless Faucet | Hands-free operation | Easy | Medium |
| Insulated Piping | Noise reduction | Easy | Low |
For authoritative guidance on plumbing upgrades, consult resources like the Family Handyman.
Frequently Asked Questions
What Is The Best Material For Kitchen Sink Drain Pipes?
PVC is generally considered the best material for kitchen sink drain pipes due to its durability, corrosion resistance, and ease of installation. It is also cost-effective and widely available. For supply lines, PEX and copper are popular choices, each with specific advantages.
How Can I Prevent Kitchen Sink Plumbing From Freezing In Cold Climates?
To prevent freezing, insulate all exposed pipes under the sink and along exterior walls. Use heat tape for extra protection in extremely cold areas. Ensure cabinet doors remain slightly open during cold snaps to allow warm air to circulate around pipes.
Is It Necessary To Install An Air Gap For The Dishwasher?
Many local plumbing codes require an air gap for dishwashers to prevent contaminated water from siphoning back into the dishwasher. Even if not required, installing an air gap or high loop is a best practice for health and safety.
Can I Connect A Garbage Disposal To Any Kitchen Sink?
Not all sinks are compatible with garbage disposals. Check the thickness and material of your sink and ensure it has a standard drain opening. Additionally, confirm that your plumbing and electrical systems can support the disposal’s requirements.
What Should I Do If My Kitchen Sink Drains Slowly Even After Installation?
If your kitchen sink drains slowly, check for clogs in the P-trap or drain line. Remove and clean the P-trap if necessary. Persistent slow drainage could indicate improper venting or a deeper blockage, which may require professional attention. For DIY solutions, see How To Fix A Slow Draining Kitchen Sink.
Upgrading or installing kitchen sink plumbing is a rewarding project that enhances your kitchen’s functionality and efficiency. With careful planning, quality materials, and attention to detail, you can achieve a professional, reliable result. Remember to consult local codes and consider hiring a licensed plumber for complex scenarios.
Regular maintenance will keep your system running smoothly and help you avoid costly repairs in the future.