Designing and building a custom cabinet for a farmhouse sink is one of the most rewarding projects for any home DIYer or professional remodeler. Farmhouse sinks, also known as apron-front sinks, offer a distinctive, timeless look and superior functionality for busy kitchens.
However, their unique size and exposed front require a specially designed cabinet, standard sink bases simply won’t do the trick. Tackling this project requires careful planning, precise measurements, and a solid understanding of cabinetry basics, but the payoff is a kitchen focal point that blends rustic charm with modern utility.
Whether you’re upgrading your space with a new farmhouse sink or retrofitting an existing kitchen, building a custom cabinet ensures a flawless fit and long-term durability. This guide will walk you step-by-step through the entire process, from planning and material selection to detailed construction techniques and final installation.
Along the way, you’ll discover expert insights, real-world examples, and essential tips to help you avoid common pitfalls. Ready to transform your kitchen with a stunning farmhouse sink and a perfectly crafted cabinet? Let’s get started.
Key Takeaways
- Precise measurements and careful planning are crucial for building a cabinet that fits your farmhouse sink perfectly.
- Material selection and joinery choices impact the durability and aesthetics of your finished cabinet.
- Farmhouse sinks require reinforced cabinet structures due to their weight and unique installation method.
- Custom cabinet construction allows for full integration with plumbing, storage, and kitchen design needs.
- Following a step-by-step process ensures a professional-quality result, even for DIYers with moderate experience.
Understanding Farmhouse Sinks And Cabinet Requirements
Farmhouse sinks, renowned for their deep basins and exposed front panels, offer both style and practicality. However, their installation diverges significantly from standard drop-in or undermount sinks, necessitating a purpose-built cabinet. Understanding these requirements is the foundation for a successful project.
What Makes Farmhouse Sinks Unique?
Unlike traditional sinks that rest atop or under the countertop, farmhouse sinks extend past the front edge of the cabinet. The apron front is a design hallmark, offering ergonomic benefits by allowing users to stand closer to the sink, reducing strain during prolonged use. These sinks typically come in fireclay, cast iron, stainless steel, or composite materials, each with its own weight and installation considerations.
Cabinet Modifications And Support Needs
A farmhouse sink’s size and weight (often exceeding 100 pounds when filled) demand special cabinet reinforcement. The front of the cabinet must be cut away to allow the apron to protrude, and an internal support frame is essential. Unlike standard sink bases, the top rail and part of the face frame are removed or modified, and the cabinet structure must bear the sink’s weight independently of the countertop.
Typical Dimensions And Planning Considerations
Farmhouse sinks range from 24 to 36 inches wide, with depths between 8 and 10 inches and apron heights from 8 to 10 inches. It’s crucial to:
- Measure the exact dimensions of your sink before starting.
- Allow for at least 1/8-inch clearance on each side for installation wiggle room.
- Plan for front-to-back depth to ensure proper fit within your cabinet run.
| Sink Type | Average Width | Apron Height | Required Cabinet Opening |
|---|---|---|---|
| Farmhouse/Apron-Front | 30, 36 in. | 8, 10 in. | Sink width + 1/4 in. |
| Standard Drop-In | 22, 33 in. | N/A | Sink width + 1 in. |
| Undermount | 23, 32 in. | N/A | Sink width + 1 in. |
Real-world Example: Retrofitting An Existing Cabinet
When I helped a client retrofit a 33-inch farmhouse sink into their older kitchen, we had to remove the entire top rail and some of the cabinet’s face frame, then reinforce the side panels with 2×4 bracing. Careful measurement and dry-fitting the sink before any cuts were essential to avoid costly mistakes.
Pro Tip:
Always purchase your farmhouse sink before building or modifying the cabinet. Manufacturer tolerances can vary, and even a 1/8-inch miscalculation can result in an ill-fitting cabinet.

Credit: maplegroveplace.blogspot.com
Planning And Designing Your Farmhouse Sink Cabinet
A successful cabinet build starts with a detailed plan. From measurements to material selection, every decision impacts the final fit, finish, and functionality of your kitchen centerpiece.
Measuring For Your Sink And Cabinet
Begin by measuring the sink’s width, height, and depth. Note the apron height, as this determines how much of your cabinet’s face frame must be removed. Add at least 1/8-inch clearance on all sides for easy installation.
- Cabinet width: Sink width + 1/4 inch (for side clearance)
- Cabinet height: Apron height + countertop thickness + cabinet floor height
- Cabinet depth: Sink front-to-back depth + 1 inch (for plumbing clearance)
Choosing Cabinet Materials
For durability and moisture resistance, select 3/4-inch plywood for the cabinet box and 1×4 or 2×4 lumber for reinforcement. Avoid particleboard near moisture-prone areas. Popular choices for face frames and doors include maple, oak, or birch hardwoods.
| Material | Strength | Water Resistance | Cost |
|---|---|---|---|
| Plywood (3/4″) | High | Moderate | Medium |
| Particleboard | Low | Poor | Low |
| Hardwood | Very High | High | High |
Integrating With Existing Kitchen Layout
Consider how the new cabinet will blend with adjacent cabinets and the countertop. You may need to adjust the height or depth to align with existing lines. If you’re installing new countertops, coordinate the sink and cabinet installation with your fabricator.
Planning For Plumbing And Accessories
Account for plumbing lines, garbage disposals, and accessories like soap dispensers or sprayers. Refer to guides like How To Install A Sink Sprayer for integrating these features.
Example: Designing For A Double Bowl Farmhouse Sink
A homeowner planning for a double bowl farmhouse sink needed a 36-inch wide cabinet, reinforced with additional cross-bracing to handle the extra weight. Plumbing was offset to accommodate both drain lines, and side panels were reinforced to prevent bowing.

Credit: www.mysocalleddiyblog.com
Tools, Materials, And Preparation
Before construction begins, assembling the right tools and materials will streamline your workflow and ensure professional results.
Essential Tools Checklist
- Table saw or circular saw for cutting panels
- Jigsaw for apron cutout
- Power drill/driver
- Pocket hole jig for joinery
- Clamps (bar and corner clamps)
- Measuring tape and square
- Level
- Sander or sanding block
- Safety gear: Goggles, ear protection, dust mask
Materials List
- 3/4-inch cabinet-grade plywood (sides, bottom, back)
- 1×4 or 2×4 lumber (support frame)
- Hardwood for face frame (optional)
- Wood glue and pocket screws
- Edge banding (if desired)
- Cabinet feet or base molding
- Primer, paint or stain, and sealant
Pre-build Preparation
- Double-check all measurements with both your sink and the installation area.
- Dry-fit your sink in the opening before final assembly.
- Lay out all tools and materials for easy access.
Example: Sourcing Eco-friendly Materials
One DIYer opted for formaldehyde-free plywood and low-VOC finishes, prioritizing indoor air quality and environmental responsibility. This added a modest cost but provided peace of mind for a kitchen used daily by a young family.
Pro Tip:
Label each panel and component as you cut. This prevents assembly mistakes and saves time during construction.
Step-by-step Cabinet Construction Process
Building a farmhouse sink cabinet involves careful joinery, structural reinforcement, and precise cutouts. Follow this systematic approach for best results.
Cutting Cabinet Panels
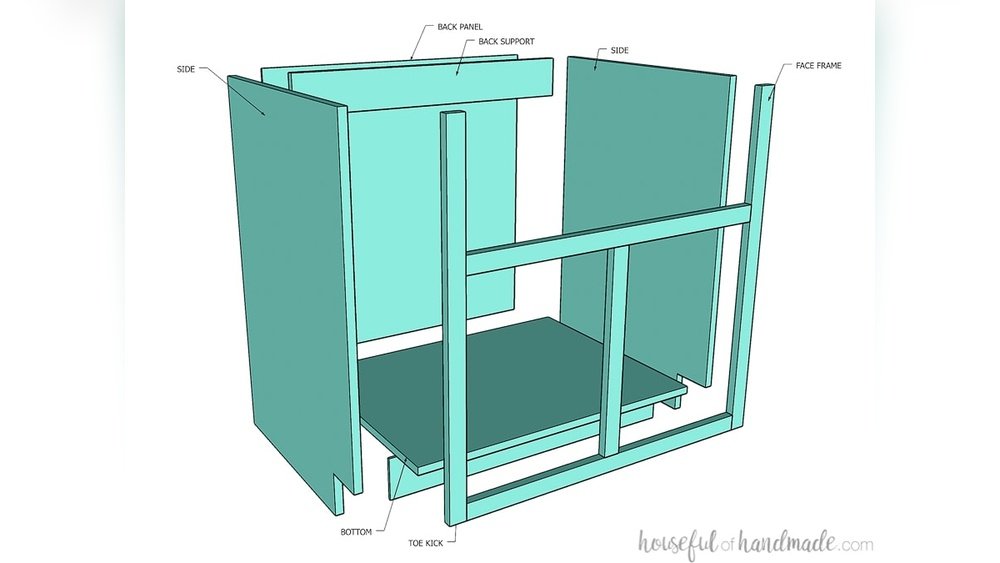
- Cut two side panels to the desired cabinet height and depth.
- Cut the bottom panel to fit between the sides.
- Cut the back panel to size for stability.
- If building a face frame, cut stiles and rails from hardwood.
Assembling The Cabinet Box
- Drill pocket holes along the edges of the bottom and back panels.
- Attach bottom to side panels using wood glue and pocket screws.
- Attach back panel for square alignment.
- Install top support rails at the front and back (except where the apron will be exposed).
Creating The Apron Cutout
- Measure and mark the apron height and width on the front of the cabinet.
- Use a jigsaw to carefully cut away the section for the sink apron.
- Sand all exposed edges smooth to prevent splintering.
Reinforcing The Structure
- Install 2×4 or 1×4 support rails beneath the sink cutout, spanning side to side.
- Add vertical blocking at the cabinet sides for additional strength.
- Ensure all reinforcement is level and securely fastened.
Adding Face Frame And Finishing Touches
- Attach the hardwood face frame (if used) with pocket screws and glue.
- Fill holes, sand all surfaces, and apply edge banding as needed.
- Prime and paint or stain for the desired finish.
- Attach base molding or cabinet feet if part of your design.
| Step | Task | Key Consideration |
|---|---|---|
| 1 | Cut panels | Accuracy of measurements |
| 2 | Assemble box | Square alignment |
| 3 | Cut apron opening | Smooth, precise cut |
| 4 | Reinforce structure | Support sink weight |
| 5 | Finish and install face frame | Flush fit and aesthetics |
Example: Overcoming Uneven Floors
In my experience, older homes often have slightly uneven kitchen floors. To ensure the sink sat level, I shimmed the cabinet base with adjustable feet before final installation, an extra step that paid off in a seamless countertop alignment.
Installing The Farmhouse Sink And Final Assembly
Once your cabinet is built, installing the farmhouse sink requires careful handling and precise adjustments. This stage completes the transformation from raw materials to a functional, beautiful centerpiece.
Positioning And Setting The Sink
- Place the cabinet in its final location; ensure it is level using shims as needed.
- Carefully lower the sink into the cutout, checking for a snug fit and proper apron alignment.
- Adjust support rails as necessary to achieve a level sink front-to-back and side-to-side.
Securing The Sink
- For heavy sinks, use construction adhesive or silicone caulk between the support rails and the sink base for added grip.
- Some manufacturers provide mounting brackets, install per instructions.
Connecting Plumbing And Accessories
- Reconnect drain lines, garbage disposal, and water lines.
- If installing a sprayer or soap dispenser, consult guides like How To Install A Soap Dispenser In A Kitchen Sink.
- Test all connections for leaks before finalizing.
Installing The Countertop
- Install the countertop after the sink is fully secured.
- Apply a bead of waterproof silicone where the sink meets the countertop to prevent moisture infiltration.
Final Adjustments And Cleanup
- Attach cabinet doors and hardware.
- Touch up any paint or finish as needed.
- Clean up the work area and inspect all joints and seams for smoothness.
Example: Integrating Modern Plumbing
A recent project involved pairing a farmhouse sink with a modern pull-down faucet and garbage disposal. By planning plumbing routes during the cabinet build, we avoided last-minute complications and achieved a clean, professional result.
Common Challenges And Expert Solutions
Even seasoned builders encounter obstacles when constructing cabinets for farmhouse sinks. Here’s how to address the most frequent issues.
Challenge: Incorrect Measurements
Solution: Always measure the actual sink, not just the specs, from multiple points. Dry-fit the sink before making irreversible cuts.
Challenge: Insufficient Support
Solution: Use full-length 2×4 rails or metal brackets under the sink. For extra-large or stone sinks, consider a plywood platform for weight distribution.
Challenge: Plumbing Interference
Solution: Check all drain and supply line locations before final cabinet assembly. Consider offsetting the drain or using flexible supply lines.
Challenge: Cabinet Alignment With Countertops
Solution: Use a level and shims to ensure the cabinet sits perfectly flush with adjacent units and the floor.
Challenge: Achieving A Seamless Apron Fit
Solution: Sand apron cutout edges and dry-fit the sink repeatedly. If gaps remain, use color-matched caulk for a clean finish.
Pro Tip:
If your farmhouse sink is slightly smaller than the cutout, install thin wood shims or filler strips, then paint or stain to match the cabinet for a seamless look.
Real-world Case Studies
Learning from real installations can help you avoid common mistakes and inspire design choices.
Case Study 1: Diy Retrofit In A Compact Kitchen
A homeowner in Portland converted a 30-inch standard base cabinet to fit a 28-inch fireclay farmhouse sink. The project required removing the top two face frame rails and reinforcing the base with 2x4s. With careful planning and the right materials, the installation maintained the integrity of surrounding cabinets and provided a dramatic style upgrade.
Case Study 2: Professional Custom Cabinet Build
A remodeling contractor built a new 36-inch cabinet from scratch for a client’s vintage cast iron farmhouse sink. Special attention was paid to aligning the apron flush with surrounding cabinets and reinforcing the structure to support 150+ pounds. The result was a showpiece kitchen with a blend of classic and contemporary elements.
Case Study 3: Sustainable Farmhouse Kitchen
An eco-conscious family opted for FSC-certified plywood and water-based finishes when building their farmhouse sink cabinet. The project included a built-in recycling drawer and pull-out shelves, demonstrating that sustainability and functionality can go hand-in-hand in custom cabinetry.
Maintenance And Longevity Tips
A well-built farmhouse sink cabinet should last decades, but ongoing care is essential for preserving both form and function.
Protecting Against Water Damage
- Apply multiple coats of water-resistant sealant to all exposed wood surfaces.
- Use a silicone bead around the sink perimeter to prevent leaks.
Routine Cleaning
- Wipe down cabinet surfaces regularly to remove moisture and prevent mold.
- Avoid harsh chemicals that can degrade finishes.
Checking For Structural Integrity
- Inspect support rails and fasteners annually.
- Re-tighten screws and brackets as needed.
Repairing Minor Damage
- Fill small dings or scratches with color-matched wood filler.
- Touch up paint or stain to prevent moisture intrusion.
Example: Extending Cabinet Life
A homeowner extended their cabinet’s lifespan by adding removable waterproof mats inside the sink base, catching drips and making cleanup easier.
Frequently Asked Questions
What Is The Minimum Cabinet Size For A Farmhouse Sink?
Most farmhouse sinks require a cabinet at least 3 inches wider than the sink itself for proper installation and side clearance. For example, a 30-inch sink typically needs a 33-inch cabinet. Always check your specific sink’s installation guide for exact requirements.
Do Farmhouse Sinks Require Special Countertops?
Yes, farmhouse sinks often work best with solid surface, stone, or custom laminate countertops that can be cut to fit the apron front. Prefabricated countertops with built-in sink cutouts may not accommodate the unique shape of a farmhouse sink.
Can I Retrofit A Farmhouse Sink Into Existing Cabinetry?
In many cases, yes, but it requires removing the top rail and part of the face frame, along with reinforcing the cabinet structure. You may also need to adjust plumbing and countertop cutouts. Consider consulting a professional if your cabinet is non-standard or in poor condition.
How Do I Prevent My Farmhouse Sink From Sagging Over Time?
Sagging is typically caused by inadequate support. Use sturdy 2×4 or metal support rails beneath the sink, and consider a plywood platform for extra-heavy models. Periodically check and tighten all fasteners to maintain structural integrity.
Are Farmhouse Sink Cabinets More Expensive To Build?
Custom farmhouse sink cabinets often cost more than standard sink bases due to reinforced construction and extra materials. However, building your own can save significantly on labor costs. For a breakdown of material costs, see Houzz’s Kitchen Remodel Cost Guide.
A farmhouse sink, paired with a thoughtfully crafted cabinet, elevates any kitchen both aesthetically and functionally. With careful planning, quality materials, and attention to structural details, you can create a lasting centerpiece that enhances daily life and adds value to your home.
Whether you’re a seasoned woodworker or a DIY enthusiast, the journey from raw lumber to a finished farmhouse sink cabinet is as rewarding as the result.