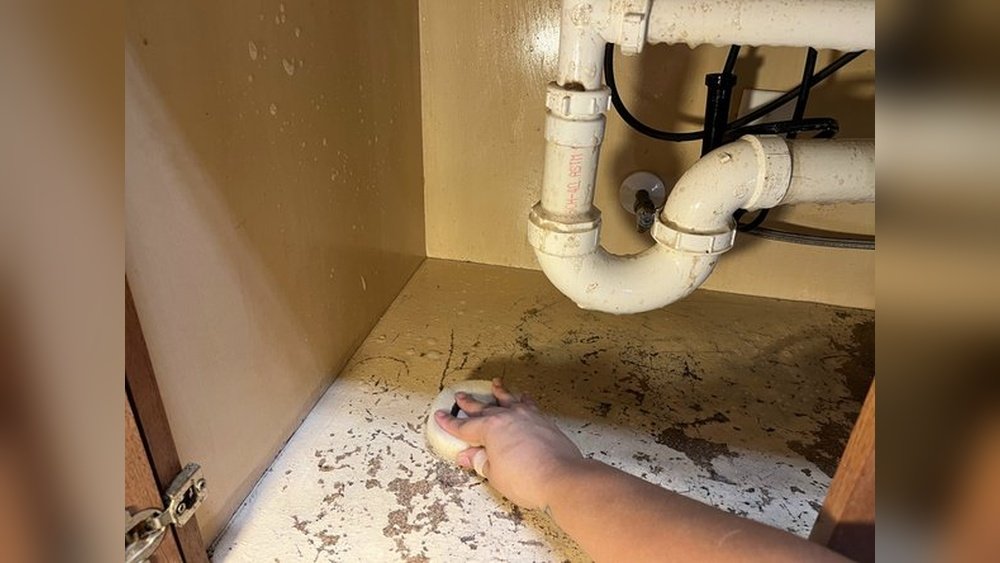
Water under the kitchen sink is more than just an inconvenience, it’s a silent destroyer. You might notice warped cabinet floors, peeling finish, or that persistent musty odor that refuses to go away. Ignoring under-sink cabinet water damage can lead to expensive repairs, mold infestations, and, in severe cases, even structural issues in your kitchen.
But the good news? With the right approach, you can fix most under-sink water damage yourself, restore your cabinet’s appearance, and prevent future disasters.
Having personally dealt with this issue in several kitchen renovations, I can assure you: understanding the root cause, using the proper tools, and following a systematic repair process is crucial. Whether you’re a DIY enthusiast or a homeowner hoping to save on repair bills, this comprehensive guide will walk you through every step, detecting, repairing, and preventing under-sink cabinet water damage for good.
Key Takeaways
- Identify the water source before beginning repairs to prevent recurring damage.
- Dry out the cabinet thoroughly to inhibit mold growth and avoid further deterioration.
- Choose the right repair approach based on the severity, minor swelling may need patching, while extensive rot could require full replacement.
- Apply waterproofing and preventive measures to extend the cabinet’s life.
- Professional help may be necessary for severe structural or mold issues.

Credit: www.ifixit.com
Understanding Under-sink Cabinet Water Damage
Under-sink cabinets are uniquely vulnerable to water damage due to plumbing connections, frequent usage, and hidden leaks. To address the problem effectively, you must first understand what causes this type of damage, how to recognize it, and the risks associated with untreated issues.
Common Causes Of Under-sink Water Damage
Most under-sink cabinet damage stems from:
- Leaking drain pipes or supply lines
- Faulty sink seals or caulking
- Overflowing sinks or accidental spills
- Condensation on cold water pipes
Even a slow drip can cause significant damage over time, especially if the cabinet base is made of particleboard or MDF, which absorbs moisture quickly.
Signs And Symptoms Of Water Damage
Key indicators include:
- Warped or swollen cabinet floors
- Discoloration or water stains
- Soft or spongy wood
- Musty odors (potential mold)
- Peeling laminate or paint
Early detection is crucial to minimize repair costs and health risks.
Risks Of Ignoring Water Damage
Neglecting water damage can lead to:
- Mold and mildew growth, posing health risks
- Cabinet structure failure
- Damage to flooring and subfloor
- Pest infestations (attracted by moisture)
If you suspect mold or structural damage beyond the cabinet, consult a licensed professional immediately.
Credit: www.reddit.com
Step-by-step Process: Fixing Under-sink Cabinet Water Damage
Restoring an under-sink cabinet is a multi-step process. Here’s how to approach it efficiently and safely.
Step 1: Identify And Fix The Water Source
Before any repair, you must locate and eliminate the cause of moisture.
- Inspect all plumbing connections (drain, supply lines, shutoff valves) for leaks.
- Check the sink rim and faucet base for failed sealant or caulk.
- Run water for several minutes and observe for drips.
- If you find a leak, turn off the water supply and repair or replace the faulty part.
Pro Tip: Use a dry paper towel to detect slow leaks, wrap it around pipes and check for dampness after a few minutes.
For guidance on repairing or installing plumbing components, see How To Install Kitchen Sink Plumbing.
Step 2: Remove Contents And Dry Out The Cabinet
Clear out all items and liners from the cabinet. Use towels to soak up standing water, then accelerate drying with:
- Fans or a dehumidifier
- Open cabinet doors to increase airflow
- Wet/dry vacuum for significant water
Allow at least 24-48 hours for thorough drying. This step is essential to prevent mold and ensure repair materials adhere properly.
Step 3: Assess Damage Severity
The repair approach depends on how badly the cabinet is affected.
- Minor swelling or stains: Usually restorable with cleaning and surface treatment.
- Soft, sagging, or crumbling base: Requires partial or full replacement.
- Visible mold or rot: Demands aggressive remediation, possibly by a professional.
Use a screwdriver to gently press the cabinet floor and walls. If it easily punctures or feels spongy, replacement is likely needed.
Step 4: Remove Damaged Materials
For cabinets with severe damage:
- Unscrew or cut away the base panel (usually sits on a frame lip).
- If necessary, cut out damaged walls or back panels.
- Clean and disinfect surrounding wood with a bleach solution (1 cup bleach per gallon water).
Warning: Always wear gloves and a mask when cleaning mold or rot.
Step 5: Repair Or Replace The Cabinet Base
Here’s a comparison of repair options for typical under-sink cabinet bases:
| Repair Method | Best For | Tools Needed | Estimated Cost |
|---|---|---|---|
| Patching with Wood Filler | Minor dents, shallow gouges | Putty knife, sandpaper | Low ($10-$30) |
| Overlay with Plywood | Moderate swelling, surface damage | Plywood, screws, drill | Moderate ($20-$60) |
| Full Base Replacement | Severe rot or collapse | Saw, measuring tape, drill, new panel | Higher ($50-$150) |
Patching Minor Damage
- Clean and sand the area.
- Apply wood filler to dents or gouges.
- Once dry, sand smooth and repaint or refinish.
Overlaying With Plywood
- Cut a 1/4″ or 1/2″ plywood panel to fit the cabinet base.
- Secure with screws or construction adhesive.
- Seal edges with silicone caulk.
Full Base Replacement
- Measure and cut a new panel (plywood or moisture-resistant MDF).
- Install on existing support rails or add new cleats if needed.
- Seal all edges and seams with waterproof caulk.
Pro Tip: For extra durability, use marine-grade plywood or add a waterproof membrane under the cabinet base.
Step 6: Treat And Prevent Mold
If you find mold:
- Scrub affected areas with a bleach solution or commercial mold remover.
- Allow to dry completely before continuing repairs.
- For large infestations (greater than 10 square feet), consult a certified mold remediation specialist.
Example: In my experience, a small patch of black mold under a leaking pipe was easily removed with bleach, but a larger area required professional help to ensure the spores didn’t spread.
Step 7: Restore Cabinet Finish
- Sand any rough or swollen spots.
- Prime and repaint or re-laminate as needed.
- Consider applying a waterproof sealant to the cabinet floor and lower walls for added protection.
Step 8: Reinstall Contents And Monitor
Replace all items, but avoid clutter that blocks airflow or hides future leaks. Install a cabinet liner or tray to catch minor drips.
Monitor the repaired area over the next few weeks for any signs of recurring moisture.

Credit: www.youtube.com
Tools And Materials Needed For Cabinet Repair
A successful repair requires the right tools and materials. Here’s a checklist to streamline your process.
Basic Tools
- Screwdriver (Phillips and flathead)
- Cordless drill
- Circular saw or jigsaw (for base replacement)
- Measuring tape
- Utility knife
- Putty knife
- Pry bar
Materials
- Plywood or moisture-resistant MDF
- Wood filler or epoxy
- Construction adhesive
- Waterproof caulk (100% silicone)
- Sandpaper (medium and fine grit)
- Paint or laminate (to match cabinet finish)
- Mold and mildew cleaner
- Cabinet liner or waterproof mat
Safety Gear
- Gloves
- Dust mask or respirator
- Safety glasses
Pro Tip: Having a wet/dry vacuum can significantly speed up water removal, especially for larger leaks.
Real-world Examples And Case Studies
Examining real-life scenarios can help you understand best practices and common pitfalls.
Example 1: Minor Leak, Quick Response
Situation: A homeowner noticed a small puddle under the sink after fixing a loose supply line. The base had minor swelling and light stains.
Solution: After tightening the connection, the area was dried using a fan, sanded, patched with wood filler, and repainted. No replacement was needed.
Result: The cabinet remained structurally sound, and the repair cost was under $30.
Example 2: Long-term Leak, Severe Damage
Situation: A slow drain leak went unnoticed for months, causing the particleboard base to collapse and visible mold growth.
Solution: The damaged base was cut out, the mold was treated with bleach, and a new plywood base was installed and sealed with silicone caulk.
Result: The total repair cost was approximately $120, but the cabinet was saved from total replacement.
Example 3: Preventive Upgrade During Remodel
Situation: During a kitchen remodel, the homeowners proactively replaced their cabinet base with marine-grade plywood and added a waterproof liner.
Solution: The upgrade added $80 to the remodel, but provided peace of mind and long-term protection.
Result: Years later, a minor leak was contained by the liner, preventing any cabinet damage.
Preventing Future Under-sink Water Damage
Prevention is far cheaper and less stressful than repair. Implementing these strategies can safeguard your cabinets for years.
Install Leak Detectors
- Place a battery-operated leak sensor under the sink. It will sound an alarm at the first sign of water.
Use Waterproof Liners Or Mats
- Line the cabinet floor with a waterproof mat or tray to contain minor leaks and spills.
- Choose materials that are easy to remove and clean.
Regularly Inspect Plumbing
- Check all connections and seals every few months.
- Tighten loose fittings and replace worn-out washers or supply lines.
Improve Cabinet Ventilation
- Avoid overfilling the cabinet, which blocks airflow.
- Consider drilling ventilation holes in the side or back panels (if not structurally compromising).
Seal Gaps And Edges
- Use silicone caulk to seal all seams, especially around pipe penetrations.
- Re-caulk the sink rim and faucet base annually.
Monitor For Early Signs
- Be alert to musty smells or unexplained dampness.
- Address issues promptly to avoid escalation.
For more on upgrading sink-related components, see How To Install A New Kitchen Sink.
Cost Comparison: Diy Vs. Professional Repair
Deciding between a do-it-yourself approach and hiring a professional depends on the extent of damage, your skill level, and budget.
| Aspect | DIY Repair | Professional Repair |
|---|---|---|
| Average Cost | $30 – $150 | $250 – $800+ |
| Time Required | 2-8 hours | 1-2 hours (labor only) |
| Expertise Needed | Basic to moderate DIY skills | Professional carpentry/plumbing |
| Warranty | None (unless parts used have warranty) | 1-5 years (varies by contractor) |
| Best For | Minor to moderate damage, budget-conscious | Major damage, mold, insurance claims |
Pro Tip: If you’re uncomfortable working with power tools or suspect significant mold, hiring a licensed contractor is safer and often more cost-effective in the long run.
Advanced Tips For Long-term Cabinet Durability
If you want to go beyond basic repairs, consider these advanced upgrades for maximum resilience.
Install A Removable Cabinet Base
- Build the base on a removable platform for easy cleaning and future access.
- Use waterproof adhesive and screws for stability.
Apply Epoxy Or Waterproof Coating
- Coat the new base and lower cabinet walls with a two-part epoxy or similar waterproof sealant.
- This provides a seamless, long-lasting barrier against moisture.
Upgrade Plumbing Components
- Replace old or flexible supply lines with braided stainless steel hoses to reduce leak risk.
- Install high-quality shutoff valves for easier maintenance.
Use Moisture-resistant Materials
- When replacing panels, opt for marine-grade plywood or PVC board over standard particleboard.
- These materials resist swelling and rot, extending cabinet lifespan.
Example: In one kitchen renovation, switching to PVC board for the under-sink base eliminated repeat water damage issues, even when a dishwasher hose burst years later.
Common Mistakes To Avoid
Even seasoned DIYers can make errors that lead to recurring damage or costly repairs. Here’s what to watch out for:
Skipping The Source Fix
Repairing cabinet wood without first fixing the leak guarantees repeat problems.
Inadequate Drying
Applying fillers or new panels to damp wood traps moisture, inviting mold and failure.
Using The Wrong Materials
Standard particleboard or untreated plywood absorbs water easily. Always use moisture-resistant options.
Neglecting Mold Remediation
Ignoring even small mold patches can allow spores to spread throughout your home.
Overfilling Cabinets
Packing cabinets tightly makes early leak detection impossible and impedes airflow.
When To Call A Professional
While DIY repairs handle most cases, professional help is warranted when:
- Structural damage extends to the floor or adjacent cabinets.
- Mold covers a large area or returns after cleaning.
- Insurance claims are involved (for major water incidents).
- You lack the tools, skills, or time for a safe repair.
A licensed contractor or water damage restoration specialist can ensure repairs meet local codes and prevent future issues.
Frequently Asked Questions
What Type Of Wood Is Best For Under-sink Cabinet Repair?
For maximum durability, marine-grade plywood or PVC board is recommended. These materials resist swelling and rot far better than standard MDF or particleboard, making them ideal for areas exposed to potential moisture.
How Do I Stop Recurring Musty Odors Under My Sink?
Persistent odors are often a sign of hidden moisture or mold. Remove all items, thoroughly dry and clean the cabinet, and treat with a mold and mildew remover. Consider adding a small vent or moisture absorber to keep the area dry.
Are There Cabinet Liners That Actually Prevent Water Damage?
Yes, heavy-duty polyethylene or silicone liners are effective at containing minor leaks and spills. Some even have raised edges to hold water until you can address the source. Choose a liner that’s easy to remove and clean.
Can Insurance Cover Under-sink Cabinet Water Damage?
Homeowner’s insurance may cover sudden and accidental leaks, but generally excludes long-term, neglected issues. Check your policy and document all damage with photos. Prompt professional assessment can help with claims.
What Should I Do If I Find Mold Behind My Cabinet Wall?
If mold is behind a cabinet wall, it’s likely spread further than visible. Limit exposure, wear protective gear, and consult a certified mold remediation specialist. Mold in hidden or hard-to-reach areas often requires professional removal to ensure safety.
Fixing under-sink cabinet water damage isn’t just about restoring appearance, it’s about protecting your kitchen’s integrity and your family’s health. By acting quickly, using the right materials, and implementing preventive measures, you can save money, avoid bigger headaches, and ensure your kitchen cabinets last for years. For further plumbing and kitchen upgrades, check out guides like How To Install A Drop-In Kitchen Sink and Water Damage on Wikipedia. With careful attention and a little effort, you’ll have a dry, safe, and functional under-sink cabinet once again.