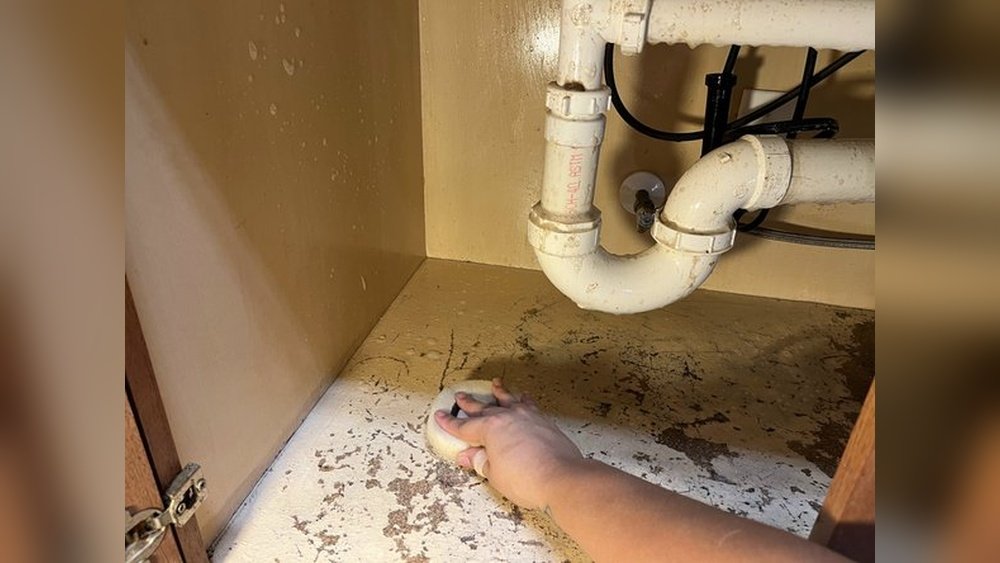
Water damage under the sink is a common yet often overlooked issue that can lead to costly repairs, stubborn mold growth, and even structural damage if not addressed promptly. The dark, enclosed space beneath the kitchen or bathroom sink is an ideal environment for moisture to accumulate unnoticed, making it a hotspot for leaks and rot.
Homeowners often discover the problem only after smelling musty odors, noticing warped cabinetry, or finding puddles during routine cleaning. Acting swiftly can prevent minor issues from escalating into major headaches.
With the right approach, fixing water damage under the sink is manageable for most DIY enthusiasts. Understanding the root cause, assessing the full extent of the damage, and following a systematic repair process are crucial for restoring your cabinetry and preventing future leaks.
This comprehensive guide draws on expert insights, real-world examples, and step-by-step instructions to empower you with the knowledge and confidence to tackle water damage under your sink head-on.
Key Takeaways
- Early detection and prompt action are essential to limit the extent of water damage under the sink.
- Identifying and repairing the source of the leak is critical before any restoration work.
- Proper drying, cleaning, and disinfecting prevent mold growth and further structural damage.
- Cabinet floor and wall repair options range from DIY fixes to professional replacements depending on severity.
- Prevention strategies such as routine inspection and maintenance can significantly reduce future risk.
- Professional help is necessary for severe water damage, persistent mold, or complex plumbing issues.
Understanding Water Damage Under The Sink
Water damage beneath sinks typically results from leaking plumbing fixtures, improper installations, or spills that are not cleaned up. The impact can range from mild discoloration and swelling of the cabinet base to extensive rot, mold, and structural decay.
Common Causes
The most frequent causes of water damage under sinks include:
- Leaky supply lines: Worn-out washers or corroded fittings.
- Faulty drain pipes: Loose connections or cracked pipes.
- Failed caulking or sealants: Around the sink rim or faucet base.
- Clogged or overflowing sinks: Water spills over the cabinet floor.
- Condensation: On pipes in humid environments.
According to the Insurance Information Institute, plumbing failures account for over 30% of all residential water damage claims in the United States.
Signs Of Water Damage
Early detection is crucial. Watch for:
- Warped, swollen, or soft cabinet base
- Musty or damp odors
- Stains or discoloration on wood or particleboard
- Visible mold or mildew
- Peeling laminate or paint
- Standing water or dampness
Pro Tip: Regularly remove all items from under your sink and inspect the base and walls for these warning signs.
Risks Of Ignoring The Problem
Neglecting water damage under the sink can lead to:
- Mold growth: Poses health risks, especially for those with allergies or asthma.
- Structural deterioration: Cabinet floors and walls can rot, requiring costly replacements.
- Insect infestations: Damp wood attracts termites and carpenter ants.
- Reduced home value: Persistent water damage can impact resale and insurance claims.

Credit: www.ifixit.com
Assessing The Extent Of Water Damage
A thorough assessment is essential before beginning repairs. This process helps you determine whether a DIY fix is feasible or if you need professional help.
Step 1: Remove Everything
Clear out all cleaning supplies, trash bins, and organizers from under the sink. This ensures you can inspect every surface and spot hidden issues.
Step 2: Inspect Cabinet Materials
Use a flashlight to check:
- Base panel: Press gently, soft or spongy spots indicate rot.
- Side walls: Look for swelling, bubbling, or discoloration.
- Back wall: Water can travel down supply lines or drains.
- Flooring beneath cabinet: Sometimes leaks seep below the cabinet itself.
If you find extensive black staining, crumbling wood, or pervasive mold, it may be safer to call a professional.
Step 3: Check Plumbing Connections
Run water from the faucet and observe:
- Supply lines: Feel for dampness along hoses and shutoff valves.
- Drain pipe and P-trap: Watch for drips or slow leaks.
- Sink rim and faucet base: Look for water pooling or seepage.
Step 4: Evaluate Mold And Odors
Any visible mold or persistent musty smell requires special attention. Mold spreads rapidly and can be hazardous, especially in poorly ventilated spaces.
Example: In my experience, a client ignored a slow drip for months, and by the time they investigated, mold had spread to the adjacent wall cavity. Early intervention would have saved hundreds in remediation costs.
Table: Signs And Severity Of Water Damage
| Sign | Severity Level | Recommended Action |
|---|---|---|
| Minor staining | Low | Dry and monitor |
| Soft or swollen base | Moderate | Repair or reinforce cabinet floor |
| Visible mold or rot | High | Remove damaged material, disinfect, replace if necessary |
| Persistent musty odor | High | Investigate for hidden moisture/mold |

Credit: www.youtube.com
Stopping The Source Of Water
Before any repairs, you must stop the water intrusion. Addressing the source prevents recurring damage and wasted effort.
Shutting Off Water Supply
- Turn off shutoff valves under the sink by rotating clockwise.
- If valves are stuck or broken, shut off the main water supply to the house.
- Open the faucet to drain any remaining water.
Pro Tip: Replace old shutoff valves during repairs to ensure reliable water control in the future.
Repairing Leaky Supply Lines
- Tighten loose connections with an adjustable wrench.
- Replace worn-out supply hoses (braided stainless steel hoses are durable).
- Install new Teflon tape on threaded fittings for a watertight seal.
Fixing Drain Pipe Leaks
- Re-seat or replace the P-trap if cracked or dripping.
- Tighten slip nuts, do not overtighten, as this can cause leaks.
- For persistent leaks, replace gaskets or the entire trap assembly.
For detailed plumbing steps, refer to guides such as How To Install Kitchen Sink Plumbing.
Sealing Rim And Faucet Leaks
- Remove old, failing caulk around the sink rim and faucet base.
- Apply a fresh bead of waterproof silicone caulk.
- Smooth with a caulking tool for a clean finish.
Checking For Appliance Leaks
- Inspect dishwasher and refrigerator supply lines if routed under the sink.
- Tighten or replace fittings as necessary.
Example: A homeowner fixed under-sink water damage twice before realizing a slow leak from the dishwasher hose was the culprit. Always check all connected appliances.

Credit: www.reddit.com
Drying, Cleaning, And Disinfecting The Area
Once the leak is stopped, thorough drying and cleaning are critical to prevent mold and restore a healthy environment.
Removing Standing Water
- Use towels, a wet/dry vacuum, or a sponge to remove all pooled water.
- Pay special attention to corners and seams where water may be trapped.
Drying The Cabinet
- Open cabinet doors to increase airflow.
- Position a fan or dehumidifier to speed up drying (run for 24, 48 hours).
- If possible, remove baseboard trim or cut an access hole in the cabinet floor for better ventilation.
Cleaning And Disinfecting
- Scrub all surfaces with a mild detergent to remove dirt and grime.
- Disinfect with a solution of 1 cup bleach in 1 gallon of water (follow manufacturer safety recommendations).
- Rinse with clean water and allow to dry thoroughly.
Warning: Never mix bleach with ammonia or other cleaners, as toxic fumes may result.
Removing Mold
- Wear gloves, goggles, and an N95 mask.
- Remove small patches of surface mold with soapy water or a commercial mildew remover.
- For mold larger than 10 square feet or that has penetrated porous materials, consult a certified mold remediation professional. The U.S. Environmental Protection Agency (EPA) provides guidelines for safe mold cleanup.
Pro Tip: Place baking soda or activated charcoal under the sink during drying to absorb odors and moisture.
Repairing Or Replacing Damaged Cabinetry
The repair approach depends on the cabinet material, extent of damage, and your DIY skill level. You may be able to salvage the cabinet with minor fixes, or you may need to replace the base or entire unit.
Repairing Minor Damage
- For laminate or wood veneer: Sand the area, apply wood filler to gouges, and repaint or refinish.
- For particleboard: Dry thoroughly; reinforce with a new plywood layer if only the surface is swollen.
- For cosmetic issues: Use contact paper, under-sink mats, or liners to cover minor stains or warping.
Example: A friend of mine used a waterproof vinyl mat over a slightly warped base, extending the cabinet’s life and improving appearance.
Replacing The Cabinet Base (“floor”)
- Cut out the damaged base with a jigsaw or oscillating tool.
- Measure and cut a new piece of 1/2″ or 3/4″ plywood to size.
- Seal edges with polyurethane or waterproof paint.
- Attach the new base with wood screws or construction adhesive.
Pro Tip: Consider using marine-grade plywood or a plastic under-sink tray for added moisture resistance.
Full Cabinet Replacement
If side walls or structure are compromised:
- Remove the sink and disconnect plumbing.
- Detach the cabinet from the wall (unscrew mounting brackets or fasteners).
- Install the new cabinet, reconnect plumbing, and seal all joints.
For a step-by-step guide, see How To Install A New Kitchen Sink.
Table: Diy Repair Vs. Professional Replacement
| Repair Option | DIY Difficulty | Estimated Cost | When to Choose |
|---|---|---|---|
| Patch and refinish | Low | $15, $50 | Minor surface damage |
| Replace cabinet base | Moderate | $40, $120 | Base only damaged, cabinet structure sound |
| Full cabinet replacement | High | $200, $600+ | Severe or structural damage, mold infestation |
| Professional remediation | N/A | $500, $2,500+ | Pervasive mold, insurance claims, health risks |
Restoring Cabinet Appearance
- Touch up with matching paint or stain.
- Add shelf liner or a waterproof mat for a clean finish.
- Reinstall organizational racks or bins only after the area is completely dry.
Preventing Future Water Damage
Proactive steps can dramatically reduce the risk of repeat damage under your sink.
Routine Inspection And Maintenance
- Check all visible plumbing connections monthly.
- Tighten loose fittings and replace worn hoses immediately.
- Inspect caulking and reseal as needed.
- Remove under-sink clutter to allow airflow and easier inspection.
Installing Leak Detectors
- Place a battery-operated leak sensor under the sink. Many models alert you via smartphone if moisture is detected.
- Some advanced sensors can automatically shut off water supply when a leak is detected.
Example: One homeowner credits a $20 leak detector for alerting them to a supply line failure, saving thousands in potential damage.
Using Under-sink Mats And Trays
- Install a waterproof tray or liner to catch spills and minor leaks.
- Choose products with raised edges to contain water and protect cabinet material.
Upgrading Plumbing Fixtures
- Use braided stainless steel supply lines, less prone to bursting than rubber or plastic.
- Replace shutoff valves with quarter-turn ball valves for reliability and easy operation.
For more on upgrading kitchen plumbing, refer to How To Install A Drop-In Kitchen Sink.
Table: Preventive Products For Under-sink Protection
| Product | Purpose | Average Cost | Effectiveness |
|---|---|---|---|
| Leak detector | Alerts to presence of water | $15, $40 | High |
| Under-sink mat/tray | Catches spills and minor leaks | $20, $60 | Moderate, High |
| Braided supply lines | Prevents hose bursts | $10, $25 each | High |
| Quarter-turn shutoff valve | Quick, reliable water shutoff | $10, $25 each | High |
Educating Household Members
- Teach everyone in your home how to shut off water in an emergency.
- Encourage prompt reporting of leaks or unusual odors.
When To Call A Professional
Some under-sink water damage scenarios require expert intervention to ensure safety and thorough remediation.
Persistent Or Hidden Leaks
If you can’t locate the leak, or if water returns after repairs, a licensed plumber should assess the problem. Hidden leaks can damage walls, flooring, and even electrical systems.
Extensive Mold Growth
If mold covers a large area or has penetrated drywall, insulation, or subfloor, call a certified mold remediation specialist. DIY attempts can spread spores and worsen health risks.
Structural Damage
If the cabinet is crumbling, side walls are rotten, or the floor beneath the cabinet is soft, a contractor can evaluate whether the damage has spread to joists or other critical structures.
Insurance And Code Requirements
Water damage claims may require documentation of professional repairs. Some municipalities have plumbing codes that require licensed professionals for certain work.
Pro Tip: Document the damage with photos before, during, and after repairs for insurance or resale purposes.
Example: Professional Mold Remediation
A family discovered a major leak under their bathroom sink after noticing a persistent odor. A professional inspection revealed mold behind the wall and under the flooring, requiring removal of cabinetry, drywall, and a section of subfloor. The remediation process included air scrubbing, antimicrobial treatment, and reconstruction, an outcome impossible to achieve with DIY methods alone.
Finding Reputable Help
- Request references and verify licensing.
- Check online reviews and consult resources like the EPA’s Mold Cleanup Guide.
- Get written estimates and clarify scope of work.
Real-world Examples And Case Studies
Example 1: Kitchen Cabinet Floor Replacement
A homeowner in Atlanta noticed soft spots under their kitchen sink. Inspection revealed a slow leak from the supply valve, which had warped and discolored the particleboard base. After shutting off water and drying the area, they cut out the damaged base and installed a new plywood panel coated with marine varnish.
The total cost was under $100, and the cabinet was saved.
Example 2: Mold Remediation After Hidden Leak
A renter in Seattle detected a musty odor under the bathroom sink. The landlord brought in a plumber, who found a pinhole leak in the copper supply line. Mold had spread to the wall cavity. A certified remediator removed all affected materials and treated the area, preventing further health risks.
Example 3: Preventive Measures Pay Off
After experiencing a burst supply line, a family in Dallas installed under-sink trays and leak detectors in all bathrooms and the kitchen. Two years later, a leak alert allowed them to shut off water within minutes, avoiding cabinet damage and costly repairs.
Frequently Asked Questions
How Can I Tell If Water Damage Under My Sink Is Causing Mold?
Mold often appears as black, green, or white fuzzy patches on wood, drywall, or cabinet surfaces. You may also notice a persistent musty odor or increased allergy symptoms among household members. If you’re unsure, purchase a mold test kit or consult a remediation professional for air quality testing.
Is It Safe To Use The Sink After Repairing Water Damage Under The Cabinet?
Yes, as long as you have fully repaired the source of the leak, thoroughly dried and disinfected the area, and restored any structural damage. If you had to disconnect plumbing or replace the cabinet base, double-check all connections for leaks before regular use.
What Type Of Material Is Most Resistant To Water Damage For Under-sink Cabinets?
Plywood, especially marine-grade, is more water-resistant than particleboard or MDF. Some modern cabinets use PVC or other plastic composites for the base, which are highly resistant to moisture. Adding a waterproof mat or tray provides an extra layer of protection regardless of cabinet material.
Can I Paint Over Water-damaged Wood Or Particleboard?
Painting alone won’t fix water damage and may trap moisture, leading to further issues. Always dry the area thoroughly and repair or replace damaged material first. Use a stain-blocking primer and waterproof paint for the best results.
What Should I Do If Water Damage Has Affected The Floor Beneath The Cabinet?
Carefully inspect the flooring for warping, staining, or softness. If the damage is minor, drying and cleaning may suffice. For severe cases, you may need to replace sections of subfloor or flooring. Consult a flooring specialist if the area feels unstable or if mold is present beneath the surface.
Addressing water damage under the sink promptly and thoroughly protects your home’s value and your family’s health. With a systematic approach, detecting leaks early, drying and cleaning thoroughly, repairing or replacing damaged materials, and implementing preventive strategies, you can restore under-sink areas to a safe and functional state.
For complex or severe damage, don’t hesitate to consult qualified professionals. The right repair now can save you significant time, money, and stress in the future.