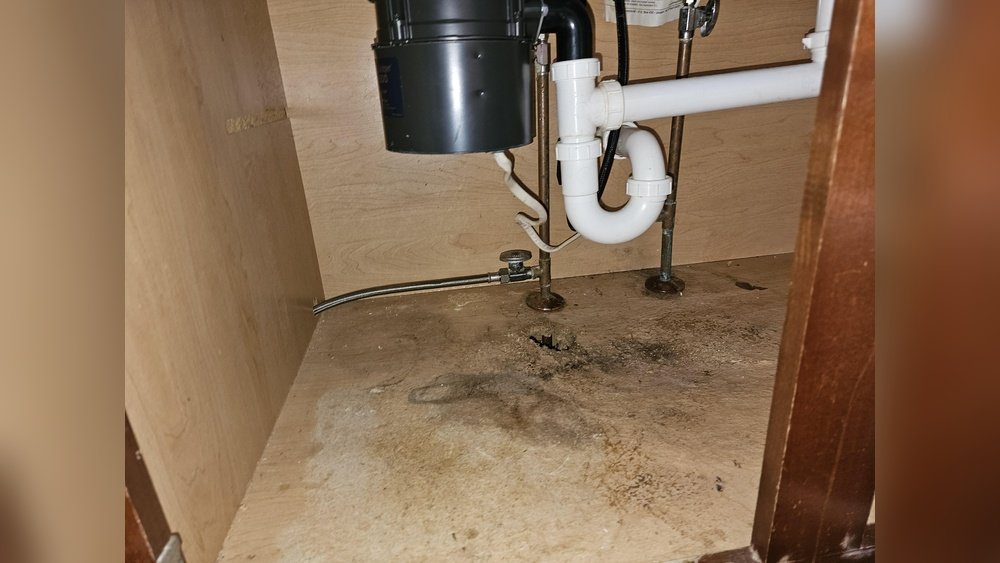
Moisture is the hidden enemy lurking beneath many kitchen sinks, threatening the structural integrity of your home. A slow leak, unnoticed spill, or even persistent condensation can quietly turn the wood under your sink into a breeding ground for rot and mold.
Left unchecked, this damage can spread, leading to costly repairs, foul odors, and even health hazards. Knowing how to fix rotted wood under the sink is a crucial skill for homeowners, renters, and property managers alike, not only to restore function and appearance but to safeguard your kitchen from further deterioration.
Acting promptly and correctly can mean the difference between a simple DIY fix and a major renovation project. This guide will walk you through every step of the process: from diagnosing the extent of the damage to choosing the right materials, executing repairs, and preventing future rot. Whether you’re dealing with minor soft spots or extensive decay, you’ll gain practical, actionable knowledge based on real experience, expert recommendations, and professional standards. Let’s transform that under-sink eyesore back to a safe, clean, and reliable part of your kitchen.
Key Takeaways
- Rotted wood under the sink is commonly caused by leaks and can lead to severe structural and health issues if ignored.
- The repair process involves identifying the source of moisture, removing damaged wood, treating remaining surfaces, and installing new panels or boards.
- Choosing the right materials and tools is essential for a lasting fix; moisture-resistant products are recommended.
- Preventive measures, such as regular inspections and proper sealing, can help you avoid future wood rot problems.
- DIY repairs are feasible for most homeowners, but professional help may be needed for extensive structural damage.
Understanding The Causes And Risks Of Wood Rot Under The Sink
Wood rot beneath kitchen sinks is rarely a random occurrence. Understanding why it happens and the risks it poses is essential before you begin repairs.
Common Causes Of Wood Rot
- Plumbing Leaks: The most frequent culprit is a leaking pipe, faucet, or drain under the sink. Even a slow drip can result in significant water exposure over time.
- Condensation: In humid climates or with poor ventilation, condensation can form on cold pipes and drip onto the wood.
- Spills and Overflows: Frequent spills or overflows that aren’t promptly cleaned up can seep into cabinet bases.
- Poor Sealing: Gaps in caulking or failed seals allow water to penetrate beneath the sink.
Risks Associated With Rotted Wood
- Structural Weakness: Rotted wood loses its strength, which can lead to collapsed cabinet floors or countertops.
- Mold Growth: Persistent moisture is a breeding ground for mold, which can pose serious health risks, especially for those with allergies or respiratory issues.
- Pest Infestation: Damp, decaying wood attracts pests such as termites and carpenter ants.
- Decreased Property Value: Visible damage and odors can reduce your home’s value and appeal.
Real-world Example: Hidden Leak Disaster
A homeowner in Seattle discovered a persistent musty odor in the kitchen. Upon investigation, they found the sink’s drain had a slow leak, saturating the wood base for months. By the time the damage was noticed, not only was the wood rotted, but black mold had formed, requiring both cabinet and subfloor replacement, a project costing over $3,000.
Early detection and repair would have saved significant money and hassle.

Credit: www.youtube.com
Diagnosing The Extent Of Wood Rot Damage
Before grabbing your tools, it’s vital to accurately assess how much of the wood is affected and whether the damage is superficial or structural.
Visual Inspection
- Discoloration: Look for dark spots, stains, or a bleached appearance on the wood.
- Texture Changes: Press gently on the wood; if it feels soft, crumbly, or spongy, rot is likely present.
- Odor: A musty or earthy smell is a telltale sign of wood decay.
Probing For Structural Integrity
- Use a screwdriver or awl to gently poke the wood. Sound wood resists penetration, while rotted areas will give way easily.
- Check all corners and edges, as rot often starts in concealed spots.
Evaluating The Scope
- Surface Rot: Limited to the upper layer; the wood beneath remains solid.
- Partial Penetration: Rot has reached deeper, but some structural integrity remains.
- Full Penetration: The wood is compromised throughout and must be replaced entirely.
Case Study: Cabinet Floor Vs. Subfloor
In my experience, a client with a rotted under-sink cabinet floor was relieved to discover the subfloor remained intact. The damage was limited to the particleboard base, which was removed and replaced in a single afternoon, avoiding more invasive repairs.
When To Call A Professional
- If the subfloor or wall studs are affected.
- If you discover mold covering a large area (over 10 square feet, according to the EPA).
- If the source of the leak is complicated or involves major plumbing repairs.

Credit: www.reddit.com
Gathering Tools And Materials For The Repair
Success hinges on having the right equipment and materials. Below is a comparison of the most common options and what you’ll need for a typical under-sink wood rot repair.
Essential Tools
- Safety gear: Gloves, dust mask, safety goggles
- Utility knife or circular saw
- Screwdriver/drill
- Pry bar
- Measuring tape
- Hammer
- Paintbrush or roller (for sealant application)
Replacement Materials
- Plywood or MDF board (moisture-resistant grade recommended)
- Wood hardener or epoxy (for minor repairs)
- Wood filler or putty
- Waterproof sealant (polyurethane or silicone caulk)
- Construction adhesive
- Screws or finishing nails
- Primer and paint (optional, for extra protection)
Comparison Table: Plywood Vs. Mdf For Cabinet Repair
| Feature | Plywood | MDF |
|---|---|---|
| Moisture Resistance | High (when sealed) | Low-Moderate |
| Strength | Excellent | Good |
| Cost | Higher | Lower |
| Ease of Cutting | Moderate (splinters) | Easy (smooth edges) |
| Best Use | Structural repairs | Cosmetic panels |
Optional Extras
- Moisture barrier membrane
- Antimicrobial paint or spray
- Dehumidifier (for drying damp areas)
Sourcing Materials
For the highest quality and durability, select exterior-grade plywood or water-resistant MDF. Always use products rated for kitchen or bathroom use.

Credit: www.reddit.com
Step-by-step Guide: How To Fix Rotted Wood Under The Sink
This section provides a detailed, actionable walkthrough for repairing rotted wood beneath your kitchen sink, suitable for DIYers with basic carpentry skills.
Step 1: Eliminate The Source Of Moisture
Before any repairs, it’s critical to find and fix the leak or moisture source.
- Inspect all plumbing connections, check the faucet supply lines, drainpipes, and garbage disposal for drips or loose fittings.
- Tighten or replace faulty components as needed.
- Dry the area thoroughly with towels or a fan.
- If mold is present, clean with a mild bleach solution (1 cup bleach to 1 gallon water), wearing protective gear.
Example: One homeowner fixed a persistent leak from the sink’s tailpiece by replacing a worn washer, stopping further water damage before beginning repairs.
Step 2: Remove Damaged Wood
- Carefully empty the cabinet and remove all items.
- Use a utility knife or circular saw to cut out the rotted sections, extending slightly into the sound wood to ensure all decay is removed.
- Pry up the damaged panels. For cabinets, this is usually a thin particleboard or plywood floor.
- If rotted material extends into walls or the subfloor, consult a professional.
Step 3: Treat Remaining Surfaces
- Brush away loose debris and dust.
- Apply wood hardener to any slightly softened but not fully rotted areas; this will reinforce the remaining wood.
- If necessary, use epoxy wood consolidant to fill small gaps or cracks.
- Let all treatments cure as per the manufacturer’s directions.
Pro Tip: Always ventilate the area well when using chemical treatments to avoid inhaling fumes.
Step 4: Cut And Fit The Replacement Panel
- Measure the opening accurately, allowing for any obstructions such as pipes.
- Transfer measurements to your new plywood or MDF panel.
- Cut the panel to size using a circular saw or jigsaw.
- Dry-fit the panel to ensure an exact fit. Trim as needed.
Step 5: Secure The New Panel
- Apply construction adhesive to the cabinet supports or cleats.
- Position the new panel, pressing firmly into place.
- Secure with screws or finishing nails. Pre-drill holes if necessary to avoid splitting the wood.
- For added durability, install support cleats (strips of wood) along the edges beneath the panel.
Step 6: Seal And Protect
- Apply a waterproof sealant to all seams, edges, and penetrations (such as pipe cutouts).
- For extra protection, coat the entire panel with primer and waterproof paint or a clear polyurethane finish.
- Allow everything to dry fully before returning items to the cabinet.
Step 7: Restore Plumbing And Test
- Reinstall any removed plumbing components.
- Slowly turn on water supply and test for leaks.
- Monitor the repaired area for several days to ensure no further moisture is present.
Summary Table: Step-by-step Repair Overview
| Step | Action | Tools/Materials Needed |
|---|---|---|
| 1 | Identify and fix leaks | Wrench, towels, replacement parts |
| 2 | Remove damaged wood | Utility knife, saw, pry bar |
| 3 | Treat remaining wood | Wood hardener, brush, epoxy |
| 4 | Cut replacement panel | Measuring tape, saw |
| 5 | Install new panel | Adhesive, screws/nails, drill |
| 6 | Seal and finish | Sealant, paint/primer |
| 7 | Restore plumbing/test | Wrench, inspection |
Advanced Techniques And Material Choices For Long-lasting Repairs
While the basic repair outlined above will suffice for most, using advanced materials and techniques can further boost the durability and moisture-resistance of your under-sink area.
Upgrading To Moisture-resistant Materials
- Marine-grade plywood: Highly resistant to water, ideal for kitchens and bathrooms.
- PVC or composite boards: Impervious to water and mold; these synthetic panels won’t rot, though they may be more costly.
- Moisture barrier membranes: Install between the cabinet base and new panel for added protection.
Specialized Coatings And Finishes
- Epoxy coatings: Create a hard, waterproof surface on the wood, protecting it from future moisture intrusion.
- Antimicrobial sprays: Inhibit the growth of mold and bacteria for healthier indoor air quality.
Case Study: Pvc Panel Success
A property manager in Florida, frustrated by repeated under-sink wood rot in rental units, switched to PVC panels for replacements. Over five years, the repairs held up perfectly, with zero recurrence of rot or mold, justifying the higher upfront cost.
Creating Access Panels For Future Maintenance
- Design your replacement panel in two pieces, with the rear portion removable for easier access to plumbing in the future.
- Secure the access section with screws rather than adhesive for simple removal.
Reinforcing Cabinet Structure
- Add cross supports or extra cleats beneath the new panel for increased load-bearing capacity, especially if storing heavy items under the sink.
Preventing Future Wood Rot Under The Sink
Repairing damage is only half the battle; taking steps to prevent recurrence is key to long-term peace of mind.
Regular Inspection And Maintenance
- Check under your sink monthly for leaks, drips, or dampness.
- Tighten any loose fittings and replace worn washers promptly.
- Look for signs of condensation, especially in humid climates.
Improving Ventilation
- Install vent grilles or leave the cabinet doors ajar occasionally to promote airflow.
- Use a small fan or dehumidifier in particularly damp kitchens.
Proper Sealing And Waterproofing
- Maintain caulking around sink edges and backsplashes.
- Reseal joints and seams as needed, especially after any plumbing work.
- Consider applying a waterproof membrane under the sink for extra protection.
Smart Storage Solutions
- Store cleaning products and liquids in waterproof bins or trays, catching any accidental spills.
- Avoid overloading the cabinet base with heavy items that could stress the panel.
Example: Preventive Bin Placement
A simple plastic tray placed under the plumbing can catch small drips and alert you to leaks before they cause major damage, a low-cost, high-impact preventive measure.
Quick Reference Table: Prevention Checklist
| Prevention Task | Frequency | Benefit |
|---|---|---|
| Check for leaks | Monthly | Early leak detection |
| Inspect caulking | Quarterly | Prevents water ingress |
| Ventilate cabinet | Weekly | Reduces condensation |
| Store items in trays | Ongoing | Protects cabinet base |
| Apply sealant | Annually | Maintains waterproofing |
Cost Considerations: Diy Vs. Professional Repair
Understanding the financial implications of fixing rotted wood under your sink helps you make an informed decision. Here’s what to expect.
Typical Diy Costs
- Plywood/MDF board: $15, $40 per sheet
- Wood hardener/epoxy: $10, $25
- Sealant/paint: $8, $20
- Fasteners/adhesive: $5, $10
- Total (DIY): $40, $100 (excluding tools you may already own)
Professional Repair Costs
- Labor charges: $50, $150 per hour, depending on region
- Materials markup: Often 20, 40% above retail price
- Total (typical job): $250, $750, especially if subfloor or major plumbing work is needed
Comparison Table: Diy Vs. Professional Repair
| Aspect | DIY | Professional |
|---|---|---|
| Cost | $40, $100 | $250, $750+ |
| Time | 2, 6 hours | 1, 2 hours |
| Skill Required | Basic carpentry | Expertise |
| Warranty | None | Usually included |
| Scope | Limited by skill/tools | Handles complex jobs |
When To Invest In Professional Services
If you suspect structural damage, extensive mold, or lack the necessary tools or confidence, hiring a pro is the safer choice. For minor cabinet floor repairs, most homeowners can achieve quality results on their own.
Insurance Considerations
Some homeowners’ insurance policies may cover water damage if caused by a sudden and accidental event (not gradual leaks). Check your policy or consult your provider for specifics.
Integrating Repairs With Other Kitchen Upgrades
Addressing wood rot under the sink presents an excellent opportunity to update other aspects of your kitchen for improved function and aesthetics.
Sink And Faucet Upgrades
If you’re already removing the sink for repairs, consider upgrading to a new model. For guidance, see these resources:
Plumbing Enhancements
Replacing old or damaged supply lines and drain pipes with modern, flexible connections can reduce the risk of future leaks. PEX or braided stainless steel hoses are highly recommended for their durability.
Cabinet Organization
Install pull-out trays, adjustable shelves, or under-sink organizers to maximize storage and keep the new cabinet base dry and accessible.
Real-world Example: Full Kitchen Sink Upgrade
During a routine under-sink floor replacement, a homeowner opted to install a new double basin sink and high-arc faucet. The project, inspired by How To Install A Double Kitchen Sink, provided not only a fresh, rot-free cabinet base but also improved kitchen functionality and resale value.
Environmental And Health Considerations
Opt for low-VOC paints and adhesives to minimize indoor air pollution. If dealing with mold, follow EPA guidelines and wear appropriate PPE.
Frequently Asked Questions
How Can I Tell If The Wood Under My Sink Is Just Stained Or Actually Rotted?
Stains alone usually leave the wood hard and intact, while rotted wood feels soft, crumbly, or spongy when pressed. You can use a screwdriver to gently probe the area; if it sinks in easily, rot is likely present. Also, look for a persistent musty odor, which often accompanies decay.
Is There A Way To Repair Rotted Wood Without Removing It?
For minor surface rot, you can use wood hardener and epoxy to reinforce the wood. However, if the rot has penetrated deeply or the wood is structurally unsound, removal and replacement are necessary. Surface treatments only work when most of the wood remains solid.
What Should I Do If I Find Black Mold Under My Sink During Repairs?
First, stop work and wear protective gear (N95 mask, gloves, goggles). According to the EPA, small areas (under 10 square feet) can be cleaned with detergent and water or a mild bleach solution. For larger areas, consult a mold remediation specialist. Always address the underlying moisture issue to prevent recurrence.
How Often Should I Check Under My Sink For Leaks Or Wood Rot?
A monthly inspection is ideal for spotting leaks, condensation, or early signs of rot. Quick checks can prevent small problems from becoming major repairs. After any plumbing work or heavy use of the sink, inspect more frequently for a few weeks.
Can I Use Tile Or Metal Instead Of Wood For The Cabinet Base?
Yes, tile or metal panels can be used for extra durability and water resistance, especially in high-risk areas. However, they require proper installation and support. Ensure all seams and edges are well-sealed to prevent water from seeping underneath and damaging surrounding materials.
Taking prompt, informed action when you discover rotted wood under the sink is the best way to protect your kitchen and your investment. By understanding the causes, using the right materials, and following proven repair steps, you can restore your cabinet’s strength and appearance while preventing future issues. For more in-depth guidance on related kitchen upgrades, explore resources like Family Handyman and How To Install Kitchen Sink Plumbing. A few hours of careful work now can save you from costly repairs and headaches down the road.