Replacing or installing a kitchen sink faucet is one of the most rewarding home improvement projects, both for its immediate impact and long-term practicality. Whether you’re upgrading an old, leaky fixture or installing a modern faucet for the first time, this process can improve water efficiency, aesthetics, and even kitchen hygiene.
The right faucet can transform the way you cook, clean, and use your kitchen every day.
With countless faucet styles, mounting options, and installation challenges, homeowners often wonder if this is a project they can tackle themselves. The good news: With careful preparation, the right tools, and step-by-step guidance, most people can install a kitchen sink faucet without hiring a plumber. This guide combines firsthand experience, expert advice, and industry standards to ensure your installation is smooth, safe, and professional, no matter your skill level. Plus, you’ll find practical examples, comparison tables, and actionable tips to help you choose the best faucet and avoid common pitfalls.
Key Takeaways
- Preparation is essential: Gather tools, check compatibility, and clear workspace before beginning.
- Understanding faucet types: Choose the right faucet based on sink configuration and kitchen needs.
- Step-by-step installation: Follow systematic instructions to ensure leak-free, secure results.
- Troubleshooting tips: Learn to handle unexpected issues like leaks or water pressure drops.
- Maintenance advice: Keep your faucet performing optimally for years after installation.

Credit: www.youtube.com
Choosing The Right Kitchen Sink Faucet
Selecting the ideal kitchen faucet isn’t just about looks, it’s about functionality, compatibility, and durability. Your choice determines how easy installation will be and how well the faucet performs.
Types Of Kitchen Faucets
Kitchen faucets vary in design and installation requirements. The most common types include:
- Single-handle faucets: Control temperature and flow with one lever. Ideal for smaller sinks and minimalist designs.
- Double-handle faucets: Separate hot and cold controls. Classic look, often preferred for traditional kitchens.
- Pull-down and pull-out faucets: Feature a flexible spray head for washing large pots and pans.
- Touchless faucets: Operate using motion sensors, improving hygiene and convenience.
Each type offers different benefits. For instance, pull-down faucets are popular for their versatility in cleaning, while touchless faucets reduce the spread of germs.
Faucet Mounting Options
Mounting style affects compatibility with your sink:
- Deck-mounted: Installed directly onto the sink or countertop.
- Wall-mounted: Attached to the wall above the sink, requiring special plumbing.
Most residential kitchens use deck-mounted faucets, but wall-mounted options are ideal for deep sinks or vintage aesthetics.
Compatibility: Sink And Faucet Holes
Faucets require a specific number of holes in the sink or countertop (usually 1-4). Check your sink configuration before purchasing. Some faucets include escutcheon plates to cover unused holes.
Example: A homeowner with a three-hole sink wanted a single-hole faucet. They chose a model with an included deck plate, ensuring a seamless look and easy installation.
Material And Finish
Choose materials like brass or stainless steel for durability. Finishes such as chrome, brushed nickel, and matte black affect both appearance and maintenance.
Pro Tip: Opt for faucets with ceramic disc valves, they last longer and are less prone to leaks.
Data Comparison Table: Faucet Type Features
| Faucet Type | Best For | Installation Complexity | Average Price Range |
|---|---|---|---|
| Single-handle | Small kitchens, modern design | Easy | $60-$250 |
| Double-handle | Traditional kitchens | Medium | $80-$300 |
| Pull-down/pull-out | High-use, flexible cleaning | Medium | $90-$350 |
| Touchless | Hygiene, tech-savvy homes | Challenging | $150-$500 |

Credit: www.lowes.com
Tools And Materials Needed
Preparation is half the battle. Having all tools and materials ready will save time and prevent mistakes during installation.
Essential Tools
- Adjustable wrench
- Basin wrench (for hard-to-reach nuts)
- Plumber’s tape (Teflon tape)
- Bucket
- Screwdriver (flathead and Phillips)
- Flashlight or headlamp
- Pliers
- Rags or towels
Installation Materials
- New faucet (check for included supply lines)
- Supply lines (if not included)
- Mounting hardware (usually comes with faucet)
- Silicone sealant (sometimes recommended for watertight seals)
Safety Equipment
- Gloves (protect hands from sharp edges)
- Eye protection (especially when working under the sink)
Example: In my experience, skipping the basin wrench led to a frustrating struggle with old mounting nuts. Investing in this inexpensive tool made the job much easier.
Comparison Table: Tool Importance
| Tool | Purpose | Estimated Cost | Difficulty Without |
|---|---|---|---|
| Basin wrench | Tighten/loosen faucet nuts | $10-$20 | High |
| Adjustable wrench | Connect supply lines | $15-$30 | Medium |
| Plumber’s tape | Seal threaded joints | $2-$5 | Low (but risk leaks) |
Material Quality Considerations
Choose supply lines made of braided stainless steel for durability. Avoid cheap plastic fittings, which can crack and leak.
Pro Tip: Check for included mounting hardware and supply lines with your faucet to avoid last-minute store runs.

Credit: www.youtube.com
Preparing For Faucet Installation
Before installing a new faucet, create a safe and organized workspace. Preparation prevents damage and ensures a smooth process.
Clearing And Cleaning The Area
- Remove items from under the sink.
- Place a bucket under the supply lines to catch water.
- Clean the sink and countertop to prevent debris from interfering with seals.
Shutting Off Water Supply
Turn off both hot and cold water supply valves under the sink. If valves are stuck, gently use pliers. Test by turning on the faucet to confirm water is off.
Warning: Never proceed with installation until you verify the water is completely shut off.
Removing The Old Faucet
- Disconnect supply lines using an adjustable wrench.
- Loosen and remove mounting nuts with a basin wrench.
- Lift the old faucet out. Clean the area to remove old sealant or mineral buildup.
Inspecting Plumbing Connections
Check for leaks, corrosion, or damaged supply lines. Replace if necessary. Ensure your new faucet matches the size and configuration of existing connections.
Example: A homeowner found corroded supply lines during removal. Replacing them prevented future leaks and water damage.
Reviewing Sink Configuration
Count faucet holes. Measure distance between holes (usually 4 inches for centerset, 8 inches for widespread). Verify new faucet fits your sink.
Pro Tip: Take photos of the plumbing setup before removal for reference during installation.
Step-by-step Faucet Installation Guide
Installing a kitchen faucet requires patience and precision. Follow these steps for a secure, leak-free installation.
Step 1: Position The New Faucet
- Place the faucet in the mounting holes.
- Align the faucet base and deck plate (if needed).
- Secure with mounting gasket or sealant according to manufacturer instructions.
Step 2: Secure The Faucet Under The Sink
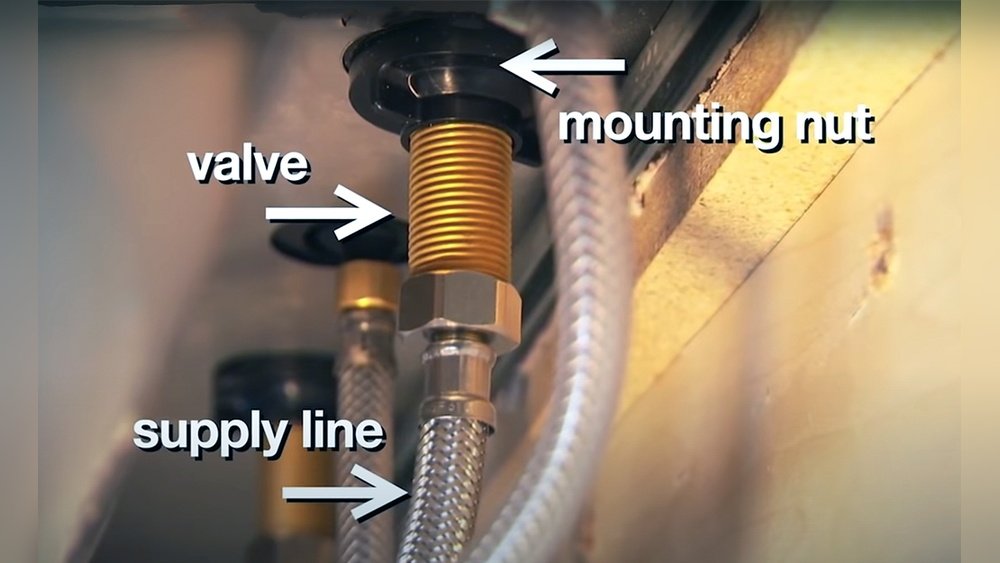
- Attach mounting nuts from underneath.
- Tighten nuts with a basin wrench, but avoid over-tightening to prevent damage.
Step 3: Connect Water Supply Lines
- Attach supply lines to faucet tailpieces.
- Connect to shut-off valves.
- Use plumber’s tape on threaded connections for a watertight seal.
Step 4: Install Additional Features
If your faucet includes a sprayer or soap dispenser:
- Insert sprayer hose through designated hole.
- Connect hose to faucet body.
- Secure soap dispenser according to instructions.
Step 5: Test And Check For Leaks
- Turn water supply valves back on.
- Run both hot and cold water.
- Inspect all connections for leaks.
- Tighten fittings if necessary.
Example: During testing, a DIYer noticed a slow drip from a supply line. Reapplying plumber’s tape and tightening the connection resolved the issue.
Step 6: Final Adjustments
- Check faucet alignment and stability.
- Clean any excess sealant.
- Confirm proper water flow and temperature control.
Troubleshooting Common Problems
Leaky Connections: Usually caused by insufficient plumber’s tape or loose fittings. Reapply tape and tighten.
Low Water Pressure: Check for debris in aerator or supply lines. Clean or replace as needed.
Loose Faucet: Tighten mounting nuts or check for missing washers.
Pro Tip: Run water for several minutes to flush out debris before using the faucet regularly.
Real-world Examples And Case Studies
Learning from others’ experiences can help you anticipate challenges and choose the right approach.
Example 1: Upgrading To A Pull-down Faucet
A homeowner replaced a basic single-handle faucet with a pull-down model for improved cleaning flexibility. The new faucet required only minor modifications, a deck plate to cover unused holes and new supply lines. Installation took under two hours and immediately improved kitchen utility.
Example 2: Installing A Touchless Faucet
A DIYer decided to upgrade to a touchless faucet for hygiene and convenience. The installation was more complex, requiring a battery pack and sensor wiring. Careful reading of instructions and patience resulted in a successful installation. The hands-free operation reduced water waste and improved cleanliness, especially with young children.
Example 3: Replacing An Old Double-handle Faucet
In an older home, a double-handle faucet was leaking and hard to operate. The homeowner chose a modern single-handle faucet, but discovered mismatched supply line sizes. A quick trip to the hardware store for adapters resolved the issue. The new faucet made temperature control easier and improved water efficiency.
Pro Tip: Research your faucet’s compatibility with your sink and plumbing before purchase. Read user reviews for installation tips and common problems.
Faucet Maintenance And Longevity
Proper maintenance keeps your faucet working reliably and extends its lifespan.
Routine Cleaning
- Wipe faucet with a soft cloth and mild soap.
- Avoid abrasive cleaners, which can damage finish.
- Clean aerator monthly to prevent mineral buildup.
Preventing Leaks
- Inspect supply lines and connections annually.
- Replace washers or cartridges if faucet begins to drip.
- Tighten fittings if faucet becomes loose.
Addressing Clogs
If water flow decreases, check aerator and supply lines for debris. For stubborn clogs, see guides such as How To Clear A Clogged Kitchen Sink Drain for detailed steps.
Example: Regular cleaning and annual inspections helped a homeowner avoid costly repairs and maintain optimal water pressure.
When To Replace Your Faucet
Most kitchen faucets last 10-15 years, depending on material and usage. Signs it’s time to replace:
- Persistent leaks
- Rust or corrosion
- Difficulty operating handles
Pro Tip: Investing in a quality faucet and maintaining it can save money on repairs and water bills.
Comparing Diy Vs Professional Installation
Deciding between DIY and professional installation depends on your confidence, plumbing skills, and faucet complexity.
| Factor | DIY Installation | Professional Installation |
|---|---|---|
| Cost | $60-$500 (faucet + tools) | $150-$400 (labor + materials) |
| Time Required | 1-3 hours | 30-90 minutes |
| Warranty | Manufacturer only | Manufacturer + labor |
| Skill Level | Beginner-Intermediate | Professional |
| Risk of Mistakes | Medium | Low |
Pro Tip: If your plumbing is old or complex, or if you’re installing a wall-mounted or touchless faucet, professional help may be worth the investment.
Advanced Tips For A Flawless Installation
Take your faucet installation to the next level with these expert strategies.
Upgrading Supply Lines
Replace old supply lines with braided stainless steel for better durability and leak resistance. This upgrade is often recommended by plumbers.
Using Silicone Sealant
Apply a thin bead of silicone sealant around faucet base to prevent water from seeping under the faucet and causing mold or damage.
Installing A Water Filter
If your faucet supports it, consider installing a water filtration system. This can improve taste, reduce contaminants, and make your kitchen healthier.
Eco-friendly Faucet Options
Choose faucets with WaterSense certification for better water efficiency. According to the U.S. Environmental Protection Agency, WaterSense faucets can save up to 700 gallons of water per year (EPA Source).
Internal Link Integration
If you encounter drainage issues during installation, see How To Fix Kitchen Sink Not Draining for troubleshooting steps. For persistent clogs, refer to How To Clear A Blocked Kitchen Drain Outside.
Pro Tip: Keep manufacturer instructions handy throughout installation. They contain specific details for your faucet model.
Frequently Asked Questions
How Long Does It Take To Install A Kitchen Sink Faucet?
Most DIY installations take between 1 and 3 hours, depending on experience and faucet complexity. Professional plumbers can often complete the job in under an hour.
What Should I Do If My Faucet Leaks After Installation?
First, check all connections for tightness and proper use of plumber’s tape. If leaks persist, inspect washers and cartridges for damage. Persistent leaks may indicate a faulty faucet or improper installation, consult a plumber if unsure.
Can I Install A Kitchen Faucet With Only One Sink Hole?
Yes, many modern faucets are designed for single-hole installation. If your sink has multiple holes, use a deck plate (escutcheon) to cover unused holes for a seamless look.
Are There Faucets That Help Conserve Water?
Absolutely. Look for WaterSense-labeled faucets certified by the EPA. These models provide strong performance while reducing water flow, saving up to 700 gallons annually (EPA Source).
How Do I Clean And Maintain A Kitchen Faucet With A Sprayer?
Detach the sprayer head and soak it in vinegar to remove mineral buildup. Clean the hose exterior with mild soap. Inspect the sprayer for leaks and replace washers as needed. Regular cleaning keeps the sprayer functioning smoothly.
Upgrading your kitchen sink faucet is a practical DIY project that enhances both the appearance and efficiency of your kitchen. With careful preparation, the right tools, and attention to detail, you can achieve professional-level results and enjoy a faucet that lasts for years. Remember to maintain your faucet regularly, choose quality materials, and consult expert guides when troubleshooting. For more tips and solutions to common kitchen sink problems, explore resources like How To Fix A Backed Up Kitchen Sink and How To Clear A Clogged Garbage Disposal. Whether you’re a first-time DIYer or a seasoned home improver, a successful faucet installation is within reach.