Key Takeaways
- Proper waste pipe installation is crucial in preventing leaks, foul odors, and costly water damage beneath your sink. A well-executed setup safeguards your kitchen or bathroom against the common pitfalls that can undermine hygiene and functionality.
- Selecting the right materials and tools forms the backbone of a durable, code-compliant plumbing solution. Material choice impacts longevity, resistance to corrosion, and ease of maintenance.
- Accurate measurements and cutting are essential for a snug fit, avoiding misalignment, and ensuring consistent drainage performance. Small errors can snowball into major issues if not addressed early.
- Secure connections between pipes, traps, and drains are foundational for preventing leaks and blockages. Proper assembly prevents recurring maintenance headaches.
- Real-world examples and troubleshooting tips offer practical solutions for unique challenges you may encounter, saving time and reducing frustration.
- Consult building codes and, for complex jobs or unfamiliar layouts, consider seeking professional advice. Code compliance ensures safety and avoids legal complications.
:max_bytes(150000):strip_icc()/how-to-install-a-sink-drain-2718789_hero_5078-64538f6f90d545c7af0728e4bf8f894e.jpg)
Credit: www.thespruce.com
Understanding Sink Waste Pipe Systems
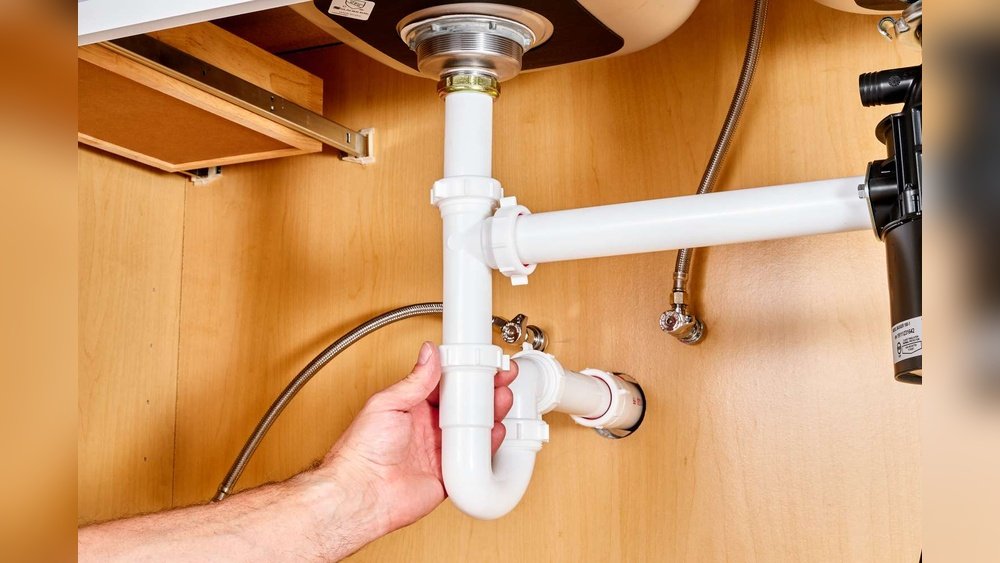
To achieve a successful installation, you must first understand the function, layout, and components of sink waste pipe systems. Waste pipes are engineered to transport wastewater efficiently from the sink to the main plumbing line, all while preventing leaks, odors, and contamination.
Types Of Waste Pipes
Waste pipes under sinks come in several materials, each offering distinct advantages and limitations:
- PVC (Polyvinyl Chloride): By far the most popular choice in modern home plumbing, PVC is known for its lightweight nature, affordability, and ease of handling. Its resistance to corrosion, chemical damage, and bacterial growth makes it a go-to for both kitchen and bathroom drains. PVC is also easy to cut and join using solvent cement, which creates strong, watertight seals.
- ABS (Acrylonitrile Butadiene Styrene): ABS pipes are similar in size and use to PVC but are black in color and slightly more rigid. They offer superior impact resistance and are not affected by sunlight, making them ideal for environments where pipes might be exposed. ABS is generally preferred in colder climates because it remains more flexible and less brittle at low temperatures.
- Metal (Chrome, Brass): Metal pipes, especially chrome and brass, are often selected for their aesthetic appeal in bathrooms with exposed plumbing. While they offer a sleek, shiny finish, these pipes are heavier, more expensive, and prone to corrosion over time if not properly maintained. Metal pipes are less common in kitchens due to constant exposure to water and cleaning chemicals.
| Pipe Type | Durability | Ease of Installation | Cost | Typical Use |
|---|---|---|---|---|
| PVC | High | Easy | Low | Kitchen & Bathroom |
| ABS | High | Easy | Low to Medium | Kitchen & Bathroom |
| Chrome/Brass | Medium | Moderate | High | Bathroom (Exposed) |
Additional Pipe Materials
While less common, you may occasionally encounter cast iron or copper waste pipes in older homes. Cast iron is extremely durable but challenging to cut and install, making it unsuitable for DIY projects. Copper, though resistant to corrosion, is expensive and typically reserved for supply lines, not waste.
Key Components Under The Sink
A properly functioning waste pipe system under a sink consists of several interconnected parts:
- Sink drain outlet: This is the point where wastewater exits the sink basin. It’s usually fitted with a strainer or basket to catch debris.
- Strainer or basket: These accessories prevent large debris, such as food scraps or hair, from entering the plumbing system and causing blockages.
- Trap (P-trap or S-trap): The trap is a curved section of pipe designed to retain a small amount of water. This water acts as a barrier, blocking sewer gases from escaping into your home. The P-trap is most commonly used, as it meets modern plumbing codes, whereas S-traps are increasingly prohibited due to siphoning risks.
- Waste arm: The waste arm is a horizontal segment that connects the trap to the wall or floor drain (stub-out). It must be properly sloped to ensure efficient drainage.
- Branch waste lines: These are additional pipes that connect other fixtures or appliances, such as dishwashers or garbage disposals, to the main waste system.
- Venting system: Vents provide airflow, preventing negative pressure that could siphon water from the trap. They also help maintain smooth drainage and minimize gurgling sounds.
Advanced Components
Some installations may include cleanout fittings for easy access in case of clogs or maintenance, and air admittance valves (AAVs) where traditional venting is impractical.
Common Sink Configurations
- Single-bowl sinks: These are the simplest setups, with one tailpiece leading directly to a trap and then to the waste arm. Installation is straightforward and requires minimal fittings.
- Double-bowl sinks: More complex, double sinks require two tailpieces joined by a T- or Y-fitting, so both drains connect to a shared trap. This arrangement must be carefully aligned to avoid cross-flow and ensure both bowls drain efficiently.
For more on double sink setups, refer to How To Install A Double Kitchen Sink.
Triple-bowl Or Custom Sinks
In luxury kitchens, you may encounter triple-bowl or custom sinks, which require extra fittings and careful planning to maintain proper pitch and venting.
Building Codes And Compliance
Municipalities enforce strict building codes to protect homeowners and ensure safe, functional plumbing:
- Minimum pipe diameters: Kitchen sinks typically require a minimum diameter of 1-1/2 inches, while bathroom sinks may use 1-1/4 inches. These sizes prevent blockages and facilitate rapid drainage.
- Trap requirements: The P-trap is mandatory in most jurisdictions because it reliably retains a water seal. S-traps, which can siphon water and allow sewer gases into the home, are prohibited or discouraged.
- Venting: Proper venting is essential to maintain the trap seal and prevent slow drainage or gurgling noises. Failure to vent can result in code violations and costly repairs.
Pro Tip: Always check your local plumbing code before starting work. Requirements can vary by location, and non-compliance can lead to fines or mandatory corrections.
Credit: www.youtube.com
Tools And Materials You’ll Need
A successful waste pipe installation depends on having the correct tools and materials ready before you begin. Quality tools speed up the process, while the right materials ensure lasting results.
Essential Tools
- Measuring tape: Accurate measurements are the foundation of any plumbing project. A sturdy tape measure helps you precisely gauge pipe lengths and distances between fittings.
- Pipe cutter or hacksaw: Pipe cutters are ideal for making clean, straight cuts in PVC or ABS. A hacksaw is versatile and can be used for metal pipes, but requires careful handling to avoid jagged edges.
- Deburring tool or sandpaper: After cutting, use a deburring tool or medium-grit sandpaper to smooth the pipe edges. This prevents damage to washers and ensures tight, leak-free connections.
- Channel-lock pliers or adjustable wrench: These tools are indispensable for tightening slip nuts, fittings, and brackets. Channel-lock pliers provide extra leverage for stubborn connections.
- Screwdriver: Needed to secure brackets, clamps, or occasionally to tighten certain fittings.
- Marker or pencil: Marking cut lines and component placement helps maintain accuracy throughout the installation.
Additional Tools
For more advanced projects, you might need a pipe reamer for smoothing internal edges, a spirit level to check pipe slope, or a drill for mounting clamps.
Necessary Materials
- Waste pipe sections (PVC, ABS, or metal): Choose the correct diameter and length for your specific sink and ensure compliance with local codes.
- Trap kit: Includes the trap bend, trap arm, slip nuts, washers, and often a waste arm. Kits simplify assembly and reduce the risk of missing components.
- Pipe fittings (elbows, T-fittings, couplings): These allow for changes in pipe direction and joining multiple pipes. Elbows are essential for navigating tight spaces or offset drains.
- Pipe solvent cement and primer (for PVC/ABS): These chemicals create permanent, watertight bonds between pipe sections. Primer cleans and softens pipe surfaces, while cement fuses them together.
- Slip joint washers and nuts: Washers ensure watertight seals at slip joints, while nuts secure the fittings. Always use new washers for best results.
- Pipe clamps or hangers: These prevent horizontal pipes from sagging, which can cause leaks or slow drainage.
Specialty Materials
For unique situations, you may need flexible connectors for offset drains, extension pieces for deep sinks, or adapter fittings to join different materials.
Choosing The Right Waste Pipe Kit
Pre-assembled waste pipe kits are invaluable for DIYers and professionals alike. They include all necessary components and are tailored to fit standard sink configurations.
| Kit Type | Contents | Ideal For | Approximate Price |
|---|---|---|---|
| Single Sink Kit | Trap, waste arm, washers, slip nuts | Single-bowl sinks | $10, $20 |
| Double Sink Kit | Dual tailpieces, T-connector, trap, waste arm | Double-bowl sinks | $15, $30 |
| Custom Components | Individual pipes and fittings | Non-standard layouts | Varies |
Custom Kits
For unusual layouts or retrofits, you may need to purchase individual pipe sections and fittings. This allows for maximum flexibility and ensures a perfect fit.
Safety Equipment
- Gloves: Protect your hands from sharp pipe edges, chemicals, and accidental scrapes.
- Eye protection: Essential when cutting pipes, applying cement, or working in tight spaces where debris may fall.
Additional Safety Tools
Consider a dust mask if working with older pipes or in confined spaces, and keep a first aid kit handy in case of minor injuries.
Step-by-step Guide: Fitting Waste Pipe Under Sink
A methodical, step-by-step approach is essential for a successful waste pipe installation. This section lays out each phase in detail, with tips for accuracy and durability.
Preparation And Planning
- Shut off water supply: While waste pipe installation doesn’t directly involve the supply lines, turning off the water prevents accidental spills and gives you a dry workspace. If replacing the faucet or working near supply lines, shut off the water to avoid flooding.
- Clear the area: Remove cleaning supplies, storage bins, or other items from under the sink. Wipe down surfaces to keep your workspace organized and safe.
- Assess existing plumbing: Examine the current setup for alignment, compatibility with the new sink, and any obstructions such as cabinetry, electrical wiring, or previous repairs. Take note of the wall stub-out location and any bends required.
- Lay out all components: Arrange pipes, traps, washers, and fittings for easy access. Double-check that you have everything before starting, missing parts can stall the project and lead to mistakes.
Planning For Complex Installations
For double sinks, disposals, or dishwashers, sketch a diagram of your planned layout. This can help visualize component placement and ensure you have the necessary fittings.
Measuring And Cutting Pipes
Precision is key for leak-free, professional results.
- Measure from the sink tailpiece to the wall drain: Use your tape measure to determine the exact length needed for the waste arm and trap arm. Account for the height difference between the sink outlet and wall stub-out.
- Mark and cut pipes: Mark the cut line with a pencil or marker. Use a pipe cutter for PVC/ABS, or a hacksaw for metal. Always cut square to the pipe axis to ensure proper seating and prevent leaks.
- Deburr pipe ends: Smooth both the inside and outside edges with a deburring tool or sandpaper. Deburring is crucial, rough edges can damage washers, create gaps, and lead to leaks.
Pro Tip: Double-check your measurements before cutting. Even small errors can make assembly difficult or cause misalignment, especially in tight spaces.
Handling Non-standard Pipe Lengths
If the stub-out is unusually high or low, use extension pieces or flexible connectors to bridge the gap without compromising slope.
Assembling The Trap
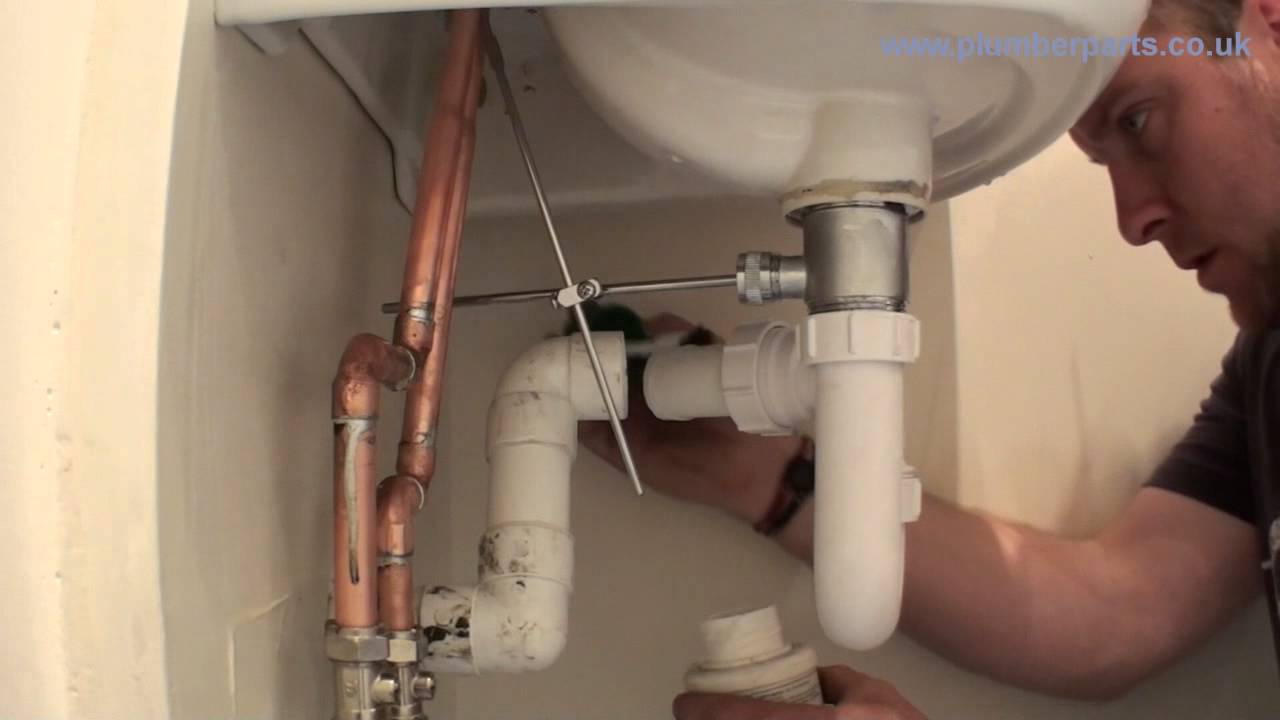
- Attach the trap bend to the sink tailpiece: Slide a slip nut and washer onto the tailpiece, then fit the trap bend. The washer’s beveled edge should face the pipe for a secure seal.
- Connect the trap arm: Attach the trap arm to the trap bend and the wall drain stub-out, using slip nuts and washers. Ensure each component fits snugly without forcing.
- Check alignment: The trap and waste arm should form a smooth, continuous path to the drain. Avoid twisting or stressing pipes, as this can cause leaks or eventual failure.
For more about trap installation, see How To Install Kitchen Sink Plumbing.
Additional Trap Assembly Tips
If the trap arm is too short, use an extension. If alignment is off, try adjustable or flexible connectors.
Connecting Fittings And Joints
- Dry-fit all components: Assemble pipes and fittings loosely to check alignment. Make adjustments before tightening or cementing.
- Apply pipe cement (if required): For PVC or ABS, apply primer to the pipe ends and fittings, then pipe cement. Twist the pipes together for a strong bond. Never use cement on slip joints, which are designed for adjustment.
- Tighten slip nuts by hand: Over-tightening can crack washers or pipes. Tighten just enough to create a snug seal, then finish with pliers if needed.
Handling Tight Spaces
If working under a deep sink or in cramped cabinetry, use compact fittings or short-arm tools to reach connections.
Securing And Testing The Installation
- Anchor horizontal runs: Secure pipes with clamps or hangers every 3, 4 feet, or as needed to prevent sagging. Sagging pipes can cause leaks and slow drainage.
- Test for leaks: Run water through the sink, checking each joint and connection for drips. If leaks are found, reseat washers or retighten slip nuts.
- Check trap water seal: Fill the trap with water to ensure it holds a seal. The trap should retain water and block sewer gases from escaping.
Advanced Testing
For added assurance, fill both sink bowls (if applicable) and drain simultaneously. This tests the system under maximum load and identifies any hidden leaks or alignment issues.
Final Adjustments
- Adjust trap arm length or angle as needed for a snug, leak-free fit. If pipes are misaligned, use adjustable fittings or re-cut sections for a perfect fit.
- Re-tighten all slip nuts after initial water test. Check for signs of movement or loosening after a few days of use.
Documenting Your Installation
Take photos of the completed system for future reference, especially if you plan to renovate or sell your home.

Credit: www.youtube.com
Special Situations: Double Sinks, Disposals, And Dishwashers
Many kitchens feature complex configurations that require special attention during installation. Understanding these scenarios prevents common mistakes and ensures code compliance.
Fitting Waste Pipes For Double Sinks
- Dual tailpieces: Each sink bowl has its own drain. The challenge is to join both drains before the trap without causing cross-flow or blockage.
- T- or Y-fitting: These fittings combine the two tailpieces into a single waste arm. The Y-fitting offers smoother flow, reducing the risk of backups.
- Ensure equal slope: Both drains must slope gently toward the trap (minimum 1/4 inch per foot). Unequal slopes cause standing water, slow drainage, and potential odors.
For a detailed double sink guide, see How To Install A Double Kitchen Sink.
Extra Tips For Double Sinks
Use a center outlet trap for symmetrical installations, and consider flexible connectors if the bowls are offset.
Integrating A Garbage Disposal
- Disposal drain outlet: The garbage disposal usually attaches to one side of a double sink. Its outlet must align with the main drain system.
- Baffle T-fitting: Special T-fittings with internal baffles prevent waste from the disposal from backing up into the other sink bowl.
- Dishwasher drain connection: Most disposals feature an inlet for the dishwasher drain hose, simplifying installation and ensuring proper venting.
If you’re adding a disposal, see How To Install A Disposal In A Single Sink.
Additional Disposal Integration Tips
Install an air gap or high loop for the dishwasher drain, as required by code, to prevent contaminated water from re-entering the appliance.
Dealing With Dishwasher Drains
- Air gap or high loop: An air gap is a small fitting mounted on the sink or countertop. It prevents backflow from the sink into the dishwasher. A high loop achieves similar results by routing the hose upward before connecting to the drain.
- Branch inlet: The dishwasher drain hose connects to a branch fitting above the trap, ensuring that wastewater doesn’t bypass the trap and vent.
Dishwasher Drain Troubleshooting
If water backs up into the dishwasher, check for clogged air gap or improperly installed high loop.
Sinks With Offset Or Unusual Drains
- Flexible waste arms: These are invaluable when the sink drain doesn’t line up with the wall stub-out. Flexible connectors adjust to irregular angles and distances.
- Additional elbows: Elbows allow for sharp turns and navigation around cabinetry or other obstacles.
Pro Tip: Always maintain a downward slope (at least 1/4 inch per foot) on horizontal waste pipes to ensure proper drainage and prevent standing water.
Troubleshooting Common Problems
Even the most meticulous installations can encounter issues. Identifying and resolving these problems early prevents bigger headaches down the road.
Leaks At Joints
- Check washer orientation: Washers must be installed with the beveled side facing the pipe. Incorrect installation leads to leaks.
- Tighten slip nuts: Hand-tighten first, then finish with a quarter-turn using pliers. Over-tightening can crack washers or deform pipes.
- Inspect for cracks: Examine washers and fittings for hairline cracks or defects. Replace any damaged parts immediately.
Persistent Leak Solutions
If leaks persist, disassemble the joint, clean the surfaces, and reassemble with new washers.
Slow Drainage
- Improper slope: Ensure all horizontal pipes are sloped toward the drain. Use a level to check pitch.
- Trap blockage: Remove and clean the trap if slow drainage persists. Accumulated hair, grease, or debris is often the culprit.
- Vent issues: Gurgling sounds or slow draining may indicate a blocked vent. Clear the vent or consult a plumber for complex venting problems.
Advanced Drainage Troubleshooting
Flush the system with hot water and enzyme-based cleaners to dissolve buildup.
Odors
- Dry trap: If the trap dries out, sewer gases can escape. Pour water into the trap to restore the seal.
- Improper venting: A missing or blocked vent can cause odor problems. Check vent connections and clear any obstructions.
Odor Elimination Tips
Install an air admittance valve if venting isn’t feasible, but confirm code compliance.
Misaligned Pipes
- Use adjustable or flexible connectors: These accommodate minor misalignments and simplify installation.
- Double-check measurements: If pipes won’t fit, re-measure and recut for accuracy.
Pro Tip: If a problem persists or you’re unsure, consult a licensed plumber to avoid costly water damage.
Real-world Examples And Case Studies
Learning from others’ experiences can help you avoid common mistakes and achieve better results.
Example 1: Retrofitting A Waste Pipe In An Older Home
A homeowner renovating a 1950s kitchen discovered that the wall drain stub-out was set much lower than the new sink’s tailpiece. By carefully measuring the difference and using a longer trap arm, they maintained the required downward slope. Pipe clamps were added every two feet to prevent sagging, and flexible connectors helped align the pipes without stressing the joints.
The finished installation was leak-free and met all code requirements.
Key Lessons
- Measure slope carefully in older homes.
- Use extension pieces and clamps to ensure long-term stability.
Example 2: Double Sink With Garbage Disposal
During a kitchen remodel, an installer faced limited space under a double-bowl sink with a garbage disposal. They selected a compact, offset T-fitting to join both drain tailpieces above the trap, positioned the disposal on the shorter bowl, and used flexible connectors for precise alignment.
A dishwasher branch was added, and an air gap was mounted on the countertop. The result was a clean, code-compliant setup with reliable drainage.
Key Lessons
- Plan component placement in tight spaces.
- Use compact fittings and flexible connectors for custom layouts.
Example 3: Dealing With Persistent Leaks
A DIYer replaced a leaking P-trap but continued to see drips at the slip joint. Upon inspection, the slip washer was installed backward, and the pipe end was rough