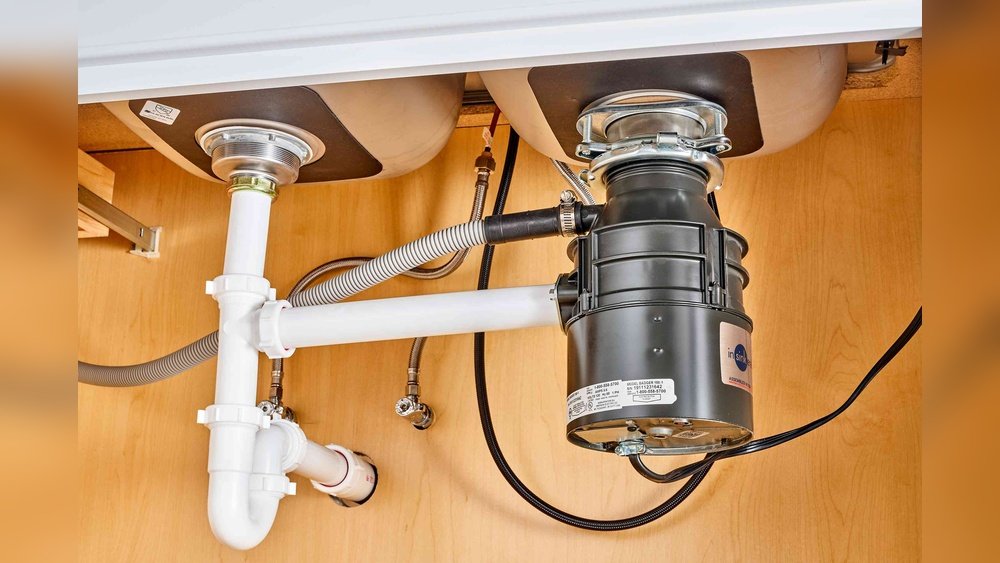
A garbage disposal drain is a transformative kitchen upgrade, offering unmatched convenience by efficiently grinding food waste and reducing landfill contributions. Whether you’re an avid home chef or value a clean, odor-free kitchen, installing a garbage disposal drain can dramatically improve your daily routine.
Although the process might seem daunting, a methodical approach and the right tools make it an accessible project for most homeowners.
In my experience, successfully installing a garbage disposal drain not only saves on costly plumber fees but also empowers homeowners to take charge of their kitchen’s functionality. This guide synthesizes expert advice, real-world examples, and step-by-step instructions to ensure a seamless installation.
By following these directions, you’ll avoid common pitfalls, achieve a leak-free result, and extend the lifespan of your disposal unit.
Key Takeaways
- Installing a garbage disposal drain requires careful preparation, the right tools, and attention to detail.
- The process involves disconnecting plumbing, mounting the disposal, and connecting electrical and drain lines.
- Choosing the correct disposal model and understanding your sink configuration are crucial for a successful installation.
- Most homeowners can complete the installation in 2, 4 hours with basic DIY skills.
- Regular maintenance and proper use will maximize the unit’s efficiency and lifespan.
- Safety precautions are essential throughout the process to prevent injury and damage.

Credit: drain-express.com
Understanding Garbage Disposal Drains
A garbage disposal drain is a motorized device mounted under your kitchen sink, designed to shred food waste into small particles that can safely flow through your plumbing. These units enhance kitchen hygiene, prevent clogged pipes, and contribute to more sustainable waste management by reducing landfill loads.
How Garbage Disposal Drains Work
A garbage disposal uses a combination of spinning metal impellers and a grinding chamber to pulverize food scraps. Once activated, water from the faucet helps flush the ground waste through the drainpipe and into your home’s plumbing system. The most common types are continuous feed (operated by a wall switch) and batch feed (requires a cover to activate).
Types Of Garbage Disposals
There are two primary types:
- Continuous Feed: Activated by a switch, allowing waste to be added while running.
- Batch Feed: Operates only when the drain cover is engaged, offering added safety.
| Feature | Continuous Feed | Batch Feed |
|---|---|---|
| Operation | Switch-activated | Cover-activated |
| Safety | Standard | Enhanced (prevents accidental activation) |
| Price Range | $75, $350 | $100, $400 |
| Common Use | Most households | Homes with children |
Benefits Of Installing A Garbage Disposal Drain
- Reduces food waste sent to landfills, lowering methane emissions.
- Prevents kitchen odors by disposing of food scraps instantly.
- Minimizes clogs in sink drains and pipes.
- Adds property value and modernizes your kitchen.
For additional information about the environmental impact of food waste disposers, see the Garbage disposal unit Wikipedia page.
Tools And Materials Needed
Proper preparation is essential for a smooth installation. Gather all tools and materials before beginning to avoid interruptions.
Essential Tools
- Adjustable wrench: For tightening and loosening nuts.
- Screwdriver (Phillips and flathead): For mounting hardware.
- Plumber’s putty: Seals the flange to the sink.
- Pipe wrench or slip-joint pliers: For drain pipes.
- Hammer: To remove the dishwasher knockout plug (if needed).
- Wire stripper/cutter: For electrical connections (if not using a plug-in model).
- Bucket and towels: To catch residual water during disassembly.
Materials Checklist
- Garbage disposal unit (ensure compatibility with your sink).
- Disposal flange and mounting ring (often included with the unit).
- Discharge tube: Connects disposal to drain trap.
- Dishwasher connector kit: If connecting a dishwasher drain.
- Electrical cord kit: Required if your unit doesn’t come with a plug.
- PVC pipes and fittings: For custom drain configurations.
Safety Gear
- Safety goggles: Protect your eyes from debris.
- Work gloves: Prevent cuts from sharp edges under the sink.
- Flashlight: Enhances visibility in tight spaces.
Pro Tip: Lay a sheet or cardboard inside the cabinet to catch small parts and protect the area.
:max_bytes(150000):strip_icc()/garbage-disposal-installation-1824830-hero-1dcd7b5b05d44a2cb367e31692500c8c.jpg)
Credit: www.thespruce.com
Planning The Installation
A successful installation begins with a clear plan. Consider your current plumbing setup, sink type, and whether you’ll be replacing an existing disposal or installing a new one.
Assessing Your Sink And Plumbing
- Single vs. Double Sink: Double sinks require a special approach to routing the drain pipes and may need a disposal flange on one side. For guidance, see How To Install A Double Kitchen Sink.
- Existing Disposal: If replacing, note the current mounting system and wiring.
- Pipe Materials: Identify if you have PVC or metal pipes, as this affects fitting selection.
Selecting The Right Garbage Disposal
Key criteria:
- Horsepower (HP): Ranges from 1/3 HP for light use to 1 HP for heavy-duty grinding.
- Size: Ensure the unit fits beneath your sink, especially in compact cabinets.
- Noise Level: Some models feature insulated grinding chambers for quieter operation.
- Connection Type: Hardwired vs. plug-in; check your under-sink outlet.
| Household Size | Recommended HP | Best For |
|---|---|---|
| 1, 2 People | 1/3, 1/2 HP | Minimal food waste |
| 3, 5 People | 1/2, 3/4 HP | Average use |
| 6+ People | 3/4, 1 HP | Frequent heavy use |
Verifying Electrical Requirements
- GFCI Outlet: For plug-in models, ensure a Ground Fault Circuit Interrupter outlet is available.
- Circuit Capacity: The disposal should be on a dedicated 15- or 20-amp circuit.
- Switch Placement: For continuous feed units, confirm the wall switch is easily accessible.
Reviewing Local Plumbing Codes
Check with your local building department for code requirements regarding air gaps, venting, and dishwasher connections. Some municipalities have restrictions on disposal installations.
Credit: www.homedepot.com
Step-by-step Installation Process
This section covers the comprehensive installation of a garbage disposal drain, whether replacing an old unit or starting fresh.
1. Preparing The Work Area
- Turn off the circuit breaker controlling the kitchen outlet.
- Clear out the cabinet beneath the sink.
- Place a bucket under the drain to catch any water when pipes are removed.
2. Removing The Old Disposal Or Sink Drain
For Replacing An Existing Disposal
- Unplug the disposal or disconnect power at the breaker.
- Loosen the discharge tube clamp and disconnect the drain pipe.
- Detach the dishwasher hose (if connected) by loosening the clamp.
- Twist off the disposal from the mounting ring using the included tool or a screwdriver.
- Remove the old mounting assembly and scrape away any plumber’s putty.
For Installing In A New Sink
If you’re installing a new sink or have no existing disposal, follow the instructions in How To Install A New Kitchen Sink to ensure your sink is ready for a disposal unit.
3. Installing The Mounting Assembly
- Apply a rope of plumber’s putty around the underside of the disposal flange.
- Insert the flange into the sink’s drain hole and press down firmly.
- From under the sink, slide on the fiber gasket, backup ring, and mounting ring.
- Tighten the mounting ring evenly. Wipe away excess putty from the sink basin.
4. Wiring The Disposal (if Required)
If your disposal does not come with a pre-installed power cord:
- Remove the electrical cover plate on the bottom of the unit.
- Connect the white wire to white (neutral), black wire to black (hot), and secure the green or bare wire to the ground screw.
- Secure the cable with the strain relief clamp.
- Replace the cover plate.
Warning: If you are not comfortable with electrical work, hire a licensed electrician for this step.
5. Attaching The Disposal To The Sink
- If connecting a dishwasher, knock out the dishwasher inlet plug inside the disposal using a screwdriver and hammer.
- Align the disposal’s mounting tabs with the mounting ring under the sink.
- Insert and twist to lock the disposal into place. Use the included wrench to ensure it is tightly secured.
6. Connecting The Drain Lines
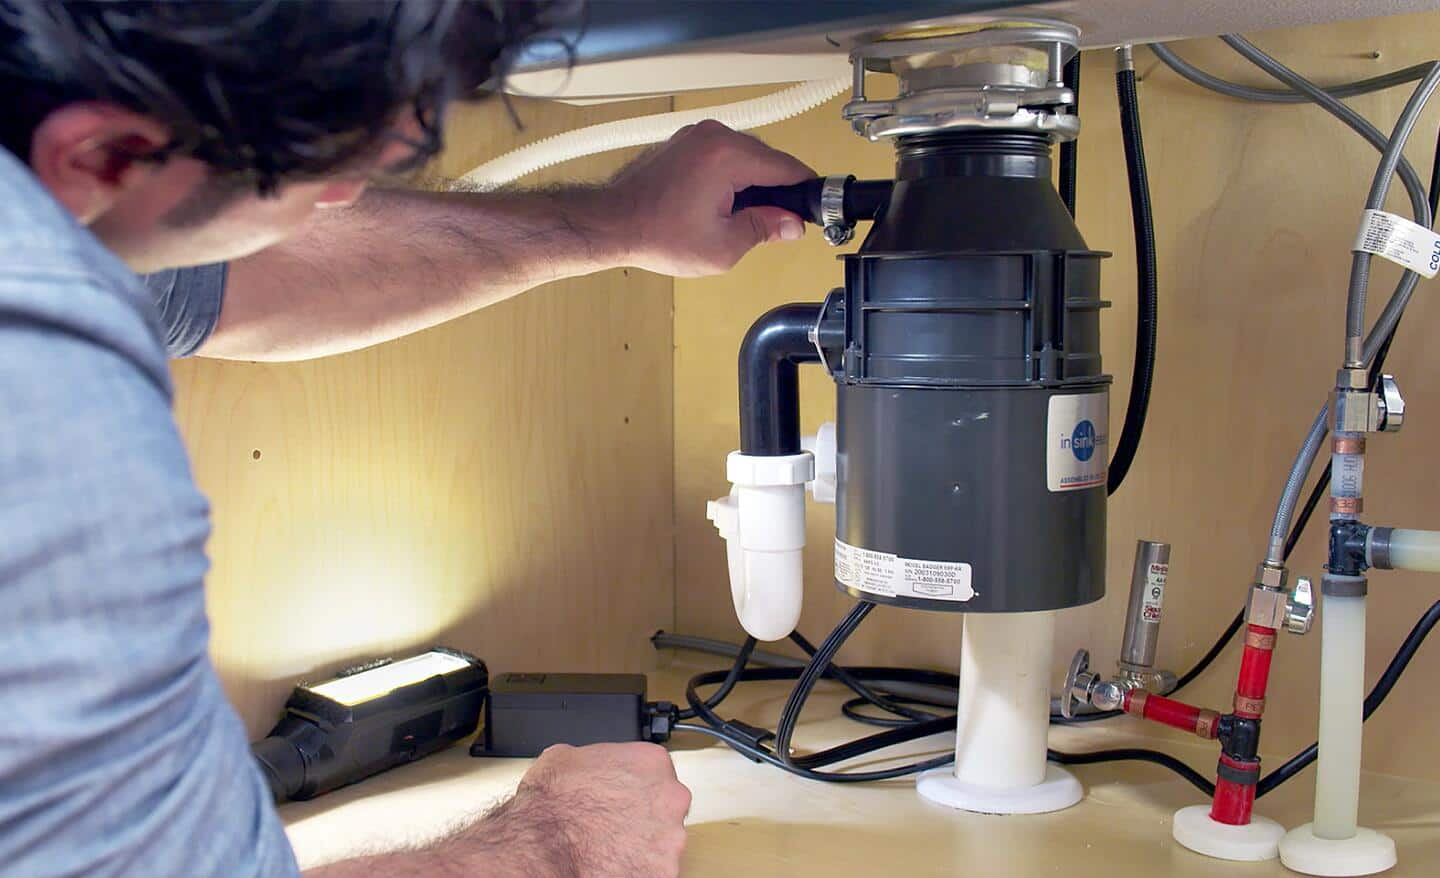
- Attach the discharge tube to the disposal’s outlet and secure with the metal clamp.
- For a dishwasher, connect the dishwasher hose to the disposal’s inlet and tighten the clamp.
- Align the discharge tube with the trap and tailpiece. Trim pipes as necessary.
- Secure all connections with slip nuts and washers.
For double sink configurations, see How To Install A Double Sink With Garbage Disposal for detailed routing instructions.
7. Testing For Leaks And Functionality
- Restore power to the disposal.
- Run cold water and operate the disposal, checking all joints for leaks.
- Tighten connections as needed.
- Test the dishwasher drain (if connected) to ensure proper water flow.
Example: Single Sink, No Dishwasher
A homeowner with a single bowl sink and no dishwasher completed the installation in under two hours by following these steps, achieving a clean, leak-free result without additional plumbing modifications.
Example: Double Sink With Dishwasher
In a two-basin setup, a Y-branch tailpiece was required to connect both sink drains to the disposal. The homeowner installed an air gap for the dishwasher line, meeting local code and preventing backflow.
Troubleshooting Common Installation Issues
Installation doesn’t always go as planned. Here are practical solutions for the most frequent challenges.
Disposal Won’t Turn On
- Ensure the unit is plugged in and the breaker is on.
- Press the reset button on the bottom of the unit.
- Check for a tripped GFCI outlet.
Persistent Leaks Under The Sink
- Inspect the flange seal; reseal with plumber’s putty if necessary.
- Tighten all slip nuts and clamps.
- Replace worn gaskets.
Dishwasher Not Draining
- Confirm the knockout plug inside the disposal is fully removed.
- Verify the hose is not kinked or clogged.
Disposal Makes Humming Noise Only
- The impeller may be jammed. Turn off power, insert an Allen wrench into the bottom slot, and manually rotate to free the jam.
Odors Or Slow Draining
- Run cold water for 30 seconds after grinding.
- Periodically clean with a mix of baking soda and vinegar.
- Avoid grinding fibrous or starchy foods that cause buildup.
Pro Tip: Always use cold water during operation to prevent fats from solidifying in the pipes.
Maintenance And Best Practices
Proper use and routine maintenance will keep your garbage disposal drain running efficiently for years.
Regular Cleaning
- Grind small ice cubes and citrus peels monthly to clean the grinding chamber and freshen the unit.
- Use a non-abrasive brush around the splash guard and baffle.
What Not To Put Down The Disposal
- Avoid fibrous foods (celery, corn husks).
- Do not grind large bones or fruit pits.
- Keep grease, oils, and fats out of the disposal.
Routine Inspections
- Check for leaks or drips under the sink every few months.
- Inspect the mounting assembly for signs of rust or loosening.
Extending Disposal Life
- Run the disposal regularly to prevent corrosion and keep parts moving.
- Only feed small amounts at a time, with water running.
- Address minor jams promptly to avoid motor damage.
Pro Tip: Refer to your disposal’s manual for specific maintenance recommendations.
Example: Disposal Lasts Over 10 Years
One homeowner’s disposal lasted 12 years with monthly cleaning and by strictly avoiding problematic items like potato peels and pasta.
Cost Comparison And Value Analysis
Understanding the cost and long-term value helps you make an informed decision about installing a garbage disposal drain.
| Installation Type | DIY Cost | Professional Cost | Estimated Time |
|---|---|---|---|
| Single Sink, No Dishwasher | $100, $250 | $250, $500 | 2, 3 hours |
| Double Sink with Dishwasher | $125, $300 | $350, $650 | 3, 4 hours |
| Replacement Only | $80, $200 | $200, $400 | 1, 2 hours |
DIY installation is significantly more cost-effective, especially if you already have the necessary tools. Professional installation is advisable for complex setups or if electrical work is required and you lack experience.
Value Over Time
- Most garbage disposals last 8, 15 years with proper care.
- The time and money saved on plumbing repairs and reduced food waste management often offset initial installation costs.
For a comprehensive comparison of disposal models and maintenance, see this Consumer Reports guide.
Real-world Installation Scenarios
Learning from practical examples can help you anticipate challenges and optimize your installation strategy.
Case Study 1: Retrofitting In An Older Home
An owner of a 1970s-era home faced limited under-sink space and outdated plumbing. They chose a compact, 1/2 HP batch feed unit to fit the cabinet. PVC adapters were used to connect to existing metal pipes. The installation took about three hours, with the most time spent modifying the drain assembly.
The result was a tidy, code-compliant setup that improved kitchen hygiene.
Case Study 2: Upgrading After A Remodel
After installing a new drop-in sink, a homeowner decided to add a disposal. They referenced How To Install A Drop-In Kitchen Sink to ensure the sink flange was compatible. The project included updating the P-trap and adding a GFCI outlet under the sink. The homeowner reported smoother food prep and fewer plumbing issues post-installation.
Case Study 3: First-time Diy Installer
A DIY enthusiast with no prior plumbing experience used online resources and the disposal’s manual. By following step-by-step instructions and double-checking all connections, they completed the project solo in half a day. Their biggest challenge was removing the old putty, but they achieved a leak-free, professional-looking installation.
Pro Tip: Take photos before disassembly to use as a reference during reassembly, especially for complex plumbing arrangements.
Frequently Asked Questions
What Should I Do If My Garbage Disposal Smells Bad, Even After Cleaning?
Persistent odors often indicate trapped food particles or grease buildup. Try cleaning the disposal with a mix of baking soda and white vinegar, followed by a flush of boiling water (with the unit off). For stubborn smells, remove the splash guard and scrub underneath with a toothbrush.
If odors persist, consider using enzyme-based cleaners specifically designed for disposals.
Is It Safe To Install A Garbage Disposal Drain If I Have A Septic System?
Not all disposals are septic-safe. Look for models labeled as “septic assist” or designed for septic systems, which add enzyme cartridges to help break down waste. Excessive food waste can overwhelm small septic tanks. Always consult your septic provider or plumber before installing a disposal with a septic system.
Can I Install A Garbage Disposal Drain On Any Type Of Sink?
Most stainless steel and cast-iron sinks are compatible, but some thinner or specialty sinks may require reinforcement to support the weight of the disposal. Composite or farmhouse sinks may need a specific flange or adapter. Always check the disposal manufacturer’s recommendations for compatibility.
What’s The Difference Between Using Plumber’s Putty And Silicone To Seal The Sink Flange?
Plumber’s putty is traditional for sealing the flange, as it remains flexible and allows easy removal later. Silicone provides a watertight seal but cures permanently, making future removal difficult. For stainless steel sinks, plumber’s putty is generally preferred; for stone or composite sinks, check the manufacturer’s guidance, as putty can stain porous materials.
How Do I Safely Remove A Jam From The Garbage Disposal?
First, turn off the power at the breaker to avoid injury. Use a flashlight to locate the jam. Insert the manufacturer’s jam-busting wrench or a 1/4-inch Allen wrench into the hex hole on the bottom of the disposal and rotate back and forth to free the impeller.
Never put your hand inside the disposal. Once cleared, restore power and test the unit.
Upgrading your kitchen with a garbage disposal drain is a practical, rewarding project that delivers lasting convenience and cleanliness. By following expert recommendations and taking safety precautions, most homeowners can achieve a professional-quality installation and enjoy the benefits of a modernized kitchen sink. Whether you’re tackling a single or double sink, or integrating a dishwasher line, the steps detailed above will help you avoid common issues and maximize your disposal’s lifespan. For more related guidance, explore resources like How To Install Kitchen Sink Plumbing and How To Install A Garbage Disposal to further enhance your kitchen’s functionality.