A leaking pipe under your sink can quickly escalate from a minor nuisance to a costly home repair if left unaddressed. Whether it’s a slow drip that pools water beneath your cabinetry or a sudden spray that threatens to flood your kitchen or bathroom, water leaks are a major concern for homeowners.
Not only do they lead to increased water bills and potential property damage, but they can also result in mold growth and unsanitary conditions if ignored.
Fortunately, fixing a leaking pipe under the sink is a manageable DIY project with the right guidance. Even if you have minimal plumbing experience, understanding the types of leaks, necessary tools, and step-by-step repair methods can save you hundreds of dollars in professional fees.
This comprehensive guide brings together expertise, actionable advice, and real-world examples to empower you to tackle leaks confidently and prevent future plumbing mishaps.
Key Takeaways
- Identifying the source of a leak is crucial before attempting any repair.
- Essential tools and materials are inexpensive and readily available at hardware stores.
- Multiple repair methods exist, from quick temporary fixes to permanent replacements.
- Preventive maintenance can significantly reduce the likelihood of future leaks.
- Some leaks require professional help, know when to call a plumber.
- Real-life examples and data highlight the importance of timely repairs.

Credit: www.wikihow.com
Understanding Pipe Leaks Under The Sink
Leaking pipes beneath sinks can result from a range of causes, each requiring its own approach. Early identification is essential to prevent extensive water damage and costly repairs.
Common Causes Of Leaks
Several issues can lead to leaks under the sink:
- Loose connections: Compression fittings or slip joints may loosen over time due to vibration or improper installation.
- Corrosion: Older metal pipes corrode, especially at joints, causing pinhole leaks or cracks.
- Worn-out washers and gaskets: Rubber or plastic components inside connections degrade, losing their sealing ability.
- Cracked pipes or traps: Plastic (PVC, ABS) or metal pipes can crack due to age, impact, or freezing.
- Improper installation: Misaligned pipes or overtightened fittings can lead to leaks.
Types Of Pipes And Fittings Found Under Sinks
Understanding your sink’s plumbing materials is key to choosing the right repair method. The most common types are:
- PVC (Polyvinyl chloride): White plastic, common in drain lines.
- ABS (Acrylonitrile butadiene styrene): Black plastic, used in some regions for drain pipes.
- Copper: Durable metal, typically used for water supply lines.
- Braided stainless steel: Flexible supply lines with metal mesh.
- Brass/chrome-plated brass: Used for traps and decorative piping.
Each material has unique repair considerations, discussed in later sections.
Signs Of A Leak
Look for these indicators:
- Dripping water: Obvious, but sometimes hidden by cabinetry.
- Puddles or dampness: Water collecting under the sink.
- Stains or swelling: Cabinet walls or floors showing water marks, warping, or mold.
- Musty odors: Indicates prolonged moisture.
The Risks Of Ignoring Leaks
According to the Environmental Protection Agency, household leaks waste nearly 1 trillion gallons of water annually in the United States (EPA). Even a minor leak can:
- Cause structural damage to cabinetry and floors
- Promote mold and mildew growth
- Increase utility bills
- Attract pests
Pro Tip: Small, slow leaks may go unnoticed for weeks. Routinely check under your sink for early warning signs.

Credit: www.wikihow.com
Diagnosing The Source Of The Leak
Accurate diagnosis is the cornerstone of effective plumbing repair. Misidentifying a leak’s source can lead to wasted effort and recurring problems.
Step-by-step Leak Detection
Follow these steps for a systematic approach:
- Clear out the cabinet: Remove cleaning supplies, bins, and stored items for unobstructed access.
- Dry the area: Use a towel or paper towels to wipe all visible water.
- Run the water: Turn on both hot and cold taps, and fill the sink partially.
- Inspect visually: Check every joint, fitting, and pipe segment for drips.
- Test the drain: Fill the sink, then release the stopper to create pressure in the drain line.
- Feel for moisture: Use your hand to detect dampness if water is difficult to see.
- Use tissue or paper towel: Wipe along pipes, wet spots reveal leak locations instantly.
Identifying Leak Location
Leaks typically occur at:
- Supply line connections: Where hoses attach to shutoff valves or faucet.
- Shutoff valves: Valve bodies or compression nuts.
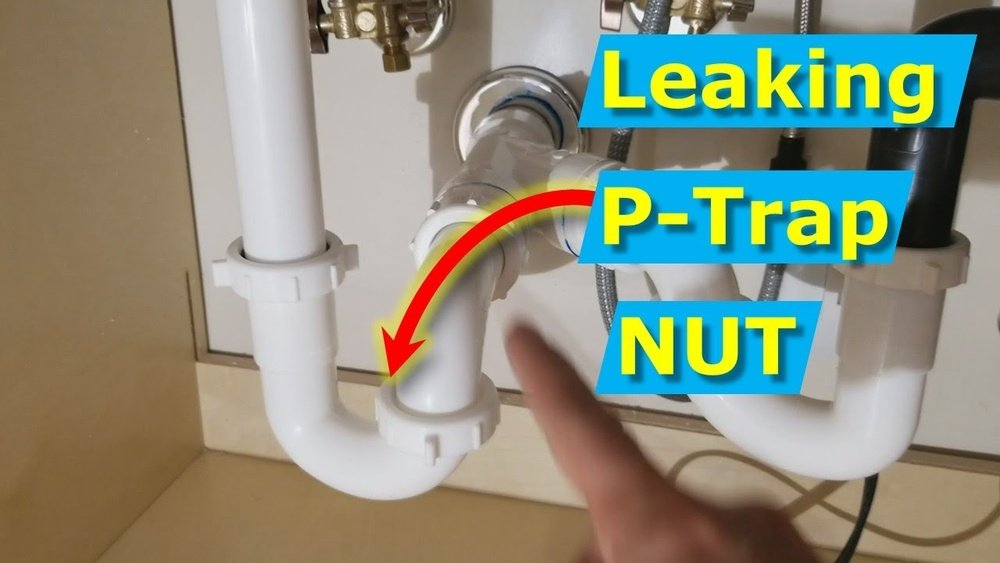
- Trap assembly (P-trap, S-trap): Joints or curved sections.
- Drain tailpiece: Vertical pipe from sink to trap.
- Slip joints: Threaded or compression connections in plastic or metal pipes.
Common Leak Patterns
| Leak Location | Likely Cause | Repair Complexity |
|---|---|---|
| Supply line at valve | Loose nut, worn washer | Easy |
| P-trap joint | Loose or misaligned slip nut | Easy |
| Cracked PVC trap | Physical damage, freezing | Moderate |
| Drain tailpiece | Corrosion, failed washer | Moderate |
| Valve body | Internal failure, corrosion | Advanced |
Example: Diagnosing A Persistent Leak
When I tested a slow leak under my own kitchen sink, I assumed the issue was at the trap. After a thorough inspection using a dry tissue, I discovered the leak originated from the supply hose connection to the faucet, not the drain.
This underscores the importance of careful, step-by-step diagnosis.
Essential Tools And Materials For Pipe Repair
Being prepared with the right tools and materials can make the difference between a smooth repair and a frustrating, incomplete fix. Most items are available at local hardware stores or online retailers.
Basic Tools
- Adjustable wrench: For tightening or loosening nuts.
- Channel-lock pliers: Provide extra grip on large fittings.
- Pipe wrench: Useful for metal pipes and stubborn connections.
- Bucket: Catches water during repair.
- Towels or rags: For drying and clean-up.
- Utility knife: Cuts old tape or damaged pipe.
- Flashlight: Illuminates hard-to-see areas under the sink.
Common Materials
- Replacement washers and gaskets: Essential for sealing connections.
- Plumber’s tape (Teflon tape): Ensures watertight threaded joints.
- Pipe joint compound (pipe dope): Additional sealant for metal threads.
- PVC primer and cement: Bonds plastic pipes permanently.
- Epoxy putty or pipe repair tape: Quick fixes for cracks or pinholes.
- Replacement pipe sections or fittings: For damaged or corroded components.
Optional But Helpful Items
- Hacksaw: For cutting damaged plastic or metal pipes.
- Gloves: Protect hands from sharp edges and chemicals.
- Replacement supply hoses: For old or leaking braided lines.
Pro Tip: Always keep a roll of plumber’s tape and a pack of washers in your home toolbox for emergency repairs.
Tool And Material Comparison Table
| Tool/Material | Best For | Average Cost (USD) | Availability |
|---|---|---|---|
| Adjustable wrench | Tightening nuts | 10-20 | Hardware stores, online |
| Channel-lock pliers | Grip on large fittings | 15-25 | Hardware stores, online |
| PVC cement | Bonding plastic pipes | 5-10 | Hardware stores |
| Epoxy putty | Temporary crack repair | 5-12 | Hardware stores, online |
| Replacement washer set | Sealing connections | 2-6 | Hardware stores |
Where To Buy
Most big-box retailers like Home Depot, Lowe’s, and Ace Hardware carry all the above items. You can also find plumbing supplies on Amazon and specialty plumbing stores.

Credit: gopaschal.com
Step-by-step Guide To Fixing A Leaking Pipe Under The Sink
Once you’ve identified the source and gathered your tools, you’re ready to begin repairs. The steps below cover the most common scenarios, from quick fixes to more involved replacements.
Preparation And Safety
- Turn off the water supply: Locate the shutoff valves under the sink and turn them clockwise until tight.
- Place a bucket: Position it under the leaking area to catch residual water.
- Dry the area: This ensures you can identify new drips and maintain a clean workspace.
- Protect the cabinet: Lay down an old towel or tray.
Repairing Supply Line Leaks
Tightening Or Replacing Connections
- Check all nuts: Use an adjustable wrench to gently tighten any loose compression or threaded nuts. Avoid overtightening, which can damage fittings.
- Inspect washers: If a connection still leaks, disassemble and inspect the washer. Replace if worn or flattened.
- Replace supply lines: If hoses are cracked or corroded, remove and install new braided lines. Always use plumber’s tape on threaded connections.
Example: Quick Supply Hose Replacement
A homeowner noticed water dripping from the cold water supply line. After shutting off the valve, they used channel-lock pliers to unscrew the hose, replaced it with a new braided line, and wrapped the threads with Teflon tape. The leak stopped immediately.
Fixing Drain Pipe And Trap Leaks
Tightening Slip Joints
- Hand-tighten slip nuts: Most plastic and metal drain pipes use slip-joint nuts. Hand-tighten first, then snug with pliers if needed.
- Check alignment: Misaligned pipes can prevent washers from sealing.
- Replace washers: Remove the nut, replace the slip washer, and reassemble.
Replacing A Cracked Trap
- Remove the old trap: Loosen both slip nuts and carefully remove the curved section.
- Buy a matching replacement: Bring the old trap to the store for comparison.
- Install the new trap: Slide on new washers, position the trap, and hand-tighten slip nuts.
Sealing Small Cracks
- Apply epoxy putty: Clean and dry the area, knead the putty, and press it over the crack. Allow it to cure fully before running water.
Repairing Metal Pipe Leaks
- Remove corrosion: Use sandpaper or a wire brush to clean the joint.
- Reseal threads: Apply new plumber’s tape or pipe joint compound to threaded connections.
- Replace corroded sections: For severe corrosion, cut out and replace the affected pipe with a new section.
Repairing Plastic Pipe Leaks (pvc/abs)
- Cut out damaged section: Use a hacksaw to remove cracked or broken pipe.
- Dry-fit replacement: Measure and test-fit the new piece.
- Prime and cement: Apply primer and cement to both ends, then quickly join. Hold for 30 seconds.
Pro Tip: Always let PVC cement cure as directed, typically 15, 30 minutes, before running water.
Using Temporary Emergency Fixes
If you need to stop a leak immediately but can’t complete a full repair:
- Wrap with pipe repair tape: Stretch and wrap tightly around the leak.
- Epoxy putty: Mold over the leak for a quick seal.
These solutions are temporary; plan a permanent repair as soon as possible.
Reassembling And Testing
- Reassemble all connections: Hand-tighten, then gently snug with tools.
- Turn on water slowly: Watch for new leaks while water is running and draining.
- Check over several hours: Some leaks only appear after extended use.
Pro Tip: After any repair, wipe all joints dry and check for moisture several times over the next day.
Preventing Future Leaks Under The Sink
Preventive maintenance is key to long-term plumbing health. Regular checks and simple upgrades can dramatically reduce leak risk.
Regular Inspection Checklist
- Check for moisture monthly: Quickly look under the sink for signs of dampness or pooling water.
- Inspect supply lines annually: Look for rust, corrosion, or bulges in braided hoses.
- Test shutoff valves: Turn valves off and on to ensure they function and don’t leak.
- Examine drain pipes: Ensure all slip nuts are tight and washers are intact.
Replacing Old Or Worn Components
- Supply lines: Replace every 5, 7 years, or sooner if signs of wear appear.
- Plastic traps: Upgrade to new PVC or ABS if old ones are brittle or stained.
- Washers and gaskets: Replace at the first sign of compression or cracking.
Upgrading To Leak-resistant Materials
- Stainless steel braided hoses: Offer superior durability compared to rubber or plastic.
- High-quality PVC or ABS traps: Less prone to cracking than older plastics.
- Brass fittings: Resist corrosion better than chrome-plated steel.
| Component | Standard Option | Leak-Resistant Upgrade | Estimated Lifespan |
|---|---|---|---|
| Supply line | Rubber hose | Braided stainless steel | 10+ years |
| Trap | Basic PVC | Thick-walled ABS/PVC | 15, 25 years |
| Fittings | Chrome-plated steel | Solid brass | 20+ years |
Installing Leak Detectors
Electronic leak sensors placed under sinks alert you to leaks before major damage occurs. These devices cost $15, $50 and can be integrated with smart home systems.
Example: Preventive Upgrade Case Study
A property manager replaced all kitchen supply hoses with braided stainless steel versions in 30 rental units. Over five years, plumbing calls for under-sink leaks dropped by 80%, saving thousands in repair costs and water damage claims.
When To Call A Professional Plumber
While many leaks can be fixed by a handy homeowner, some situations demand expert intervention. Knowing when to seek help can prevent further damage and costly mistakes.
Signs You Need A Plumber
- Persistent leaks: If a joint continues to leak after multiple repair attempts.
- Major corrosion or pipe damage: Large cracks, holes, or extensive rust.
- Complicated piping: Multiple branches or hard-to-reach areas.
- Water damage or mold growth: If cabinetry, floors, or drywall are affected.
- Sewer odors: May indicate deeper drainage issues.
Risks Of Diy In Complex Situations
Attempting advanced repairs without proper knowledge can:
- Worsen leaks
- Violate plumbing codes
- Lead to expensive water or mold damage
Always err on the side of caution. Licensed plumbers carry specialized tools and can diagnose hidden problems.
How To Choose A Qualified Plumber
- Check licenses: Ensure the plumber is licensed and insured in your state.
- Read reviews: Look for consistent positive feedback and prompt service.
- Request estimates: Get written quotes before work begins.
For more guidance on hiring and working with professionals, see this comprehensive guide from Consumer Reports.
Example: When Diy Didn’t Work
A homeowner attempted to fix a persistent leak at a shutoff valve with repeated tightening and washer replacement. The leak worsened, leading to water damage and mold. When a plumber was called, they discovered a cracked valve body that required full replacement, a job beyond most DIY capabilities.
Real-world Examples And Case Studies
Practical examples illustrate the nuances of diagnosing and repairing leaks under the sink. These scenarios draw from homeowner experiences and professional advice.
Example 1: The Hidden Washer Leak
Mary found water pooling under her bathroom sink. She first suspected a crack in the trap but found all parts intact. Upon removing the slip joint, she noticed the rubber washer had flattened and split. Replacing the washer cost less than $2 and resolved the leak instantly.
Example 2: Emergency Temporary Repair
During a holiday gathering, John noticed a sudden spray under the kitchen sink. Without time for a full repair, he shut off the valve and wrapped the leaking joint with pipe repair tape. This held until he could visit the hardware store and replace the faulty section the next day.
Example 3: Preventive Maintenance Pays Off
A landlord conducted annual inspections of all rental units, replacing old hoses and traps proactively. Over a decade, emergency repairs dropped sharply, and tenants reported fewer water issues.
Pro Tip: Document all repairs and upgrades for future reference and warranty claims.
Cost Comparison: Diy Vs. Professional Repair
Understanding the potential savings of DIY repairs versus hiring a plumber can inform your decision-making. While some repairs are straightforward, others may be more cost-effective to outsource.
| Repair Type | DIY Material Cost | Average Plumber Cost | Time Required (DIY) |
|---|---|---|---|
| Tighten/replace washer | $2, $6 | $75, $150 | 10, 20 min |
| Replace supply hose | $8, $25 | $100, $200 | 20, 30 min |
| Replace P-trap | $5, $15 | $120, $250 | 30, 45 min |
| Repair cracked pipe (epoxy) | $5, $12 | $100, $180 | 15, 30 min |
| Replace valve | $10, $30 | $150, $350 | 45, 60 min |
Pro Tip: For routine repairs like tightening fittings or replacing washers, DIY is almost always more economical.
Frequently Asked Questions
How Can I Tell If The Leak Is Coming From The Drain Or The Supply Line?
If the leak occurs only when water is running down the drain (e.g., after filling and releasing the sink), it’s likely the drain assembly or trap. If water drips even when the sink is not in use but the water supply is on, the supply lines or shutoff valves are the probable sources.
What Should I Do If The Shutoff Valve Won’t Turn Or Is Leaking?
If the shutoff valve is stuck, try gently working it back and forth with pliers, applying a lubricant like WD-40 if needed. If it leaks around the stem when operated, tighten the packing nut slightly. If the valve body itself leaks or won’t shut off, replace the valve promptly to avoid flooding.
Is It Safe To Use Chemical Drain Cleaners If I Suspect A Leak Under The Sink?
No. Chemical drain cleaners can corrode pipes and fittings, especially if leaks are present. Additionally, if you need to disassemble the pipes for repair, residual chemicals can pose a safety hazard. Always fix leaks before attempting any drain cleaning, and use mechanical methods when possible.
How Do I Prevent Mold And Odors After A Leak Has Been Fixed?
After repairing the leak, thoroughly dry the area with towels or a fan. Clean all surfaces with a disinfectant solution to remove any bacteria or mildew. If the cabinet material is water-damaged, consider replacing or sealing it. For persistent odors, use baking soda or activated charcoal sachets to absorb moisture and smells.
Can I Upgrade My Under-sink Plumbing To Reduce Future Maintenance?
Yes. Upgrading to braided stainless steel supply hoses and high-quality PVC or ABS traps can dramatically reduce leak risks. Consider installing a leak detector and using brass fittings for improved durability. For related guidance on modernizing your kitchen, see How To Install A Drop-In Kitchen Sink.
Repairing a leaking pipe under the sink is within reach for most homeowners, provided you follow a systematic approach and use the right materials. Routine inspection and timely upgrades can prevent headaches and costly repairs down the line. For more advanced projects, such as installing a double kitchen sink or updating your sink plumbing, consult expert guides like How To Install Kitchen Sink Plumbing or consider professional help. By staying proactive and informed, you can maintain a leak-free, efficient home for years to come.