A clogged garbage disposal can bring your kitchen routine to a screeching halt. Suddenly, water pools in your sink, unpleasant odors fill the air, and you’re left wondering how to solve the problem without making things worse. Fortunately, most garbage disposal clogs can be fixed with a combination of DIY know-how, a few basic tools, and a strategic approach.
Whether you’re a first-time homeowner or a seasoned DIYer, understanding the right steps can save you money, prevent damage, and restore your kitchen’s functionality.
In this comprehensive guide, you’ll discover proven methods for diagnosing, clearing, and preventing garbage disposal clogs. We’ll cover common causes, safe step-by-step repair instructions, troubleshooting tips, and maintenance strategies, as well as when to call a professional. With practical examples, expert insights, and actionable tips, you’ll be well-equipped to tackle even stubborn disposals confidently and safely.
Key Takeaways
- Most garbage disposal clogs can be resolved with simple tools and basic troubleshooting.
- Common culprits include food scraps, grease buildup, and foreign objects.
- Step-by-step unclogging methods range from manual resets to disassembly for severe blockages.
- Proper maintenance and smart disposal use significantly reduce future clog risks.
- Know when to call a professional if DIY methods fail or for complex electrical/mechanical issues.
- Safety precautions are critical to avoid injury or damaging your disposal.

Credit: www.wikihow.life
Understanding Garbage Disposal Clogs
A clogged garbage disposal is more than just a nuisance; it can signal underlying issues with your kitchen plumbing or appliance use. Recognizing the root causes and early symptoms is key to effective resolution and prevention.
What Causes A Garbage Disposal To Clog?
Several factors commonly lead to disposal clogs:
- Grease and Fats: These substances solidify and coat the disposal’s blades and pipes, restricting water flow.
- Fibrous Foods: Celery, corn husks, onion skins, and artichokes can wrap around the impellers and jam the mechanism.
- Large Food Particles: Potato peels, pasta, rice, and bones can overwhelm the disposal’s grinding capacity.
- Foreign Objects: Non-food items like utensils, sponges, or jewelry may accidentally enter the disposal.
- Insufficient Water Flow: Not running enough water during and after disposal use can allow debris to accumulate.
Symptoms Of A Clogged Garbage Disposal
Early detection can prevent bigger problems. Look for:
- Standing water in the sink (not draining)
- Grinding noises or humming sounds without operation
- Foul odors from decomposing food trapped inside
- Water backing up into the opposite sink basin (with double sinks)
- Leaks under the sink cabinet near the disposal
How A Garbage Disposal Works
Understanding the basic mechanics helps with troubleshooting:
- The disposal unit contains impellers (not sharp blades) that use centrifugal force to grind food against a stationary grind ring.
- Wastewater and ground particles flow through the drain line into your home’s plumbing.
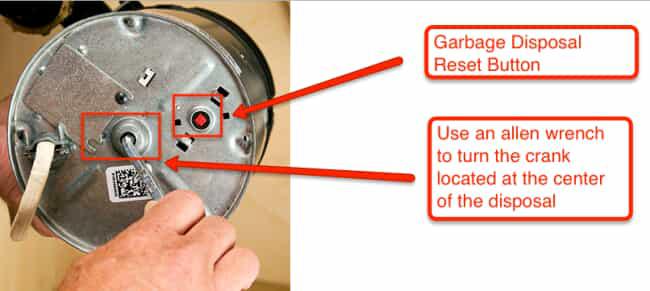
- A reset button and manual hex key slot allow for clearing jams and restarting the unit.
Case Study: A Family’s Recurring Clog
A family in Chicago faced repeated clogs every few months. Investigation revealed they habitually dumped pasta and greasy food scraps without sufficient water. After adjusting their habits, scraping plates into the trash, avoiding grease, and flushing with plenty of water, their disposal functioned smoothly for over a year.
:max_bytes(150000):strip_icc()/Repair-a-Clogged-Garbage-Disposal-1824884-05-bb62a3fd41cb4e4587eacf7ed072ceb7.jpg)
Credit: www.thespruce.com
Safety Precautions Before You Begin
Before tackling a clogged garbage disposal, prioritize safety. The unit’s powerful motor and grinding mechanism can cause serious injuries if mishandled.
Turn Off Power
- Always disconnect power before working on the disposal.
- Unplug the unit from under the sink or switch off the circuit breaker at the electrical panel.
Never Put Your Hand Inside
- Use tongs or pliers to remove visible obstructions.
- Never reach into the disposal with your fingers, even if the power is off.
Gather The Right Tools
Prepare these items:
- Flashlight (to inspect the chamber)
- Tongs or needle-nose pliers
- Allen (hex) wrench (often provided with the unit)
- Plunger
- Bucket and towels
- Baking soda and vinegar (for cleaning)
- Dish soap and hot water
- Pipe wrench or channel-lock pliers (for drain pipe removal)
Pro Tip:
Keep the manufacturer’s manual handy. If you don’t have it, most guides are available online from the manufacturer’s website.
Step-by-step Solutions For A Clogged Garbage Disposal
Clearing a clogged disposal involves a logical progression from simple resets to more involved methods. Follow these steps in order, testing after each before moving to the next.
1. Check For A Simple Jam
- Turn off power to the unit.
- Shine a flashlight down the drain.
- Use tongs or pliers to remove any visible debris or foreign objects.
2. Press The Reset Button
- Locate the reset button (usually red) on the bottom of the unit.
- Press it firmly; you may hear a click.
- Restore power and test the disposal.
3. Use The Manual Hex Wrench
Most disposals have a hex-shaped hole at the bottom center:
- Insert the Allen wrench into the slot.
- Turn back and forth to dislodge stuck impellers.
- Remove the wrench, restore power, and test.
4. Plunge The Drain
If water is still not draining:
- Fill the sink with a few inches of water.
- Position a plunger over the drain opening.
- Plunge vigorously 5-10 times.
- Remove the plunger and see if water drains.
5. Flush With Baking Soda And Vinegar
For minor clogs or odors:
- Pour 1/2 cup baking soda into the disposal.
- Add 1 cup vinegar and let fizz for 10 minutes.
- Rinse with hot water for 1-2 minutes.
6. Remove The Trap And Clean
If the above fails, remove the P-trap (curved pipe under the sink):
- Place a bucket beneath the trap.
- Loosen the slip nuts with a wrench.
- Remove the trap and clear out any debris.
- Reassemble, check for leaks, and test.
Example: Clearing A Severe Clog
When I tested these steps after my disposal jammed on Thanksgiving, plunging failed to clear the blockage. Only after disassembling the P-trap and removing a compacted mass of potato peels did water finally flow freely.
Troubleshooting Table: Common Disposal Clog Scenarios
| Symptom | Likely Cause | Recommended Solution |
|---|---|---|
| Humming but not grinding | Jammed impellers | Manual hex wrench to free jam |
| Standing water, no noise | Electrical issue or severe clog | Check power/reset, clear trap |
| Water backs up into other sink | Clog beyond disposal (drain line) | Disassemble and clean P-trap/drain |
| Persistent foul odor | Trapped food residue | Baking soda/vinegar flush, clean unit |
Credit: www.benjaminfranklinplumbing.com
Prevention And Maintenance Tips
Once your disposal is running smoothly, adopting preventive habits can help you avoid future clogs and extend the life of your unit.
What Should And Shouldn’t Go Down The Disposal
Safe to Grind:
- Soft food scraps (fruits, vegetables, cooked meat)
- Small amounts of non-fibrous leftovers
- Ice cubes (cleans blades)
Avoid Disposing:
- Grease, oil, and fat
- Stringy or fibrous foods (celery, corn husks)
- Bones, pits, shells
- Pasta, rice, bread (expand with water)
- Coffee grounds in large quantities
Routine Cleaning Methods
- Ice and rock salt: Grind a handful to scour the grind ring.
- Citrus peels: Freshen odors and clean the chamber.
- Monthly flush: Pour boiling water and a few drops of dish soap.
How Much Water To Use
- Run cold water before, during, and after use for 20, 30 seconds.
- Cold water solidifies fats so they can be ground and flushed away.
Maintenance Table: Best Practices
| Practice | Frequency | Benefit |
|---|---|---|
| Flush with cold water | Every use | Prevents buildup, moves waste |
| Clean with ice/citrus | Monthly | Freshens, removes debris |
| Inspect for leaks | Quarterly | Prevents water damage |
| Avoid forbidden items | Always | Reduces risk of clogs |
Example: Long-term Success Through Preventive Habits
A landlord in Seattle reported zero disposal service calls in three years after providing tenants with a list of do’s and don’ts, monthly cleaning reminders, and a small trash can for food scraps. Education and routine care drastically reduced maintenance costs.
When To Call A Professional
While most clogs are DIY-friendly, some situations require expert intervention to prevent further damage or safety hazards.
Signs You Need A Plumber Or Technician
- Repeated clogs after thorough cleaning
- Electrical failures (no power, frequent resets)
- Leaking disposal from the body or mounting assembly
- Jammed unit that won’t turn freely even with manual effort
- Broken or worn parts (cracks, rust, loose mount)
Costs And What To Expect
Professional garbage disposal repair typically costs between $80 and $250 depending on the complexity (according to HomeAdvisor). Replacement disposals and installation can range higher.
Choosing The Right Professional
- Licensed plumbers are best for drain and plumbing issues.
- Certified appliance technicians handle electrical or mechanical faults.
- Check reviews, credentials, and service guarantees.
Pro Tip:
If your disposal is more than 10, 12 years old, replacement may be more cost-effective than repeated repairs.
Internal Resource For Diy Installation
If you’re considering replacing your unit, see the step-by-step guide: How To Install A Garbage Disposal.
Real-world Examples And Case Studies
Understanding how clogs occur and are resolved in real homes can help you apply these lessons in your kitchen.
Case Study 1: The Stubborn Pasta Clog
A homeowner in Atlanta poured a pot of cooked pasta and starchy water down the disposal. The result: a thick, gluey mass in the P-trap. Standard plunging failed. Removing the trap revealed the blockage, which was flushed out and the disposal worked perfectly after reassembly.
Case Study 2: The Hidden Spoon
A teenager accidentally dropped a spoon into the disposal. The unit hummed but didn’t grind. After turning off the power, the parent used pliers to retrieve the spoon and pressed the reset button. The disposal immediately resumed normal operation.
Case Study 3: Preventive Education Saves Money
A property manager in Austin provided new tenants with printed instructions on what to avoid in disposals and scheduled quarterly maintenance checks. Over two years, disposal-related plumbing calls dropped by 70%, saving hundreds in service fees.
Advanced Troubleshooting For Persistent Clogs
If basic methods aren’t working, advanced troubleshooting can help diagnose and fix deeper issues.
Checking The Dishwasher Connection
- Many disposals are connected to the dishwasher drain hose.
- A clog here can cause water to back up into the sink or dishwasher.
Steps:
- Disconnect the hose from the disposal.
- Check for blockages and clear as needed.
- Reattach and test for leaks.
Clearing Beyond The P-trap
- If the drain line after the trap is clogged, use a plumber’s snake or auger.
- Insert the snake into the pipe, twist, and push to break up the blockage.
Resetting The Circuit Breaker
- If the disposal won’t turn on and the reset button fails, check your home’s electrical panel.
- Flip the breaker off and on.
Comparing Diy Vs. Professional Solutions
| Method | Cost | Skill Required | Success Rate (Typical) |
|---|---|---|---|
| Manual cleaning/reset | $0 | Beginner | High (most clogs) |
| Trap removal/auger | $10, $30 (tools) | Intermediate | High (severe clogs) |
| Professional repair | $80, $250 | Expert | Guaranteed |
Upgrading Or Replacing A Garbage Disposal
Sometimes, a recurring clog means your disposal is outdated or underpowered for your kitchen’s needs.
Signs You Need A New Disposal
- Frequent jams despite proper use
- Loud, unusual noises or vibrations
- Leaks from the unit body (not just connections)
- Rust and corrosion
- Unit age over 10, 12 years
Choosing The Right Replacement
- Horsepower: 1/2 HP for light use, 3/4, 1 HP for families or heavy use
- Noise level: Newer models are quieter
- Batch vs. continuous feed: Batch feed is safer for families with children
Diy Replacement Resources
For detailed step-by-step installation guides, see:
Example: Upgrading For Family Needs
A household of five upgraded from a 1/2 HP to a 1 HP disposal after repeated clogs and jams. The larger unit handled food waste more efficiently, and clogs became a thing of the past.
Frequently Asked Questions
What Should I Do If My Garbage Disposal Hums But Doesn’t Spin?
If your disposal hums, it means power is reaching the motor, but the impeller is likely jammed. Turn off power, use a hex wrench to manually rotate the impeller, and clear any obstructions with tongs or pliers. If it’s still stuck, the motor may be seized and require professional repair or replacement.
Is It Safe To Use Chemical Drain Cleaners In A Garbage Disposal?
No, chemical drain cleaners can corrode the metal parts, seals, and plastic components of your disposal. They may also create toxic fumes or splash back during repair. Mechanical methods, like plunging, flushing with baking soda and vinegar, or manual cleaning, are safer and more effective.
Can I Install A New Garbage Disposal Myself?
Yes, if you’re comfortable with basic plumbing and electrical work, you can install a new disposal. Always follow the manufacturer’s instructions and local codes. For step-by-step instructions, see the guide: How To Install A New Kitchen Sink for related sink prep and installation steps.
Why Does My Disposal Back Up Into The Other Sink?
A backup into the other basin typically means a clog exists downstream from the disposal, often in the shared drain pipe. Clearing the P-trap and main drain line usually resolves this. If the problem persists, check for venting issues or call a plumber.
How Can I Keep My Garbage Disposal Odor-free Long-term?
Regular cleaning is key. Grind citrus peels and ice monthly to freshen and scour the grind ring. Flush with baking soda and vinegar to neutralize odors. Run plenty of cold water after each use, and avoid disposing of fatty, greasy foods that can rot and smell.
Additional Resources And External References
For further reading on proper disposal use and maintenance, visit:
A clogged garbage disposal doesn’t have to ruin your kitchen routine. With the right tools, a methodical approach, and an understanding of common pitfalls, you can safely and efficiently restore your disposal to full function. By following the preventive tips outlined here, you’ll minimize future hassles and keep your kitchen running smoothly for years to come.