A leaky or clogged drain pipe under your kitchen sink can quickly turn into a messy, disruptive, and potentially costly problem. Whether you’re dealing with slow drainage, water pooling under the cabinet, or persistent odors, tackling the issue promptly is essential for maintaining a functional kitchen and avoiding water damage.
But while a professional plumber can always help, many kitchen sink drain pipe problems can be fixed with some basic tools, a little patience, and the right guidance.
This comprehensive guide empowers homeowners and DIY enthusiasts to fix drain pipes under the kitchen sink with confidence. We’ll cover everything from identifying the problem to selecting the right replacement parts, step-by-step repair instructions, troubleshooting complex issues, and tips for preventing future problems. With real-world examples, clear tables, and expert insights, you’ll be equipped to restore your kitchen’s plumbing, and your peace of mind.
Key Takeaways
- Most kitchen sink drain pipe issues, including leaks and clogs, can be fixed with basic tools and DIY know-how.
- Proper diagnosis is crucial: Pinpoint the exact source of leaks or blockages before attempting repairs.
- Replacing old, cracked, or corroded pipes is often more effective than patching, especially for long-term durability.
- Regular maintenance and smart installation can prevent many common drain pipe problems.
- Safety first: Always turn off water supply and protect yourself from contaminated water before starting repairs.
- Some complex issues may require a professional plumber for safe and lasting results.

Credit: www.wikihow.com
Understanding Your Kitchen Sink Drain Pipe System
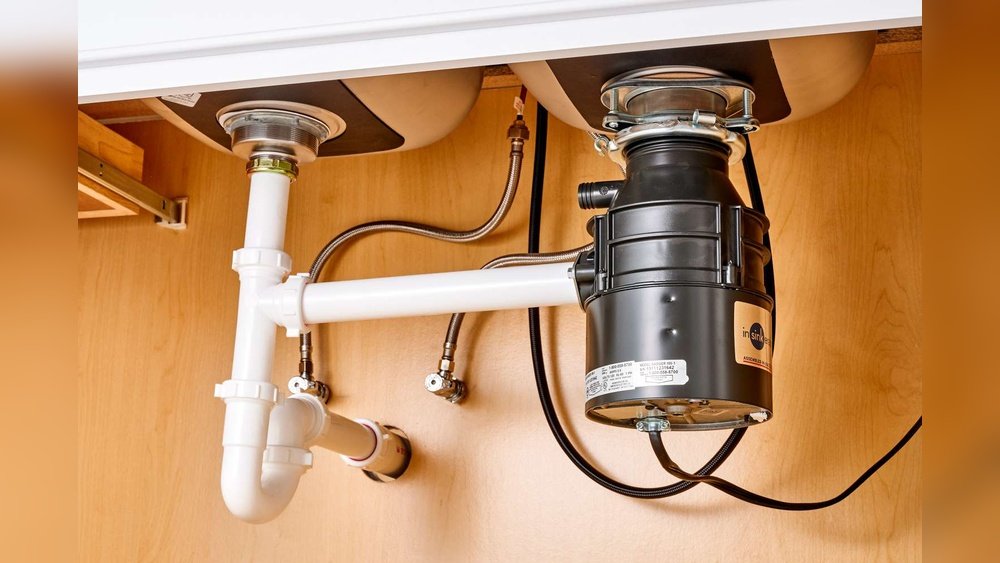
To fix a drain pipe under the kitchen sink, it’s essential to first understand its components and how they work together. The typical kitchen sink drain assembly consists of several parts, each with a specific function.
Main Components Of A Kitchen Sink Drain
- Sink Strainer: The metal or plastic basket that fits into the sink’s drain hole, filtering out large debris.
- Tailpiece: The vertical pipe that connects directly to the strainer and extends downward.
- Slip Joint Nuts and Washers: These create watertight seals between pipe sections.
- P-Trap: The distinctive U-shaped pipe that traps water to block sewer gases.
- Trap Arm: The horizontal pipe connecting the P-trap to the wall drain.
- Branch Drain: The pipe within the wall that carries wastewater to the main household drain.
Each joint and section can become a potential failure point due to age, wear, or improper installation.
Types Of Kitchen Sink Drain Pipes
Kitchen sink drain pipes are typically made from one of three materials:
| Material | Pros | Cons | Common Issues |
|---|---|---|---|
| PVC (Polyvinyl Chloride) | Lightweight, inexpensive, easy to cut/install | Less durable under heat, can become brittle | Cracks, loose fittings |
| ABS (Acrylonitrile Butadiene Styrene) | Strong, rigid, easy to work with | UV-sensitive, not allowed everywhere | Joint leaks, breakage |
| Metal (Chrome/Brass) | Durable, attractive finish | Corrosion, cost, harder to cut | Rust, corrosion, leaking joints |
Pro Tip: Always check your local building codes before replacing drain pipes, as some regions restrict certain materials.
Common Problems And Their Causes
- Leaks: Often from loose connections, cracked pipes, or failed gaskets.
- Clogs: Caused by food debris, grease, or foreign objects.
- Odors: Usually due to trapped debris, dried-out traps, or improper venting.
- Corrosion: More common in metal pipes, resulting in pinhole leaks or weakened joints.
Understanding these basics will help you accurately diagnose and address the issue under your kitchen sink.
:max_bytes(150000):strip_icc()/replacing-a-sink-p-trap-2718773-hero-f3f65fbc400e41438c4d8280de025fc6.jpg)
Credit: www.thespruce.com
Diagnosing The Problem: Leaks, Clogs, And Odors
Before grabbing a wrench or calling a plumber, take time to diagnose the precise problem. A careful inspection can save hours of unnecessary work and ensure the right fix.
Locating Leaks
Leaks are often visible as water pooling under the sink or damp cabinet floors. To pinpoint the source:
- Dry the area thoroughly with a towel.
- Run water in the sink for several minutes.
- Check each joint and connection for signs of dripping or seepage.
- If you see moisture, mark the location with tape or a marker.
Warning: If you notice mold, warped cabinetry, or a musty smell, the leak may be long-standing and require further inspection.
Identifying Clogs
Symptoms of a clogged drain include:
- Slow draining water
- Gurgling sounds from the pipe
- Water backing up into the sink
To confirm a clog:
- Fill the sink with a few inches of water.
- Release the drain plug and observe the flow.
- If water drains slowly or not at all, the clog is likely in the trap or branch drain.
Tracing Odors
Persistent odors may indicate:
- Rotting debris caught in the P-trap
- A dry P-trap (water has evaporated, allowing sewer gas in)
- Improper venting or a broken vent pipe
Pouring a small amount of water into the drain can restore the trap seal, while a thorough cleaning may be needed for lingering smells.
Real-world Example: Diagnosing A Hidden Leak
When I tested a leaky kitchen sink in an older home, the visible drip came from the trap arm joint. However, upon closer inspection, the actual source was a hairline crack in the tailpiece above the joint. This underscores the importance of a full inspection before starting repairs.
Tools And Materials You’ll Need
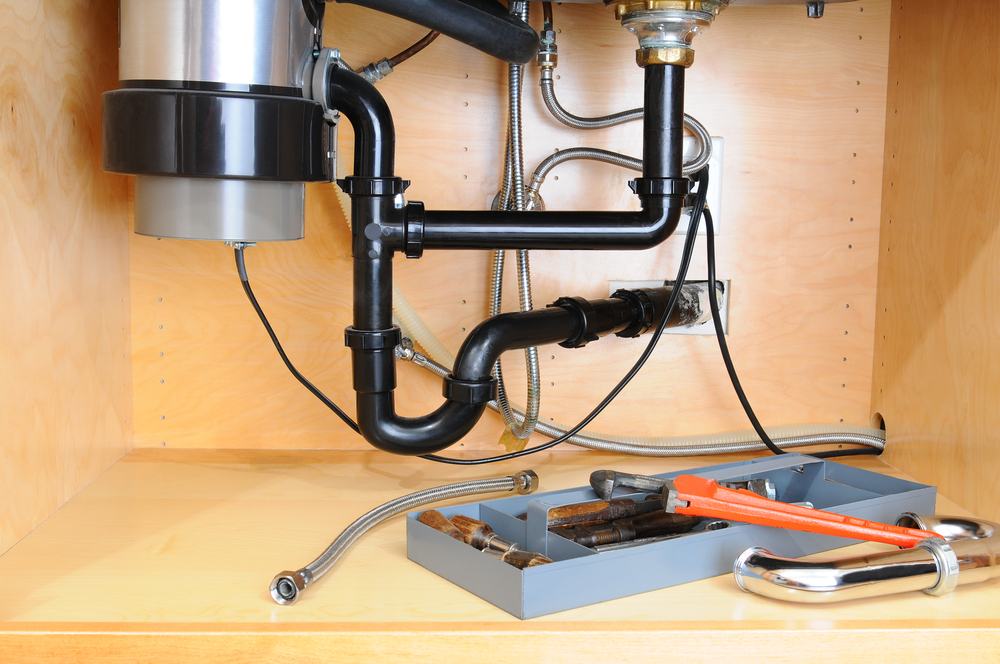
Having the right tools and supplies is half the battle when fixing kitchen sink drain pipes. Here’s a comprehensive list to get you started.
Essential Tools
- Adjustable wrench: For tightening and loosening slip nuts.
- Channel-lock pliers: Useful for gripping and turning pipes.
- Basin wrench: Especially handy for hard-to-reach nuts.
- Pipe cutter or hacksaw: For cutting plastic or metal pipes.
- Bucket and towels: To catch water and protect cabinetry.
- Flashlight: For better visibility under the sink.
Replacement Parts And Materials
- P-trap kit: Includes trap, washers, and nuts.
- Tailpiece: If the existing one is cracked or corroded.
- PVC or metal pipe sections: As needed for damaged sections.
- Slip joint washers and nuts: For watertight connections.
- Plumber’s putty or Teflon tape: For sealing threaded joints.
- Pipe thread sealant: For metal-to-metal connections.
Optional Items
- Drain auger (snake): For stubborn clogs further down the line.
- Plunger: Useful for dislodging minor blockages.
- Pipe brush: For cleaning inside pipes and fittings.
- Disposable gloves: To protect your hands from grime and bacteria.
Pro Tip: Purchase a universal P-trap kit, these often fit most modern sinks and include all necessary washers and nuts.
Credit: www.wmhendersoninc.com
Step-by-step Guide: How To Fix A Drain Pipe Under Your Kitchen Sink
Once you’ve diagnosed the issue and gathered your tools, follow these step-by-step instructions to fix the most common drain pipe problems under a kitchen sink.
Safety And Preparation
- Turn off the water supply to the sink (if available).
- Place a bucket under the drain assembly to catch any residual water.
- Clear out the cabinet for easy access and to prevent damage to stored items.
- Wear gloves and safety glasses if working with dirty water or chemicals.
Removing The Old Drain Pipe
Step 1: Loosen Slip Joint Nuts
- Use an adjustable wrench or your hands to unscrew the slip joint nuts at each connection (tailpiece, P-trap, trap arm).
- Carefully wiggle each section free.
- If the nuts are stuck, apply penetrating oil and allow it to sit for a few minutes.
Step 2: Remove The P-trap
- Slide the P-trap and attached pipes out from under the sink.
- Pour any trapped water into the bucket.
Step 3: Inspect All Parts
- Check for cracks, corrosion, or worn washers.
- Identify which sections need replacement and which can be reused.
Cleaning And Preparing For Reinstallation
- Clean pipe ends and fittings with a rag.
- Remove old plumber’s putty or debris from mating surfaces.
- Test-fit new parts to ensure proper alignment and length.
Example: In one repair, a misaligned trap arm caused persistent leaks. After cutting a new, properly sized section, the leak stopped immediately.
Installing The New Drain Pipe
Step 1: Assemble The P-trap Kit
- Slide slip joint washers and nuts onto each pipe section, facing the correct direction.
- Dry-fit all components before tightening.
Step 2: Connect The Tailpiece
- Insert the new or cleaned tailpiece into the sink strainer.
- Tighten the slip nut by hand, then give an extra quarter-turn with pliers.
Step 3: Attach The P-trap
- Connect one end of the P-trap to the tailpiece and the other to the trap arm.
- Adjust the alignment so all pipes fit snugly without force.
- Tighten all slip nuts evenly, avoid over-tightening, as this can crack plastic fittings.
Step 4: Secure The Trap Arm
- Slide the trap arm into the wall drain fitting.
- Tighten the slip nut or compression fitting.
Testing For Leaks
- Run water in the sink for several minutes.
- Check each joint for leaks, tightening as necessary.
- Wipe connections dry and inspect again after a few minutes.
If leaks persist, disassemble and ensure washers are seated correctly and pipes are not cross-threaded.
Special Case: Fixing A Metal Pipe Leak
For small leaks in metal pipes, a pipe repair clamp or epoxy putty can provide a temporary fix. However, replacing the damaged section is usually best for long-term durability.
Pro Tip: If you’re replacing multiple sections or upgrading to PVC, consider reading How To Install Kitchen Sink Plumbing for a complete installation overview.
Dealing With Clogs: Clearing And Preventing Blockages
Clogs are a frequent culprit behind slow or stopped drainage under the kitchen sink. Addressing them promptly will keep your plumbing working smoothly.
Clearing A Basic Clog
- Remove the P-trap as described in the previous section.
- Check the trap for debris, often, food scraps or grease are lodged here.
- Use a pipe brush to clean the inside of the trap and tailpiece.
- If clear, inspect the trap arm and wall fitting for clogs.
Using A Drain Auger (snake)
If the clog is further down the branch drain:
- Insert the auger into the wall drain opening.
- Turn the handle to work the snake through the pipe, breaking up the clog.
- Withdraw the auger and clean off debris.
Preventing Future Clogs
- Avoid pouring grease or oil down the drain; collect in a container for disposal.
- Use a sink strainer to catch food scraps.
- Run hot water for 15 seconds after using the disposal.
- Clean the P-trap every 6-12 months for optimal flow.
Example: A household that started using a mesh strainer and stopped dumping coffee grounds noticed a dramatic drop in clogs over the next year.
Quick Comparison: Chemical Cleaners Vs. Mechanical Cleaning
| Method | Effectiveness | Safety | Environmental Impact | Cost |
|---|---|---|---|---|
| Chemical Cleaners | Good for minor organic clogs | Can harm pipes and skin | Potentially harmful | Low to moderate |
| Mechanical (Snake/Disassembly) | Very effective for tough clogs | Safe if used properly | Eco-friendly | Low (after initial tool purchase) |
Warning: Avoid using chemical cleaners on metal pipes, as they can accelerate corrosion. For persistent or deep clogs, consult a professional.
Advanced Repairs: Replacing And Upgrading Drain Pipes
Sometimes, a simple repair won’t suffice, especially if pipes are old, corroded, or repeatedly leaking. Here’s how to approach a full replacement or upgrade.
Choosing Replacement Materials
- PVC is recommended for most modern kitchens due to its durability and ease of installation.
- ABS is strong but may not meet code in all areas.
- Metal pipes are attractive but more expensive and prone to corrosion.
Check local code requirements before selecting materials.
Sizing And Fitting Pipes
Most kitchen sink drains use 1 1/2-inch diameter pipes. Measure the existing pipes to ensure compatibility.
Step-by-step Replacement
- Remove the entire drain assembly as described earlier.
- Cut new pipe sections to match the length and angles of the old pipes.
- Dry-fit all components to ensure a proper fit.
- Assemble using slip joint washers and nuts for a leak-free seal.
- Test for leaks before restoring items under the sink.
Upgrading To A Garbage Disposal Or Double Sink
If you’re considering a kitchen upgrade, such as a disposal or double sink, you’ll need to modify the drain assembly. Guides such as How To Install A Double Kitchen Sink and How To Install A Disposal In A Single Sink provide detailed instructions.
Case Study: Pvc Upgrade Success
A homeowner with recurring leaks switched from old metal piping to a new PVC drain kit. The upgrade took under an hour and eliminated leaks for years. The key was measuring pipe lengths accurately and hand-tightening all joints to prevent over-stressing the plastic.
Preventing Future Drain Pipe Problems
Prevention is always better than cure. With a few simple habits and periodic checks, you can avoid most under-sink drain pipe issues.
Regular Maintenance Checklist
- Inspect joints and washers every six months for signs of wear or leaks.
- Clean the P-trap at least once a year.
- Flush the drain with hot water weekly to prevent grease buildup.
- Check for odors and address them quickly.
Smart Usage Habits
- Don’t overload the disposal with fibrous or starchy foods.
- Avoid harsh chemicals that can damage pipes.
- Teach household members what not to put down the drain.
When To Call A Professional
- If leaks persist after tightening and replacing parts
- When pipes are corroded or broken inside the wall
- If mold, rot, or significant water damage is present
- For complex installations involving multiple sinks or appliances
Pro Tip: Many plumbing disasters start as small leaks. Early detection and repair can save thousands in water damage and mold remediation costs.
Cost Comparison: Diy Vs. Professional Repairs
Understanding the financial aspect helps you decide whether to attempt a DIY fix or hire a plumber.
| Repair Type | DIY Cost (Parts Only) | Professional Cost (Typical) | Time Required |
|---|---|---|---|
| Replace P-Trap | $8, $25 | $100, $250 | 30, 60 min (DIY) |
| Clear Clog | $0, $30 (tools/chemicals) | $100, $200 | 15, 45 min (DIY) |
| Replace Full Assembly | $20, $60 | $200, $500 | 1, 2 hours (DIY) |
Example: A DIYer who replaced a leaking PVC P-trap with a $15 kit saved over $150 compared to a plumber’s minimum service call.
For more complex projects, such as installing a new sink or faucet, see How To Install A New Kitchen Sink.
Real-world Examples And Case Studies
Learning from real repairs can make the process clearer and more relatable.
Case Study 1: Fixing A Persistent Leak
A homeowner noticed water under their kitchen sink even after tightening the P-trap. After inspecting the assembly, they found a cracked tailpiece. Replacing just the tailpiece and washer solved the problem, highlighting the need to check each component thoroughly.
Case Study 2: Dealing With Repeated Clogs
A family struggled with monthly clogs due to heavy disposal use. After cleaning the P-trap and using a drain auger, they started using a mesh strainer and stopped putting coffee grounds down the sink. Clogs became a rare occurrence.
Case Study 3: Upgrading To Modern Materials
An older home with corroded metal pipes switched to PVC. The process involved cutting the metal out, measuring, and fitting new pipes. The result: no more leaks and faster drainage, with an upgrade that met local code.
Pro Tip: For step-by-step installation guides, resources like Wikipedia: Plumbing provide additional context and historical perspective.
Frequently Asked Questions
What If My Kitchen Sink Drain Pipe Is Leaking At The Wall?
If the leak is at the wall connection, the trap arm or the wall fitting may have failed. Start by removing the trap arm and inspecting the wall fitting for cracks or corrosion. Sometimes, tightening the slip nut or replacing the washer can stop the leak.
If the pipe inside the wall is damaged, it’s best to consult a licensed plumber, as wall pipes often require specialized tools and may involve cutting drywall.
Can I Use Flexible Drain Pipes For A Quick Fix?
Flexible drain pipes are available and can be helpful for tight or awkward installations. However, they are more prone to leaks and can trap debris, leading to future clogs. They’re best used as a temporary solution or in situations where rigid pipes can’t be fitted.
For long-term durability, stick to standard PVC or metal pipes that meet local codes.
How Do I Know If My P-trap Needs Replacing Instead Of Cleaning?
A P-trap should be replaced if it shows visible cracks, corrosion (in metal traps), or if the slip joint threads are stripped and no longer tighten securely. If cleaning does not resolve odors or leaks, and if the trap is more than 10 years old, replacement is advisable.
Modern PVC P-traps are inexpensive and easy to install.
What Should I Do If The Drain Pipe Vibrates Or Makes Noise?
Vibrations or rattling noises are usually caused by loose pipes or improper mounting. Check that all slip nuts are snug and that the trap arm is properly inserted into the wall fitting. Use pipe straps or hangers to secure pipes that move when water flows.
Persistent noises may indicate a venting issue or partially blocked pipe, which may require professional diagnosis.
Are There Eco-friendly Ways To Maintain My Kitchen Drain Pipes?
Yes! Regularly flush drains with boiling water and a small amount of baking soda, followed by vinegar, to help remove grease and debris naturally. Avoid harsh chemical cleaners that can harm pipes and the environment. Installing a mesh strainer and composting food scraps instead of sending them down the drain are also effective eco-friendly practices.
Fixing a drain pipe under your kitchen sink is a manageable and rewarding DIY project for most homeowners. By understanding your plumbing system, gathering the right tools, and following step-by-step instructions, you can resolve leaks, clogs, and odors efficiently. Preventative maintenance and smart usage habits will minimize future problems, saving you time and money.
Remember, for complex repairs or if you encounter damage inside the wall, don’t hesitate to consult a professional plumber. With the knowledge and confidence gained from this guide, you’re well-equipped to keep your kitchen running smoothly and your home protected from water damage.