A broken pipe under your sink is one of those household emergencies that demands swift action. Whether you’re greeted by a sudden puddle or the unmistakable sound of dripping water, the consequences can be significant: water damage, mold growth, and expensive repairs. Yet, with the right approach and tools, most under-sink pipe issues can be resolved by homeowners in a single afternoon. By understanding what causes these breaks, how to properly diagnose them, and the best repair methods for each scenario, you’ll save money and prevent bigger plumbing problems in the future.
This comprehensive guide will walk you through everything you need to know to fix a broken pipe under your sink. We’ll cover how to identify the source of the leak, select the correct repair method, gather the necessary tools and materials, and execute the fix with confidence.
Along the way, you’ll find expert tips, comparison tables, and real-world examples to help ensure a successful DIY repair. Let’s turn that dreaded drip into a plumbing victory.
Key Takeaways
- Identify the source of the leak before starting repairs to ensure a precise fix.
- Turn off the water supply and protect your workspace to prevent further damage.
- Match the repair method to the type and material of the broken pipe (PVC, copper, etc. ).
- Use quality materials and double-check connections to reduce the risk of future leaks.
- Know when to call a professional, some pipe issues require licensed plumbing expertise.

Credit: www.youtube.com
Understanding Under-sink Pipe Breaks
Before jumping into repairs, it’s essential to grasp why pipes break under sinks and how their location impacts both the urgency and complexity of the fix.
Common Causes Of Under-sink Pipe Damage
The most frequent culprits behind under-sink pipe failures include:
- Corrosion: Especially in older copper or galvanized steel pipes, long-term exposure to moisture, cleaning chemicals, and acidic drain cleaners weakens the pipe walls.
- Mechanical Stress: Over-tightening of fittings, improper installation, or repeated jostling from stored items can crack or dislodge pipes.
- Clogs and Pressure: Persistent clogs cause water pressure to build up, sometimes enough to burst weak pipe sections or joints.
- Freezing Temperatures: In colder climates, water in pipes can freeze, expand, and split the pipe material.
- Aging Materials: PVC and plastic pipes become brittle over time, making them prone to snapping or splitting at stress points.
Types Of Pipes Commonly Found Under Sinks
Pipes under kitchen and bathroom sinks generally fall into a few categories:
- PVC (Polyvinyl Chloride): Common in newer homes for drainpipes due to its affordability and ease of installation.
- ABS (Acrylonitrile Butadiene Styrene): Another plastic option, black in color, resistant to impact but less common than PVC.
- Copper: Popular for water supply lines, long-lasting but susceptible to corrosion if water quality is poor.
- Flexible Braided Hoses: Often connect faucets to supply lines, can burst or fray over time.
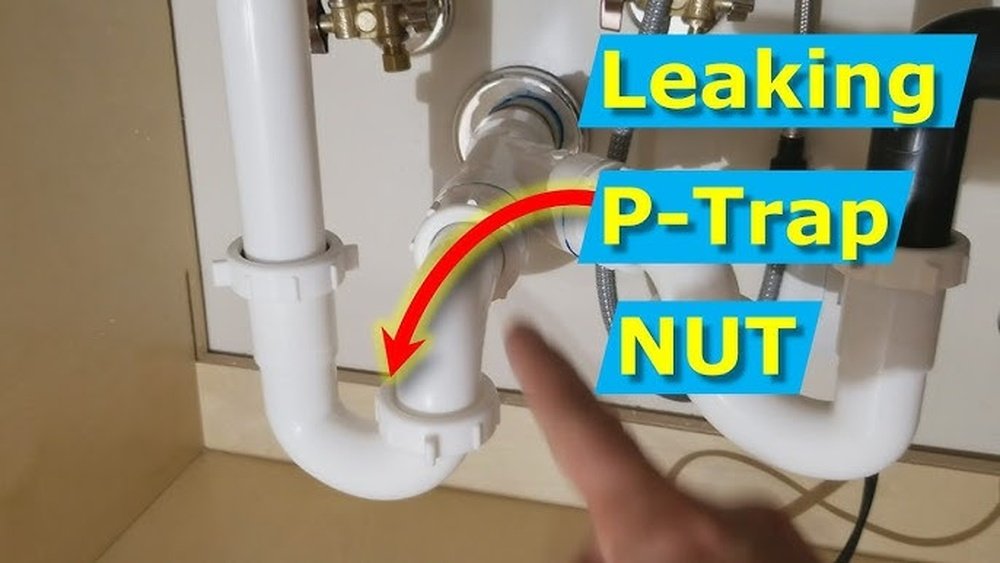
Example: In my experience, a cracked PVC trap (U-shaped section) under a kitchen sink is one of the most common DIY repairs, often caused by overtightening or accidental impact during cleaning.
Signs That Your Pipe Is Broken
Knowing what to look for can help you catch a broken pipe early. Key indicators include:
- Visible water or dampness beneath the sink
- Mold or mildew odors
- Water stains or swelling on cabinetry
- Decreased water pressure (for supply lines)
- Persistent dripping sounds, even when faucets are off
Pro Tip: Place a dry paper towel under the suspected leak and run water briefly. Any dampness or drips will show up quickly, pinpointing the leak’s location.
Diagnosing The Problem
Accurate diagnosis is the foundation of an effective repair. Not all leaks originate from the same place, and misidentifying the source can waste time and money.
Locating The Leak
Begin by clearing out the cabinet and drying the area thoroughly. Use a flashlight to inspect all joints, bends, and connections. Turn on the faucet briefly and watch for:
- Drops forming on pipe seams or joints
- Spraying or bubbling from cracks
- Water running down the outside of pipes
Determining Pipe Material And Joint Type
Identifying the pipe material is crucial for selecting compatible repair supplies. For example, you can’t use PVC glue on copper, and vice versa. Examine the color, texture, and markings:
- White/Gray: PVC
- Black: ABS
- Shiny Metal: Chrome-plated brass or copper
Check if the leak is from a threaded joint (screws together), a slip joint (held by a compression nut), or a glued seam.
Assessing Severity: Repair Or Replace?
Not every break requires a full pipe replacement. Use this rule of thumb:
- Small cracks or pinholes: May be patched.
- Loose or corroded joints: Can often be tightened or resealed.
- Large cracks, breaks, or crushed pipes: Replace the damaged section.
Real-world Example: Diagnosing A Persistent Leak
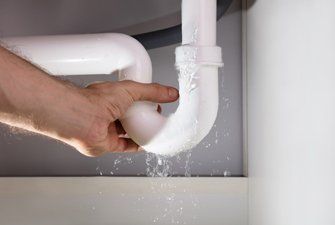
A homeowner noticed water pooling under their bathroom sink, despite recently tightening all connections. Upon closer inspection, the culprit was a hairline crack in the PVC trap, nearly invisible but enough to drip continuously when the faucet was in use.
Credit: www.michiganplumbing.com
Preparing For The Repair
Preparation is half the battle in plumbing projects. Gather the right tools, materials, and take steps to protect your home before starting the fix.
Essential Tools And Materials
Here’s a checklist of tools and supplies commonly needed for under-sink pipe repairs:
- Adjustable wrench or channel-lock pliers
- Bucket or shallow pan (to catch water)
- Towels or rags
- Pipe cutter or hacksaw (for replacing sections)
- Replacement pipe sections (PVC, copper, etc.)
- Pipe joint compound or plumber’s tape (for threaded connections)
- PVC cement and primer (for plastic pipes)
- Slip joint washers/gaskets
- Epoxy putty or pipe repair tape (for temporary fixes)
- Flashlight
- Gloves and safety glasses
Protecting Your Workspace
- Lay down towels or a plastic sheet to catch spills.
- Remove cleaning products and stored items from the cabinet.
- Open a window or ensure good ventilation if using adhesives.
Warning: Always turn off the water supply to the sink (shutoff valves are usually under the sink) before attempting any pipe repair.
Comparing Pipe Materials And Their Repair Requirements
| Pipe Material | Repair Complexity | Common Tools Needed | Replacement Availability |
|---|---|---|---|
| PVC | Easy | PVC cutter, glue, primer | High (widely available) |
| Copper | Moderate to Difficult | Pipe cutter, torch, solder | Moderate |
| ABS | Easy | Hacksaw, ABS cement | High |
| Braided Hose | Very Easy | Wrench | High |
Gathering Replacement Parts
Bring a sample or a clear photo of your pipe and fittings to the hardware store. Many stores offer “repair kits” specifically for common under-sink pipes, which can save you time and ensure compatibility.

Credit: www.wikihow.com
Step-by-step Repair Methods
Now that you’re prepared, it’s time to fix the broken pipe. The exact steps will depend on the type of break and pipe material.
Fixing Pvc Or Abs Drain Pipes
1. Remove The Damaged Section
- Place a bucket under the pipe.
- Use a hacksaw or PVC cutter to cut out the damaged section, leaving about 1 inch of clean pipe on each side.
- Dry-fit the new section and fittings to ensure a snug fit.
2. Clean And Prime The Pipe Ends
- Use PVC/ABS primer to clean the ends of the existing pipe and the inside of the replacement fittings.
- Allow to dry for at least 30 seconds.
3. Apply Cement And Assemble
- Spread a thin layer of PVC/ABS cement on both the pipe and fitting.
- Quickly join the pieces, giving a slight twist to distribute the cement evenly.
- Hold for 30 seconds to set.
4. Wait And Test
- Allow cement to cure as per manufacturer instructions (usually 15 minutes for handling, 2 hours for full cure).
- Turn water back on and check for leaks.
Repairing Copper Water Supply Pipes
1. Shut Off Water And Drain
- Close the shutoff valve and open the faucet to drain residual water.
2. Cut Out The Broken Section
- Use a pipe cutter to remove the damaged area, ensuring straight cuts.
3. Clean And Prepare Pipe Ends
- Use a wire brush or emery cloth to clean the outside of the pipe and inside of the new fitting.
4. Solder The New Section
- Apply flux to cleaned surfaces.
- Slide on the fitting.
- Heat the joint with a propane torch and touch solder to the seam until it melts and fills the gap.
5. Cool, Clean, And Test
- Let cool naturally.
- Wipe away excess flux.
- Turn water back on and check for leaks.
Pro Tip: If you’re uncomfortable soldering, consider using a “push-to-connect” fitting (like SharkBite) that simply clicks onto the cleaned pipe ends.
Fixing Flexible Braided Supply Hoses
1. Turn Off Water And Disconnect
- Use an adjustable wrench to unscrew both ends of the hose.
2. Inspect And Replace
- Check for cracks or fraying.
- Replace with a new, matching hose of the same length and diameter.
3. Reconnect And Test
- Hand-tighten, then snug with a wrench, do not overtighten.
- Turn water back on and check for leaks.
Temporary Pipe Repairs (emergency Fixes)
If you need to stop a leak before a full repair, consider these options:
- Epoxy putty: Knead and press onto the crack for a watertight seal (for PVC, copper, or metal).
- Pipe repair tape: Wrap tightly around the leak.
- Rubber patch and clamp: For larger cracks, wrap a section of rubber (like an old glove) and secure with a hose clamp.
These methods are temporary and should be followed up with a permanent repair as soon as possible.
Real-world Example: Quick Pvc Trap Replacement
A family noticed water leaking from their kitchen sink’s U-shaped trap. After removing the trap, they found a split along the bottom. With a replacement PVC trap kit, the repair took under 20 minutes and cost less than $10.
Reassembling And Testing Your Repair
With the broken pipe repaired or replaced, careful reassembly and testing are crucial for a successful, leak-free outcome.
Reconnecting All Components
- Ensure all washers, gaskets, and slip joint nuts are in place.
- Hand-tighten slip joints first, then use pliers for a final snug, avoid overtightening.
- Double-check that pipes are properly aligned and not under tension.
Restoring Water Supply And Checking For Leaks
- Slowly turn the shutoff valves back on.
- Run water for several minutes, checking all connections for drips.
- Wipe each joint with a dry paper towel to detect even minor leaks.
Troubleshooting Persistent Leaks
If you notice any leaks after reassembly:
- Loosen and realign connections, ensuring washers are seated correctly.
- Add pipe joint compound or plumber’s tape to threaded joints.
- For persistent leaks at glued joints, you may need to redo the connection with a new fitting.
Example: Misaligned Trap Causing Leaks
A homeowner replaced a broken ABS trap but noticed continued drips. Upon inspection, the trap was slightly misaligned, causing the washer to seat improperly. Loosening, realigning, and retightening the connections solved the issue.
Table: Common Under-sink Pipe Failures And Solutions
| Problem | Likely Cause | Best Fix |
|---|---|---|
| Drip at slip joint | Loose nut or worn washer | Tighten nut, replace washer |
| Cracked PVC trap | Impact or overtightening | Replace trap section |
| Leaking copper supply | Corrosion or pinhole | Cut and solder new section |
| Burst braided hose | Aging or fraying | Replace hose |
Preventing Future Pipe Problems
Once your repair is complete, taking steps to prevent future issues can save you from repeated headaches and damage.
Regular Inspections
- Check under sinks monthly for moisture, corrosion, or loose fittings.
- Inspect flexible hoses for signs of wear, bulging, or rust at the connectors.
Proper Installation And Handling
- Avoid overtightening slip joint nuts.
- Do not use pipes or fittings not rated for under-sink use.
- Store heavy items away from pipes to prevent accidental knocks.
Water Quality And Pipe Longevity
Hard or acidic water can accelerate pipe corrosion. If you notice frequent supply pipe failures, consider a water quality test and consult a plumber about filtration or pipe replacement options.
Proactive Upgrades
- Replace rubber washers and hoses every 5-7 years, regardless of appearance.
- Upgrade to braided stainless steel hoses for longer lifespan.
- Use Teflon tape or pipe joint compound on all threaded connections.
Example: Preventive Replacement Avoids Major Leak
A homeowner noticed minor rust on their 10-year-old supply hoses. Proactively replacing them with braided stainless steel versions prevented a future burst and costly water damage.
When To Call A Professional
While many under-sink pipe repairs are within reach for DIYers, certain situations require expert intervention for safety and compliance.
Complex Or Hidden Leaks
If you can’t locate the source, or water is seeping from the wall or floor, call a licensed plumber to assess for hidden damage.
Major Pipe Replacements
If the repair involves soldering multiple copper joints, rerouting pipes, or working near electrical wiring, a professional is recommended.
Code Compliance And Permits
Some municipalities require permits and inspections for plumbing work. Check your local regulations before starting extensive repairs.
Insurance And Liability
Significant water damage may be covered by homeowner’s insurance, but only if repairs are performed correctly and documented. If in doubt, contact your insurer and a plumber.
Pro Tip: For a comprehensive guide to installing new kitchen sink plumbing, visit How To Install Kitchen Sink Plumbing.
Real-world Case Studies
Learning from actual repairs can give you confidence and insight into handling your own under-sink pipe emergencies.
Case Study 1: Kitchen Pvc Pipe Crack
A family in Ohio noticed a slow leak under their kitchen sink. Inspection revealed a hairline crack in the PVC drain just above the trap. With basic tools, they cut out the damaged section and used a replacement coupling and cement.
The repair cost under $15 and held up for years.
Case Study 2: Copper Supply Line Pinhole
A DIYer in California found a greenish stain and steady drip on their copper supply pipe. After shutting off the water and cutting out the damaged section, they used a push-to-connect fitting to join a new length of pipe. This avoided the need for soldering and provided a secure, lasting repair.
Case Study 3: Burst Braided Hose Catastrophe
A homeowner returned from vacation to find water flooding their kitchen from a burst braided hose. The hose was over a decade old and had frayed at the connector. Their insurance covered the damage, but they replaced all hoses in the home with new, reinforced versions to prevent recurrence.
Cost Comparison: Diy Vs. Professional Pipe Repair
Understanding the potential savings from DIY repairs can help you decide how to proceed.
| Repair Type | DIY Cost (USD) | Pro Cost (USD) | Time Required |
|---|---|---|---|
| PVC Trap Replacement | $10-$20 | $100-$250 | 20-40 mins |
| Copper Pipe Repair | $15-$40 | $150-$400 | 1-2 hours |
| Braided Hose Replacement | $10-$30 | $75-$150 | 10-20 mins |
| Temporary Patch | $5-$15 | Not typically offered | 5-10 mins |
Source:HomeAdvisor
Safety And Legal Considerations
Plumbing repairs, while usually safe, do come with some risks and legal requirements.
Safety Precautions
- Always turn off water before disassembling any pipes.
- Use gloves and eye protection when cutting, soldering, or using adhesives.
- Ventilate the area when using chemical cements or solvents.
Legal And Code Considerations
- Some repairs require adherence to local plumbing codes.
- In rental properties, major plumbing repairs must typically be performed by licensed professionals.
- For extensive changes, you may need a permit, consult your city or county’s building department.
Environmental Responsibility
Dispose of old pipes and chemical containers according to local regulations. Many hardware stores offer recycling for PVC and metal pipes.
Pro Tip: For detailed steps on adding or upgrading sink features, see How To Install A New Kitchen Sink.
Frequently Asked Questions
What Should I Do First If I Discover A Broken Pipe Under My Sink?
Immediately turn off the water supply at the shutoff valves beneath the sink. Place a bucket or towels to catch any remaining water and minimize damage. Once water flow stops, clear out the cabinet for inspection and repair.
Can I Use Duct Tape As A Temporary Fix For A Leaking Pipe?
Duct tape is not recommended for plumbing leaks because it cannot create a watertight seal under pressure. Instead, use pipe repair tape or epoxy putty specifically designed for plumbing as a temporary solution until you can perform a permanent repair.
How Do I Know If My Pipes Are Pvc Or Abs?
PVC pipes are typically white or light gray, while ABS pipes are black. Both are common in drain-waste-vent systems under sinks. If uncertain, check for manufacturer markings printed along the pipe, or bring a section to a hardware store for identification.
What Are The Signs Of A Failing Flexible Braided Hose?
Look for visible fraying, bulging, rust at connectors, or dampness near the hose ends. These indicate the hose is nearing failure and should be replaced promptly to avoid flooding.
Is It Safe To Use Chemical Drain Cleaners On Pipes Under My Sink?
Frequent use of chemical drain cleaners can damage both plastic and metal pipes, leading to leaks and corrosion. Instead, clear clogs with a plunger, drain snake, or enzymatic cleaner. If you must use a chemical cleaner, follow manufacturer instructions and use sparingly.
When armed with the right knowledge, tools, and safety mindset, fixing a broken pipe under your sink is an achievable DIY project. Remember to approach each repair methodically, choose quality replacement parts, and never hesitate to call a professional if the problem exceeds your experience or comfort level.
With these tips, you’ll restore your sink to full function and gain valuable home maintenance skills along the way.