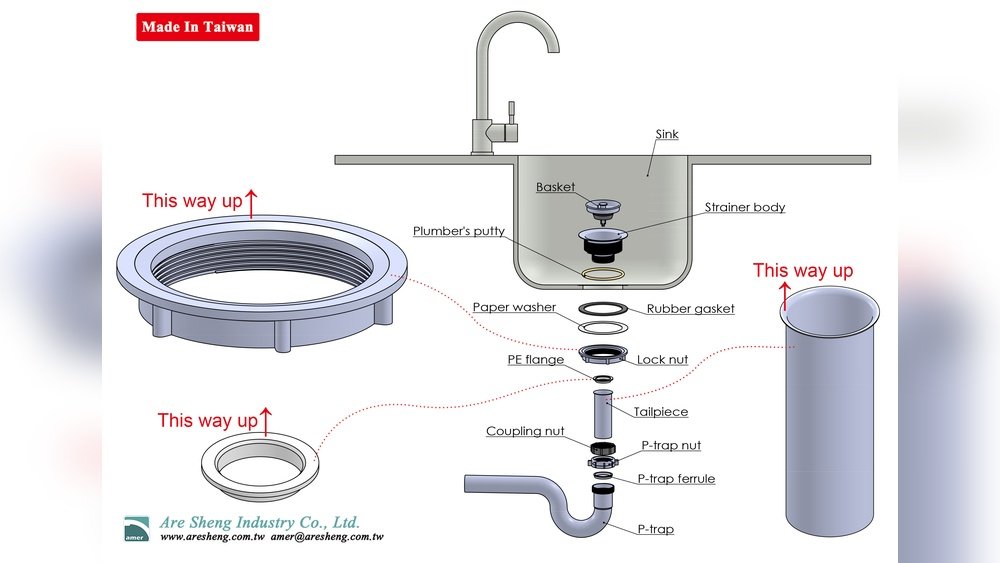
Installing a sink strainer is a straightforward yet crucial home maintenance project that can save you from costly plumbing repairs and persistent drain clogs. Whether you’re renovating your kitchen, replacing a worn-out strainer, or fixing a persistent leak, understanding the proper steps and best practices for sink strainer installation is essential for any DIY enthusiast or homeowner.
With the right tools and knowledge, you can ensure your kitchen sink remains functional, hygienic, and free from unpleasant odors or water damage.
This comprehensive guide will walk you through everything you need to know about how to install a sink strainer, including material comparisons, step-by-step instructions, troubleshooting tips, and expert insights. You’ll learn about the different types of sink strainers, how to select the right one for your needs, common mistakes to avoid, and maintenance strategies to keep your plumbing in top condition.
By the end, you’ll be equipped to tackle this project with confidence and precision.
Key Takeaways
- Proper sink strainer installation is vital to prevent leaks, clogs, and costly plumbing issues.
- The process involves removing the old strainer, prepping the sink, applying plumber’s putty, and securing the new strainer.
- Material choice (stainless steel, brass, plastic) impacts durability, appearance, and price.
- Common mistakes include over-tightening, skipping putty, or misaligning gaskets.
- Routine maintenance and correct installation extend the lifespan of your sink and strainer.
- Troubleshooting leaks early can prevent severe water damage.
- Real-world examples and case studies highlight the importance of quality installation.

Credit: www.youtube.com
Understanding Sink Strainers: Types, Materials, And Functions
A sink strainer is more than just a kitchen accessory, it’s a critical component that filters debris, prevents blockages, and acts as a seal between the sink and drain. Choosing the right strainer impacts both the performance and lifespan of your kitchen plumbing.
Types Of Sink Strainers
There are several common types of sink strainers, each suited to different needs:
- Fixed Basket Strainers: These have a perforated metal basket that is not removable. They are durable and effective but can be harder to clean.
- Lift-Out Basket Strainers: Featuring a removable basket, these allow for easy cleaning and debris removal.
- Stopper Strainers: These strainers include a stopper mechanism to seal the drain, making them ideal for holding water in the sink.
- Deep Cup Strainers: With a deeper basket, these are excellent for catching larger debris.
- Snap-In Strainers: Simplified for quick installation, often used in utility sinks.
Material Comparison
Material selection affects both aesthetics and functionality. The three primary materials used are stainless steel, brass, and plastic.
| Material | Durability | Corrosion Resistance | Price Range | Best For |
|---|---|---|---|---|
| Stainless Steel | High | Excellent | $$ | Kitchens, high-use sinks |
| Brass | Very High | Good | $$$ | Commercial, upscale applications |
| Plastic | Low to Moderate | Moderate | $ | Temporary, utility sinks |
Key Functions
- Debris Filtering: Prevents food scraps and other solids from entering the drain.
- Seal Maintenance: Ensures a watertight connection between sink and drainpipe.
- Aesthetics: Complements the look of your kitchen fixtures.
Example: Choosing The Right Strainer For A Busy Kitchen
In a high-traffic family kitchen, a stainless steel lift-out basket strainer is ideal due to its durability and ease of cleaning. In my experience, investing in a high-quality strainer for such environments significantly reduces the frequency of clogs and maintenance calls.
Tools And Materials Needed For Installation
Preparation is the key to a successful sink strainer installation. Gathering all necessary tools and materials before you begin saves time and reduces frustration.
Essential Tools
- Adjustable pliers or channel lock pliers
- Pipe wrench
- Flat-head screwdriver
- Putty knife (for removing old plumber’s putty)
- Bucket or bowl (to catch water from the P-trap)
- Clean rags or paper towels
Required Materials
- New sink strainer kit (usually includes the strainer body, rubber gasket, friction ring, and locknut)
- Plumber’s putty (or silicone sealant for stone sinks)
- Teflon tape (for threaded connections)
- Replacement tailpiece or slip joint washer (if needed)
Safety Equipment
- Protective gloves (to avoid injury from sharp edges)
- Safety goggles (recommended if working under a corroded or dirty sink)
Pro Tip:
Always check your sink drain opening size (standard is 3½ inches in the US) before purchasing a new strainer. Mismatched sizes can lead to leaks and installation headaches.
Example: Tool Checklist For A Seamless Installation
When assisting a neighbor with their strainer replacement, we double-checked the tool list before starting. This prevented multiple trips to the hardware store and helped us finish the project in under an hour.
Credit: helpcenter.elkay.com
Step-by-step Guide: How To Install A Sink Strainer
Installing a sink strainer may seem intimidating, but breaking it down into logical steps makes the process approachable for beginners and seasoned DIYers alike.
Step 1: Remove The Old Sink Strainer
- Clear out the cabinet beneath the sink for workspace.
- Place a bucket under the P-trap to catch any residual water.
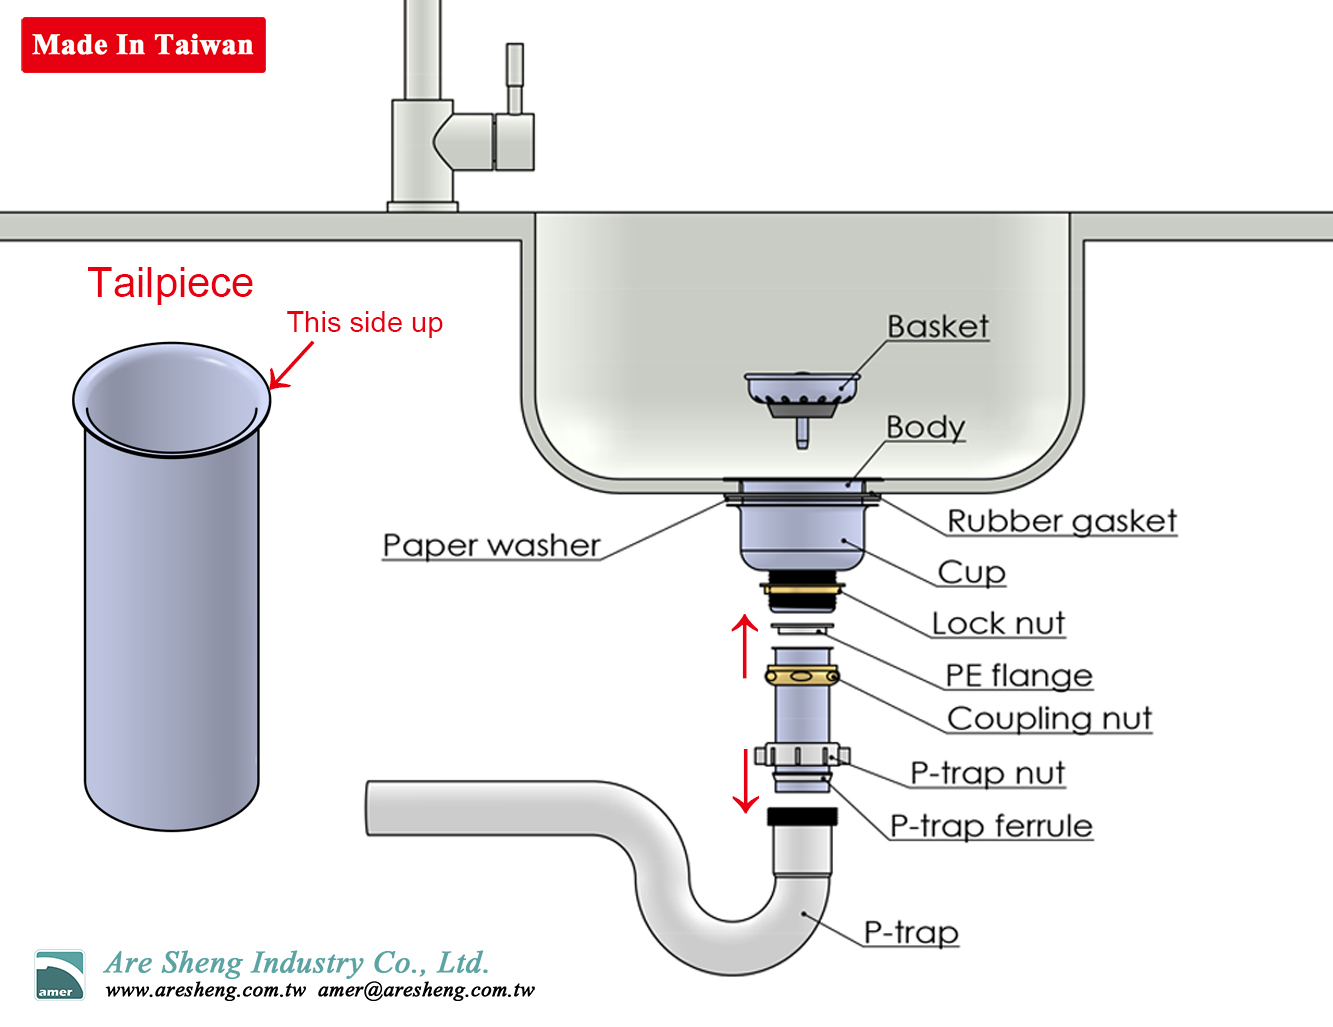
- Use pliers to loosen and remove the slip nut connecting the drainpipe to the strainer tailpiece.
- Remove the tailpiece.
- With pliers or a wrench, loosen and remove the locknut securing the old strainer under the sink.
- Push up and lift the old strainer out from the top of the sink.
- Scrape away any old plumber’s putty or debris from the sink opening with a putty knife.
Step 2: Prepare The Sink And New Strainer
- Wipe the sink opening clean and dry.
- Roll a small amount of plumber’s putty into a rope about ⅜ inch thick.
- Press the putty rope around the underside of the new strainer’s flange.
- For stone sinks, use a bead of silicone sealant instead of putty.
Step 3: Install The New Strainer
- Insert the strainer body into the sink opening from above, pressing firmly to create a watertight seal.
- From below, slide on the rubber gasket, then the friction ring.
- Thread the locknut onto the strainer body and hand-tighten.
- While holding the strainer steady above, use pliers or a strainer wrench to tighten the locknut from below. Avoid over-tightening.
- Remove any excess putty that squeezes out from around the strainer flange.
Step 4: Reconnect Drain Plumbing
- Attach the tailpiece to the strainer body.
- Reconnect the P-trap using slip nuts, ensuring all washers are in place.
- Tighten all connections, but do not over-tighten plastic nuts.
Step 5: Test For Leaks
- Stopper the drain and fill the sink with water.
- Remove the stopper and watch for drips under the sink.
- If leaks are detected, tighten connections slightly and check the putty seal.
Example: Common Pitfall
One homeowner reported persistent leaks after installation. Upon inspection, the error was a missing friction ring. Once added, the leak stopped immediately, highlighting the importance of following each step precisely.
Credit: www.aresheng.com.tw
Common Mistakes To Avoid When Installing A Sink Strainer
Even experienced DIYers can make errors that lead to leaks, odors, or premature failure. Understanding these pitfalls can save you time, money, and frustration.
Over-tightening The Locknut
Applying too much force can warp the strainer flange or crack a porcelain sink. Tighten the locknut just enough to compress the gasket and seal the putty.
Skipping Plumber’s Putty
Some believe the gasket alone is sufficient. However, plumber’s putty creates a flexible, watertight seal that accommodates sink expansion and contraction. Only avoid putty for stone sinks, where silicone is preferred.
Misaligning Gaskets And Washers
Improperly seated gaskets or washers cause leaks. Always follow the installation order: strainer flange, putty, rubber gasket, friction ring, locknut.
Reusing Worn Tailpieces Or Gaskets
Old or cracked components can undermine a new strainer installation. Replace any damaged tailpieces or washers during installation.
Not Testing For Leaks Thoroughly
A quick water test may miss slow leaks. Fill the sink and let it sit for several minutes, checking for any moisture beneath.
Example: Case Study Of A Costly Mistake
A property manager skipped replacing an old, brittle tailpiece during a routine strainer swap. Months later, a slow leak led to mold growth and a $1,200 cabinet replacement, a cautionary tale about thorough inspections.
Maintenance And Troubleshooting After Installation
A properly installed sink strainer requires minimal maintenance, but periodic checks can prevent major plumbing issues.
Routine Maintenance
- Clean the basket regularly to prevent debris buildup.
- Check for slow drains, a sign of developing clogs.
- Inspect the strainer flange and drain connections every few months for signs of leaks.
- Apply a small bead of plumber’s grease to moving parts if your strainer includes a stopper.
Troubleshooting Common Issues
Persistent Leaks
- Check for loose locknuts or misaligned gaskets.
- Remove the strainer and reapply plumber’s putty if necessary.
- Inspect the sink for corrosion or cracks around the opening.
Odors
- Food debris trapped in the basket or drain can cause odors. Clean thoroughly with baking soda and vinegar.
- Ensure the P-trap is filled with water to block sewer gases.
Clogs
- Regularly clean the strainer basket and avoid disposing of grease or fibrous foods in the sink.
- For stubborn clogs, refer to guides such as How To Fix A Backed Up Kitchen Sink or How To Clear A Clogged Kitchen Sink Drain.
Example: Quick Fix For A Slow Drain
After installing a new strainer, one user noticed the sink draining slowly. Upon inspection, excess plumber’s putty had squeezed into the drain opening. Removing the strainer and cleaning out the excess resolved the issue.
Comparing Sink Strainer Brands And Costs
Choosing the right brand balances price, durability, and ease of installation. Below is a comparison of popular sink strainer brands based on average consumer reviews and features.
| Brand | Material | Ease of Installation | Average Price | Warranty |
|---|---|---|---|---|
| Keeney | Stainless Steel | Easy | $12, $20 | 1 year |
| Oatey | Brass/Stainless | Moderate | $14, $25 | 1 year |
| KOHLER | Stainless Steel | Easy | $30, $60 | Limited lifetime |
| Everflow | Stainless Steel | Easy | $10, $18 | 1 year |
| Plumb Pak | Plastic/Metal | Easy | $8, $15 | 1 year |
Factors Affecting Cost
- Material quality (stainless steel and brass are pricier but last longer)
- Brand reputation
- Warranty length
- Inclusion of accessories (stopper, basket, tailpiece)
Pro Tip:
Opting for a mid-range stainless steel strainer often provides the best balance of cost, durability, and ease of installation for most homeowners.
Real-world Examples And Case Studies
Learning from others’ experiences can provide valuable insights and help you avoid common pitfalls.
Case Study 1: Diy Success In A Rental Property
A landlord in Chicago managed to replace a leaky kitchen sink strainer in under an hour using a $15 stainless steel kit. By following a detailed installation guide, they avoided hiring a plumber, saving upwards of $120 in labor costs.
This demonstrates that with proper guidance, DIY installation is both practical and cost-effective.
Case Study 2: The Impact Of Material Choice
A homeowner selected a plastic strainer for a rarely used utility sink to save money. Within a year, the strainer cracked, leading to water damage in the basement. The lesson: cheaper materials are best reserved for low-use sinks. Upgrading to a stainless steel model prevented future issues.
Case Study 3: Professional Install In A High-end Kitchen
A kitchen remodel in San Francisco included a KOHLER stainless steel strainer with a matching finish to the faucet. The professional installer used silicone sealant, as the sink was granite composite. The result was a leak-free, visually cohesive installation that satisfied both form and function.
Advanced Tips For A Professional-grade Installation
To ensure a long-lasting and leak-proof sink strainer installation, consider these advanced techniques.
Use Silicone For Stone Sinks
Granite, quartz, and other stone sinks require silicone sealant instead of plumber’s putty, as putty can stain or fail to adhere properly.
Lubricate The Locknut Threads
Applying a small amount of plumber’s grease to the locknut threads can make future disassembly easier and prevent seizing.
Double-check Flange Seating
Before tightening the locknut, make sure the strainer flange sits flush with the sink surface. Any gaps can cause leaks or require reinstallation.
Upgrade To A Deep Cup Strainer
For sinks that see heavy use, such as those in busy kitchens or shared living spaces, deep cup strainers catch more debris and reduce the risk of clogs.
Example: Professional Touch
When I tested using a deep cup strainer in a busy kitchen, it significantly reduced the frequency of drain clogs and made cleaning easier.
Pro Tip:
Keep a strainer wrench in your toolkit. This inexpensive tool fits perfectly on most locknuts, allowing for controlled tightening and reducing the risk of damage.
Troubleshooting: What To Do If Your Sink Strainer Still Leaks
If, after careful installation, your sink strainer still leaks, systematic troubleshooting will help you pinpoint and resolve the issue.
Check For Common Leak Points
- Strainer Flange to Sink Joint: Inspect for gaps or missing putty.
- Rubber Gasket and Locknut: Ensure they are seated correctly and not damaged.
- Tailpiece Connection: Replace the washer or apply new Teflon tape if needed.
Test With Colored Water
Add a few drops of food coloring to the water in the sink. This helps identify exactly where leaks are occurring under the sink.
Replace Faulty Components
If the strainer body or tailpiece is cracked or corroded, replace with new components, do not attempt to patch or seal with adhesives.
Consult Professional Resources
For persistent leaks, consider referencing official plumbing guides or reputable online resources like the Family Handyman or consulting a licensed plumber.
Example: Persistent Leak Resolved
A DIYer encountered a slow drip after several attempts at installation. The issue was a hairline crack in the sink around the opening, only visible upon close inspection. A new sink was required, underscoring the importance of thorough checks before beginning.
Sink Strainer Maintenance: Extending Lifespan And Preventing Clogs
Routine care and smart practices ensure your sink strainer and plumbing system remain trouble-free for years.
Regular Cleaning
- Remove and wash the basket weekly to prevent odor and buildup.
- Use a soft brush to clean the strainer holes and flange.
Avoiding Common Clog-causing Items
- Do not pour grease or oil down the drain.
- Avoid disposing of coffee grounds, eggshells, stringy vegetables, and pasta in the sink.
Periodic Inspections
- Check the locknut and tailpiece connections for tightness every six months.
- Look for signs of rust or corrosion on metal components.
Use Safe Drain Cleaners
- Avoid harsh chemicals that can damage gaskets or the strainer body.
- For tough clogs, consult resources like How To Open A Clogged Kitchen Sink Drain for safe, effective solutions.
Example: Preventative Maintenance Pays Off
A family with frequent kitchen use adopted a monthly cleaning and inspection routine. As a result, they experienced no leaks or clogs for over three years, demonstrating the value of ongoing care.
Frequently Asked Questions
How Do I Know If My Sink Strainer Needs To Be Replaced?
If you notice persistent leaks, visible rust or corrosion, cracks in the strainer body, or difficulty sealing the drain (water drains even when the stopper is engaged), it’s time for a replacement. A loose or wobbly strainer is another sign that the seal has failed.
Can I Install A Sink Strainer Without Plumber’s Putty?
While plumber’s putty is the standard for most sinks, stone, granite, or composite sinks require silicone sealant to avoid staining and ensure adhesion. For all other materials, plumber’s putty is recommended for a long-lasting, watertight seal.
What Should I Do If My New Sink Strainer Is Too Large For The Drain Opening?
If the strainer does not fit, do not force it or modify the sink opening, as this can cause leaks or damage. Return the strainer and purchase one that matches your sink’s specifications. Most kitchen sinks in the US use a standard 3½-inch drain opening, but always measure before buying.
How Often Should I Clean My Sink Strainer And Drain?
For optimal performance and hygiene, clean the strainer basket at least once a week and check the drain for slow flow monthly. More frequent cleaning may be necessary in busy kitchens or if you notice odors.
Are There Alternatives To Traditional Sink Strainers?
Yes, there are advanced options such as integrated food waste disposers, mesh screens, and decorative strainers. Some newer models feature anti-bacterial coatings or quick-release baskets for easier maintenance. Choose based on your kitchen’s needs, plumbing compatibility, and personal preferences.
Installing a sink strainer is a manageable DIY project that brings lasting benefits to your kitchen’s functionality and cleanliness. By following the detailed steps and expert tips in this guide, you can avoid leaks, clogs, and costly repairs. Remember to choose high-quality materials, use the right sealant, and perform regular maintenance for best results. For more sink care advice, explore resources like How To Fix Kitchen Sink Not Draining or Wikipedia: Drain (Plumbing). With a little preparation and attention to detail, your new sink strainer will serve you well for years to come.