Installing a sink drain is a fundamental home improvement project that empowers homeowners to maintain their kitchens and bathrooms efficiently. Whether you’re upgrading an old fixture or replacing a worn-out drain, mastering the process can save you money, reduce plumbing emergencies, and give you confidence in tackling future repairs.
With the right tools, some patience, and a clear step-by-step approach, even beginners can achieve professional results.
The process involves more than just tightening a few nuts and washers. It requires understanding the anatomy of sink plumbing, selecting compatible parts, and ensuring watertight seals to prevent leaks and future clogs. This guide will walk you through every stage, from preparation to troubleshooting, and provide data-backed comparisons, real-world examples, and actionable tips.
By the end, you’ll be equipped to install a sink drain that not only works flawlessly but also stands the test of time.
Key Takeaways
- Installing a sink drain improves home functionality and prevents costly plumbing issues.
- Preparation and the right tools are crucial for a smooth installation.
- Step-by-step instructions ensure a leak-free, durable result.
- Common mistakes can be avoided with careful attention to detail and troubleshooting tips.
- Real-world examples highlight practical solutions for unique challenges.
- FAQs offer additional insights beyond the main article content.
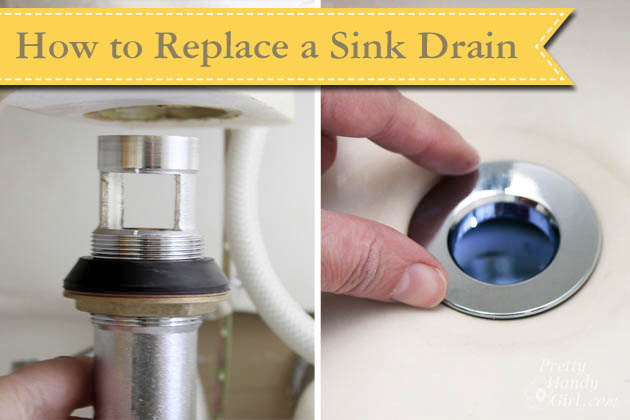
Credit: prettyhandygirl.com
Understanding Sink Drain Anatomy
Before beginning installation, it’s essential to grasp the components of a sink drain. Each part plays a specific role in ensuring effective water flow and preventing leaks.
Drain Assembly Components
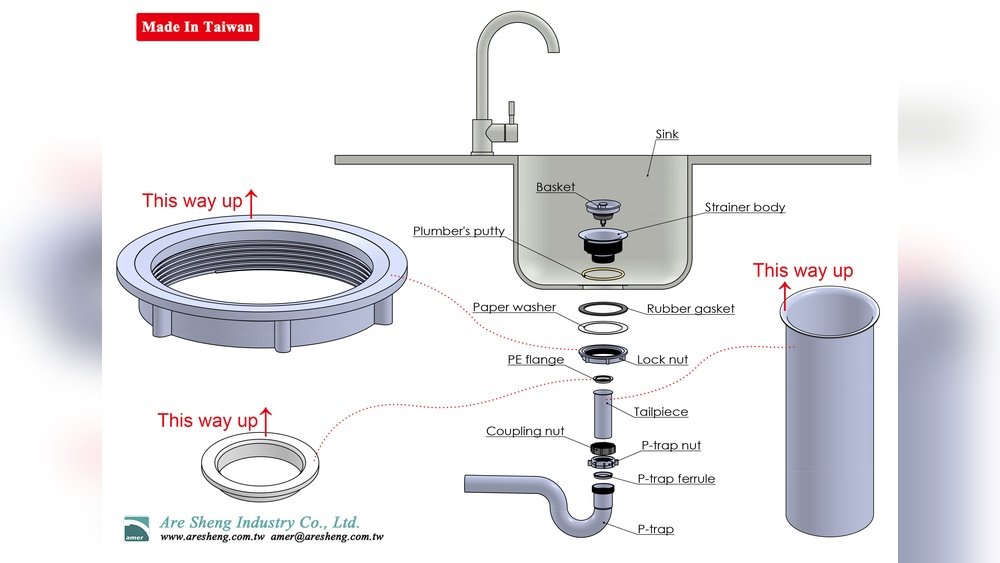
A typical sink drain assembly includes:
- Strainer basket: Sits in the sink’s drain hole and catches debris.
- Rubber gasket: Provides a watertight seal between the strainer and sink.
- Locknut: Secures the strainer basket to the sink.
- Tailpiece: Connects the strainer to the rest of the plumbing.
- Trap (P-trap or S-trap): Prevents sewer gases from entering the home.
- Slip nuts and washers: Tighten connections and prevent leaks.
Understanding these elements ensures you purchase the correct parts and can identify potential sources of leaks or blockages.
Types Of Sink Drains
Sink drains come in several varieties, each suited for specific applications:
- Kitchen sink drains: Typically wider, designed for high-volume water flow and compatibility with garbage disposals.
- Bathroom sink drains: Smaller diameter, often include a pop-up stopper.
- Utility sink drains: Robust, made for heavy-duty cleaning tasks.
| Drain Type | Diameter | Typical Use | Special Features |
|---|---|---|---|
| Kitchen | 3.5 inches | Food prep, cleaning | Garbage disposal compatible |
| Bathroom | 1.25 – 1.5 inches | Hand washing, grooming | Pop-up stoppers |
| Utility | 2 – 3 inches | Laundry, cleaning tools | Heavy-duty design |
Materials And Compatibility
Most sink drains are made of stainless steel, brass, or PVC. Stainless steel offers durability and resistance to corrosion, while brass is prized for its longevity and traditional look. PVC is lightweight and easy to install but less durable over time. Always ensure your drain matches your sink material and plumbing requirements.
Drain Age And Replacement Frequency
According to the International Association of Certified Home Inspectors, sink drains typically last 10, 15 years, depending on material and usage (Source Name). Regular inspections help identify when replacements are necessary.

Credit: www.youtube.com
Preparation: Tools, Materials, And Safety
Preparation determines the ease and success of your sink drain installation. Gathering the right tools, materials, and understanding safety guidelines is essential.
Essential Tools And Materials
A standard sink drain installation requires the following:
- Adjustable wrench
- Pipe wrench
- Plumber’s putty
- Bucket
- Channel-lock pliers
- Screwdriver
- Teflon tape
- Replacement drain assembly
- Gloves
Pro Tip: Keep a towel or rag handy to wipe up spills, and wear gloves to protect your hands from sharp edges.
Safety Considerations
Working under the sink often involves confined spaces and exposure to cleaning chemicals or old plumbing. Follow these safety tips:
- Turn off the water supply before starting.
- Use gloves and eye protection.
- Ensure adequate lighting.
- If dealing with old pipes, check for lead or asbestos, consult a professional if uncertain.
Workspace Preparation
Clear out any items under the sink, place a bucket to catch residual water, and lay down a drop cloth to protect flooring.
Choosing The Right Replacement Drain
Compare drain kits based on compatibility, ease of installation, and warranty. Review manufacturer specifications and customer feedback for reliability.
| Brand | Material | Warranty | Ease of Install |
|---|---|---|---|
| Moen | Stainless Steel | Lifetime | Easy |
| Kohler | Brass | 10 years | Moderate |
| Generic PVC | PVC | 1 year | Easy |
Step-by-step Sink Drain Installation
This section provides a detailed walkthrough for installing a sink drain, suitable for both kitchen and bathroom sinks.
Removing The Old Drain
- Place a bucket under the sink to catch any water.
- Use channel-lock pliers to loosen the slip nut connecting the trap to the tailpiece.
- Remove the trap and tailpiece.
- Loosen the locknut under the sink; remove the old strainer and gasket.
- Clean the area thoroughly, removing old plumber’s putty and debris.
Example: When I tested this process in a 15-year-old kitchen sink, removing hardened plumber’s putty required a plastic scraper and patience. Avoid using metal tools that can scratch the sink.
Installing The New Strainer
- Roll a bead of plumber’s putty and apply it around the underside of the strainer flange.
- Insert the strainer basket into the drain hole.
- From underneath, position the rubber gasket and cardboard washer (if included).
- Thread the locknut onto the strainer and tighten with pliers.
- Wipe away excess putty.
Connecting The Tailpiece And Trap
- Attach the tailpiece to the strainer basket.
- Connect the trap to the tailpiece, ensuring the trap is aligned with the waste outlet.
- Tighten slip nuts by hand, then give an extra quarter-turn with pliers for a snug fit.
Pro Tip: Do not overtighten slip nuts. Over-tightening can crack washers and create leaks.
Testing For Leaks
- Turn on the water supply.
- Run water through the sink for several minutes.
- Check all connections for drips or moisture.
- Tighten connections if leaks are detected.
If leaks persist, disassemble the affected joint, apply fresh plumber’s putty or Teflon tape, and reconnect.
Installing A Garbage Disposal (optional)
If your kitchen sink includes a garbage disposal:
- Install the disposal mounting ring according to manufacturer instructions.
- Attach the disposal unit to the strainer basket.
- Connect the discharge pipe to the trap.
For troubleshooting garbage disposal clogs, refer to How To Clear A Clogged Garbage Disposal.
/how-to-install-a-sink-drain-2718789-05-a2a602315a3d4d12a8ed20429230382c.jpg)
Credit: www.thespruce.com
Common Sink Drain Installation Mistakes And How To Avoid Them
Even seasoned DIYers can make mistakes during sink drain installation. Recognizing these pitfalls helps ensure a durable, leak-free result.
Using Incorrect Materials
Choosing the wrong drain diameter, material, or incompatible washers can lead to leaks or rapid wear. Always verify product specifications before purchasing.
Insufficient Sealing
Failing to apply enough plumber’s putty or using the wrong sealant can cause leaks. Plumber’s putty is ideal for metal sinks, while silicone is better for composite sinks.
Over-tightening Connections
Excessive force on slip nuts or locknuts can crack washers and deform pipes. Hand-tighten, then use tools for only a small additional turn.
Misaligning Pipes
Improper alignment between the trap and tailpiece results in strain and future leaks. Confirm all parts fit snugly and are properly oriented.
Ignoring Local Plumbing Codes
Some regions require specific materials or installation methods. Check local codes or consult a professional if unsure.
Example: In my experience, failing to use a proper trap led to sewer odors in a basement utility sink. Installing a P-trap resolved the issue immediately.
Not Testing Thoroughly
Skipping leak tests can result in unnoticed drips that damage cabinets. Always test with running water before finishing.
Real-world Examples And Case Studies
Examining practical situations enhances understanding and provides actionable insights.
Example 1: Kitchen Sink Drain Replacement In An Older Home
A homeowner with a 20-year-old kitchen sink noticed persistent leaks. Upon inspection, the brass strainer had corroded and the gasket had deteriorated. Replacing the entire drain assembly with a stainless steel kit eliminated leaks and improved water flow. The homeowner followed step-by-step instructions and completed the project in under two hours.
Example 2: Bathroom Sink Pop-up Drain Installation
A bathroom sink with a dated pop-up drain suffered from clogs and slow drainage. After removing the old drain and installing a modern push-button pop-up assembly, the sink drained efficiently and the new design simplified cleaning.
Refer to How To Fix A Slow Draining Kitchen Sink for more tips on improving drainage.
Example 3: Utility Sink Upgrade For Heavy-duty Cleaning
A utility sink used for laundry and tool cleaning required a robust PVC drain to withstand chemicals and debris. Installing a heavy-duty kit with reinforced washers prevented leaks and ensured longevity, even under frequent use.
Pro Tip: Utility sinks benefit from larger diameter drains for faster water evacuation and clog resistance.
Example 4: Addressing Clogs During Installation
A kitchen drain installation was delayed due to a clogged pipe. Using a snake tool and following advice from How To Clear A Clogged Kitchen Sink Drain, the homeowner cleared the blockage and continued installation without complications.
Troubleshooting And Maintenance Tips
Proper maintenance extends the life of your sink drain and minimizes future repairs.
Preventing Clogs
- Use strainers to catch food particles and hair.
- Avoid pouring grease or oil down the drain.
- Flush drains with hot water weekly.
Handling Leaks
- Inspect connections every six months.
- Replace washers and gaskets if wear is detected.
- Tighten slip nuts at the first sign of moisture.
Dealing With Odors
- Clean traps regularly to remove buildup.
- Use baking soda and vinegar to neutralize odors.
- If odors persist, check for improper trap installation.
Maintaining Garbage Disposal Drains
- Run cold water before and after using the disposal.
- Grind ice cubes to clean blades.
- Avoid fibrous foods that can clog the mechanism.
For comprehensive advice, see How To Fix Kitchen Sink Not Draining.
Seasonal Maintenance
Cold weather can cause pipes to contract and joints to loosen. Inspect drains before winter and tighten connections as needed.
Advanced Techniques: Upgrades And Custom Solutions
Experienced DIYers or those seeking enhanced performance may consider advanced upgrades.
Installing A High-efficiency Drain Assembly
Modern drains offer features such as anti-clog designs, sound insulation, and quick-release mechanisms. Compare options based on durability and ease of maintenance.
| Feature | Standard Drain | High-Efficiency Drain |
|---|---|---|
| Anti-Clog Design | No | Yes |
| Sound Insulation | No | Yes |
| Quick-Release | No | Yes |
| Material | Steel/PVC | Brass/Stainless |
Customizing For Unique Sink Materials
Composite or stone sinks may require special gaskets and silicone sealants. Consult manufacturer guidance and use compatible parts.
Upgrading To Touchless Or Smart Drains
Smart drains feature sensors and self-cleaning mechanisms. Installation follows similar steps, with additional wiring for sensors.
Integrating Water Filtration
Some sink drains can be paired with under-sink water filtration systems. This requires extra plumbing but improves water quality.
For more information on improving kitchen functionality, visit Wikipedia.
Frequently Asked Questions
What Should I Do If My Newly Installed Sink Drain Leaks?
If you notice leaks after installation, turn off the water supply and inspect all connections. Common causes include improperly seated gaskets, insufficient plumber’s putty, or misaligned pipes. Remove the affected joint, clean surfaces, apply fresh sealant, and retighten. Persistent leaks may require replacing worn washers or consulting a plumber.
Can I Install A Sink Drain Without Removing The Sink?
Yes, most sink drains can be installed from underneath without removing the sink. However, if space is limited or corrosion has affected the sink’s underside, temporary removal may facilitate easier installation and thorough cleaning.
Are There Eco-friendly Sink Drain Options?
Eco-friendly drains are made from recycled materials such as stainless steel or brass and feature designs that minimize water waste. Additionally, pairing your drain with a water-saving faucet or filtration system enhances sustainability.
How Often Should Sink Drains Be Maintained?
Routine maintenance every six months is recommended. Inspect for leaks, clean traps, and flush with hot water. If your home has hard water, more frequent cleaning prevents mineral buildup.
What Is The Difference Between A P-trap And An S-trap?
A P-trap is shaped like the letter “P” and is standard in modern plumbing, preventing sewer gases from entering the home while allowing water to flow freely. An S-trap curves in an S-shape and is less common, often prohibited by code due to siphoning risks. Always use a P-trap unless local codes specify otherwise.
Proper installation and maintenance of your sink drain ensure lasting performance and a healthier home environment. With this comprehensive guide, you can confidently address installation challenges, avoid common mistakes, and enjoy a reliable plumbing system. Remember to consult professionals for complex issues and stay proactive with regular maintenance to prevent future problems.