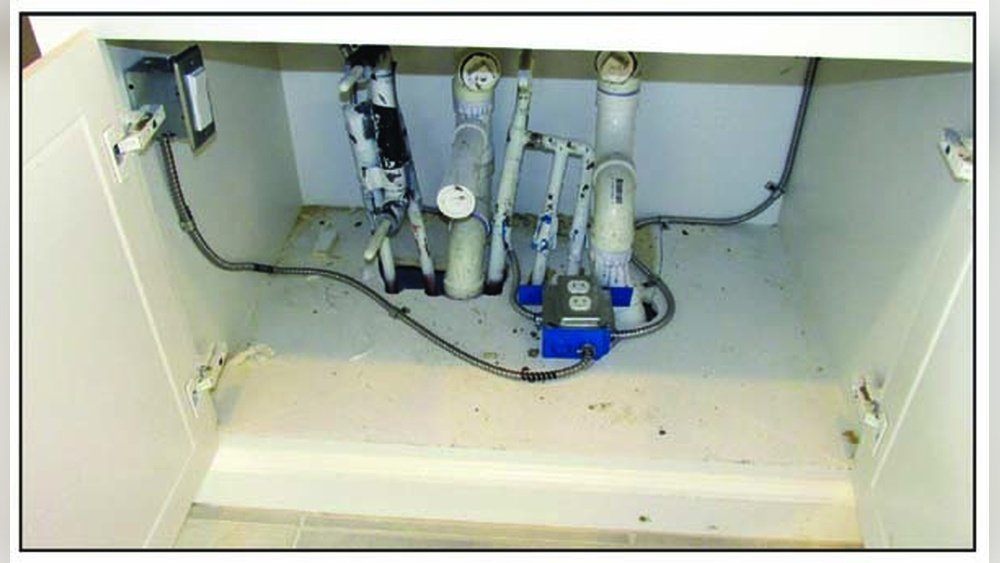
Installing an electrical outlet under your sink can be very useful. You can plug in small appliances like garbage disposals or water filters. If you do not have an outlet there, it can be hard to use these devices. This guide will help you install an outlet safely and easily.
What You Need Before You Start
Before you begin, gather all the tools and materials. Having everything ready will make the job faster and safer.
- Outlet box (plastic or metal, suitable for wet areas)
- Ground fault circuit interrupter (GFCI) outlet – required near water
- Electrical cable (14/2 or 12/2 wire, depending on your circuit)
- Wire stripper
- Screwdriver (flathead and Phillips)
- Voltage tester
- Drill with hole saw (if needed for the outlet box)
- Wire nuts
- Electrical tape
- Measuring tape
- Flashlight (optional)

Credit: forum.nachi.org
Safety First
Electricity can be dangerous. Always take safety steps before working.
- Turn off the power at the circuit breaker box. Do not just turn off the switch.
- Use a voltage tester to make sure the power is off before touching wires.
- Wear rubber-soled shoes and do not work in wet areas.
- If you feel unsure, call a professional electrician.
Step 1: Choose the Outlet Location
Find a good spot under your sink for the outlet box. Pick a place that is dry and easy to reach. Avoid areas where water pipes can drip or leak.
Common spots are on the cabinet wall or the back panel under the sink. The outlet should be mounted at least 6 inches above the floor of the cabinet.

Credit: forum.nachi.org
Step 2: Turn Off the Power
Go to your home’s breaker panel. Find the breaker for the kitchen or the area near the sink. Switch it off. Use your voltage tester to check the wires where you will work.
Remember: No power means no shocks.
Step 3: Cut the Hole for the Outlet Box
Use the outlet box as a guide. Mark the wall where you want to install it. Use a pencil to draw the outline.
Use a drill with a hole saw or a keyhole saw to cut the hole carefully. Make sure the hole fits the outlet box snugly.
Step 4: Run the Electrical Cable
You need to connect the new outlet to power. This means running electrical cable from a nearby power source.
Look for an existing outlet or junction box nearby. This will be your source of power.
Measure the distance from the source to the new outlet location. Cut the cable a little longer than this distance.
Carefully run the cable behind walls or along cabinet edges. Use cable clips to keep the wire in place.
Step 5: Install the Outlet Box
Insert the outlet box into the hole. Make sure it fits tightly.
Use screws to fix the box firmly to the wall or cabinet. The box should not move.
Step 6: Wire the Outlet
Strip about 6 inches of the cable’s outer jacket. Then strip about 1/2 inch of insulation from each wire: black (hot), white (neutral), and green or bare (ground).
| Wire Color | Function | Connection Point on Outlet |
|---|---|---|
| Black | Hot (live) wire | Brass or gold screw |
| White | Neutral wire | Silver screw |
| Green or bare copper | Ground wire | Green screw |
Attach the wires to the outlet screws. Tighten the screws firmly but do not overtighten. Use wire nuts if connecting to other wires in the box. Wrap connections with electrical tape for safety.
Step 7: Install the GFCI Outlet
Near sinks, you must use a GFCI outlet. It protects from electric shock.
Connect the wires to the GFCI outlet following the marks on the device. Usually, line wires go to the “LINE” terminals. Do not connect to the “LOAD” terminals unless you want to protect other outlets downstream.
Push the wires back into the outlet box carefully. Attach the outlet to the box with screws.
Step 8: Attach the Outlet Cover Plate
Put the cover plate over the outlet. Secure it with screws. This keeps the outlet safe and clean.
Step 9: Turn the Power On and Test
Go back to your breaker panel. Turn the breaker back on.
Use a voltage tester or plug in a small device to check if the outlet works. Press the “TEST” and “RESET” buttons on the GFCI outlet to make sure it operates correctly.
Tips for Success
- Always check local building codes before starting.
- Keep wires neat and do not force them into the box.
- If the cabinet is wet or damp, consider a weatherproof outlet box.
- Label the new outlet on your breaker panel for future use.
- If you feel unsure about wiring, call a licensed electrician.
Why Install an Outlet Under the Sink?
Having an outlet under the sink makes it easy to add appliances.
- Garbage disposals need power.
- Water filters or softeners may need electricity.
- Small kitchen tools can plug in nearby.
This setup keeps cords hidden and counters clean. It also improves safety by reducing the need for extension cords.
Final Words
Installing an outlet under your sink is a useful project. Follow steps carefully and always keep safety first. With the right tools and patience, you can do it yourself.
Remember, if you feel unsure, hiring a professional is the safest choice.
Frequently Asked Questions
How Do I Install An Outlet Under The Sink Safely?
Turn off the power at the breaker before starting. Use a GFCI outlet to protect against water risks. Follow local electrical codes for safety.
What Tools Do I Need To Install An Outlet Under A Sink?
You need a voltage tester, wire stripper, screwdriver, drill, and electrical tape. These tools help you work safely and correctly.
Can I Install A Regular Outlet Under A Kitchen Sink?
No, a GFCI outlet is required under sinks to prevent electric shock. It cuts power quickly if it detects a problem.
How Far Should The Outlet Be From The Sink Basin?
Keep the outlet at least 6 inches away from the sink basin. This distance reduces the chance of water splashing on the outlet.