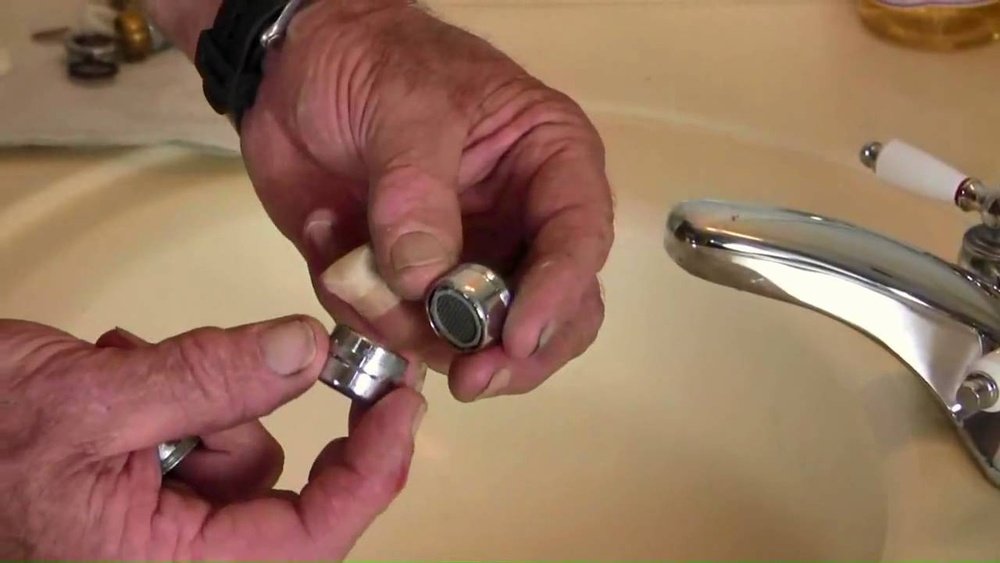
Do you want to clean or fix your kitchen sink faucet? The first step is to open the faucet head. This part is called an aerator. It is a small device at the tip of your faucet.
The aerator controls how water flows out of the faucet. Sometimes, it gets clogged with dirt or minerals. This can make the water flow weak or uneven. Opening the aerator helps you clean or replace it. This guide will show you how to open a kitchen sink faucet head easily.
What is a Faucet Aerator?
An aerator is a small tool at the faucet’s end. It mixes air with water. This makes the water flow softer and less splashy. It also saves water by controlling the flow.
Most kitchen faucets have aerators. They are usually round and made of metal or plastic. Inside, there is a screen and some small parts. These parts can get dirty over time.
Why Open the Aerator?
- Clean dirt or mineral build-up: Hard water can leave white marks.
- Fix water flow issues: Water may come out weak or uneven.
- Replace a broken aerator: Sometimes, the aerator breaks or wears out.
- Inspect for damage: Check if the parts inside are okay.
Tools You Might Need
Before you start, gather some simple tools. You may not need all of them, but it is good to have them ready.
- Rubber gloves (optional)
- A cloth or towel
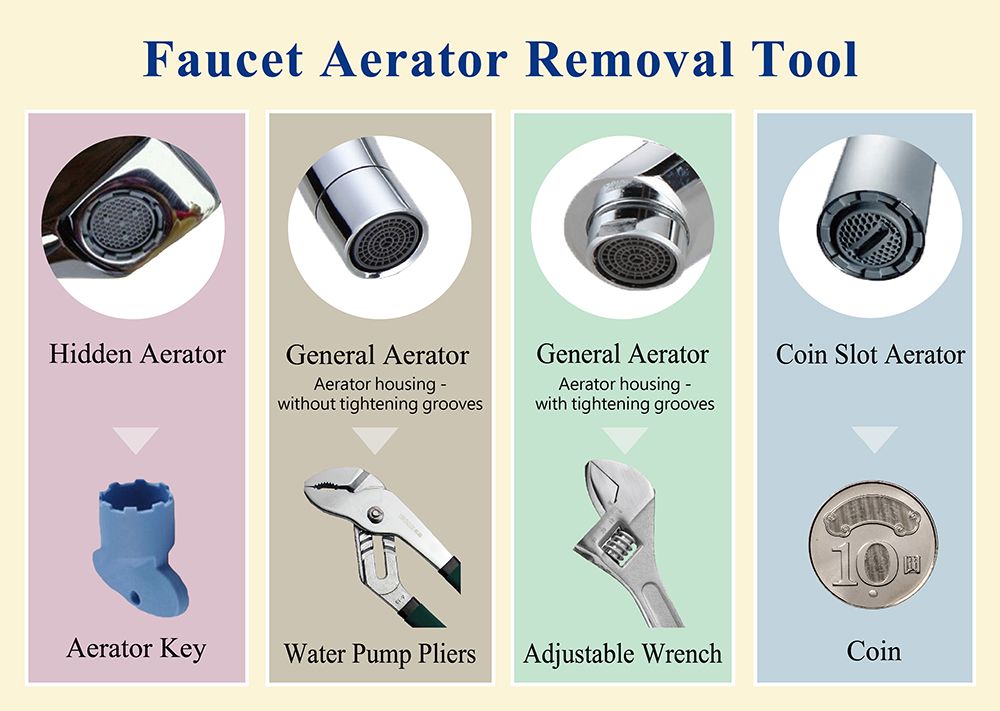
- Adjustable wrench or pliers
- Rubber jar opener or rubber band
- Small brush or old toothbrush
- Vinegar (for cleaning)
:max_bytes(150000):strip_icc()/removing-a-faucet-aerator-2718836-hero-01d87b8d7dd942ce8a8eee99f555781f.jpg)
Credit: www.thespruce.com
Step-by-Step Guide to Open the Kitchen Sink Faucet Head
Step 1: Turn Off The Water (optional)
You do not always need to turn off the water. But it is safer to do so. Look under your sink for the water valves. Turn them clockwise to close.
This stops water from flowing while you work. It helps avoid leaks or spills.
Step 2: Cover The Drain
Place a cloth or towel over the drain. This prevents small parts from falling inside. You do not want to lose the aerator pieces down the drain.
Step 3: Try To Unscrew The Aerator By Hand
Look at the faucet tip. The aerator is the round piece at the end.
Hold the faucet with one hand. Use the other hand to turn the aerator counterclockwise. If it moves, keep turning until it comes off.
Sometimes, the aerator is tight or stuck. Do not force it too hard. You could break it.
Step 4: Use A Rubber Grip Or Jar Opener
If the aerator is hard to turn, use a rubber grip. A rubber jar opener or a thick rubber band works well.
Wrap the rubber around the aerator. This gives you a better grip. Try to turn the aerator again. It should move more easily.
Step 5: Use Pliers Or Wrench Carefully
If it still does not move, try pliers or an adjustable wrench. Be very careful. The metal can scratch or dent the faucet.
Wrap a cloth or tape around the aerator first. This protects the metal.
Gently grip the aerator with the pliers or wrench. Turn it counterclockwise. Do not use too much force. If it does not move, try a little more, but be patient.
Step 6: Remove The Aerator
Once it loosens, unscrew the aerator by hand. Keep it level to avoid dropping parts.
Inside, you will see a small screen and other parts. These are the aerator components.
Credit: www.strongltd.com.tw
How to Clean the Aerator
After opening the aerator, you can clean it. Dirt and minerals can block the screen.
- Take apart the aerator pieces carefully.
- Soak them in vinegar for 30 minutes. Vinegar helps dissolve mineral build-up.
- Use a small brush or old toothbrush to scrub the parts gently.
- Rinse all parts with clean water.
- Dry the parts with a cloth or let them air dry.
After cleaning, put the aerator back together.
How to Put the Aerator Back
Once clean or replaced, put the aerator back on the faucet.
- Line up the threads of the aerator with the faucet tip.
- Turn the aerator clockwise by hand to screw it on.
- Make sure it is tight but do not over-tighten.
- If needed, use pliers or wrench to tighten gently with a cloth.
Turn the water back on if you had turned it off. Test the faucet to check if water flows well.
Tips to Make the Job Easier
- Wear rubber gloves to protect your hands.
- Use a cloth to protect the faucet from scratches.
- If stuck, spray a little cooking oil or WD-40 on the aerator threads. Wait a few minutes, then try again.
- Clean the aerator every few months to avoid build-up.
- If the aerator is broken, buy a replacement at any hardware store.
Common Problems and Solutions
| Problem | Possible Cause | Solution |
|---|---|---|
| Aerator stuck and won’t turn | Mineral build-up or corrosion | Use rubber grip, oil spray, and gentle force |
| Water leaks after reassembly | Aerator not screwed in tightly or damaged washer | Tighten carefully or replace washer |
| Water flow still weak | Damaged aerator screen or other faucet issues | Replace aerator or check faucet parts |
| Parts fall into the drain | No drain cover or cloth used | Always cover drain before opening aerator |
Summary
Opening your kitchen sink faucet head (aerator) is easy. Follow these simple steps. Use your hands first. Then try rubber grip or pliers if needed. Clean the parts well to keep water flowing nicely.
Remember to protect your faucet and parts. Take your time and be gentle. With these tips, your faucet will work well again. No need to call a plumber for simple cleaning or small fixes.
Keep your kitchen faucet clean and enjoy smooth water flow every day!
Frequently Asked Questions
How Do I Remove A Kitchen Sink Faucet Aerator?
Turn off the water supply first. Use your hand or a wrench to unscrew the aerator gently. Clean or replace it as needed.
What Tools Are Needed To Open A Faucet Aerator?
Most aerators can be removed by hand. If tight, use pliers or an adjustable wrench with a cloth to avoid scratches.
Can I Clean The Aerator Without Removing It?
No, removing the aerator is necessary for proper cleaning. This helps clear debris and improve water flow.
How Often Should I Open And Clean The Aerator?
Clean your aerator every 3 to 6 months. This prevents clogging and keeps water pressure steady.