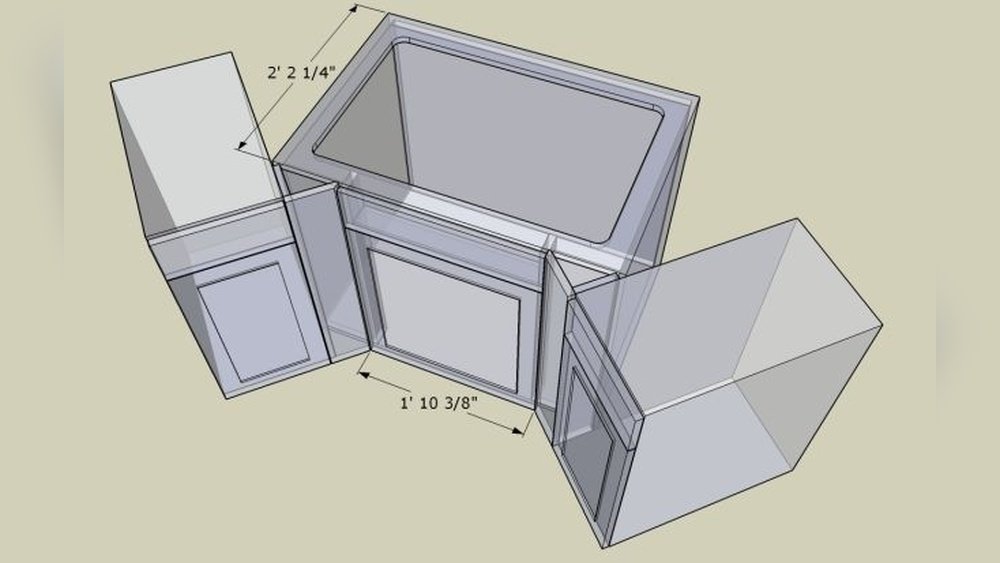
Building a corner sink base cabinet is one of the most rewarding and complex DIY projects you can undertake in a kitchen renovation. Not only does it require precision woodworking and an understanding of plumbing requirements, but it also demands smart planning to maximize functionality in often-underused corner spaces.
Whether you’re customizing for a unique kitchen layout or replacing an outdated fixture, mastering this build gives you control over materials, dimensions, and style. A well-built corner sink base cabinet enhances workflow, increases storage, and can even raise your home’s value.
Many homeowners hesitate to tackle this project, fearing the complexity of angles and the challenge of integrating plumbing in tight quarters. Yet, with a systematic approach and clear guidance, even intermediate DIYers can achieve professional results. This guide leverages expert tips, real-world examples, and data-driven comparisons to ensure you understand every critical step, from design to installation.
You’ll learn how to select the right materials, cut accurate angles, and accommodate modern plumbing, all while ensuring the finished cabinet meets both aesthetic and functional standards.
Key Takeaways
- Corner sink base cabinets optimize kitchen space and increase efficiency.
- Planning and precise measurements are essential for a successful build.
- Quality materials and proper joinery techniques ensure durability.
- Specialized plumbing considerations are critical for corner installations.
- Professional guidance can prevent costly mistakes and speed up the process.
Planning Your Corner Sink Base Cabinet
A successful cabinet build starts with careful planning. Corner cabinets differ significantly from standard base cabinets, requiring attention to both spatial geometry and plumbing logistics.
Assessing Kitchen Layout
Begin by measuring your kitchen’s corner area. The most common configurations are blind corner and L-shaped cabinets. A blind corner cabinet has one side deeper than the other, while an L-shaped cabinet forms a right angle. Measure wall lengths, ceiling height, and account for existing fixtures or appliances.
- Use a laser measure for accuracy.
- Record all dimensions in a sketch.
- Consider traffic patterns and accessibility.
Choosing The Right Sink
Corner sinks come in various shapes: round, D-shaped, and rectangular. Most standard kitchen sinks range from 22″ to 36″ wide. The choice affects the cabinet’s internal structure and plumbing layout.
- Undermount sinks require a solid surface countertop.
- Drop-in sinks are easier for DIYers to install.
- Double-bowl sinks need more space and complex plumbing.
Material Selection
For durability and moisture resistance, opt for plywood or MDF with a high-quality veneer. Avoid particleboard in sink cabinets due to water exposure risks. Solid wood frames add strength, but ensure all surfaces are sealed.
- Plywood: Strong, water-resistant.
- MDF: Smooth, ideal for painting, but less water-resistant.
- Hardwood: Excellent for face frames and doors.
Example: In my experience, using 3/4″ birch plywood for the cabinet box and maple for the face frame delivers superior longevity and finishes well.
Budgeting And Timeline
Building a corner sink base cabinet typically costs between $200 and $600, depending on materials and hardware. Allow at least 2-3 days for construction and installation, factoring in drying time for adhesives and finishes.
| Material | Average Cost (USD) | Water Resistance | Ease of Finishing |
|---|---|---|---|
| Plywood | $60-120/sheet | High | Moderate |
| MDF | $40-80/sheet | Low | Easy |
| Solid Wood | $90-200/board | High | High |

Credit: www.youtube.com
Designing The Cabinet Structure
Designing the cabinet involves balancing structural strength, accessibility, and aesthetics. A corner sink base cabinet must support the sink’s weight and accommodate plumbing, all while fitting neatly into the corner.
Creating A Detailed Cabinet Plan
Use cabinet design software or graph paper to sketch your cabinet. Account for the sink’s dimensions, countertop overhang, and plumbing clearance.
- Include toe kick (typically 3.5-4″ high).
- Plan for a minimum 24″ depth and 36″ width for standard sinks.
- Allow at least 2″ extra space behind the sink for plumbing.
Determining Joinery Methods
Choose strong joinery techniques such as dado joints, pocket screws, or mortise and tenon for the cabinet’s main box. Avoid nails alone, as they may loosen over time.
- Dado joints: Ideal for side panels and bottom.
- Pocket screws: Quick and strong for face frames.
- Mortise and tenon: Best for heavy-duty applications.
Incorporating Storage Features
Maximize usable space with clever storage solutions. Lazy Susans, pull-out trays, and under-sink organizers can improve functionality.
Example: A client added a custom pull-out trash bin in their corner sink cabinet, increasing convenience and freeing up floor space.
Selecting Cabinet Hardware
Choose hardware rated for moisture exposure. Soft-close hinges, heavy-duty slides, and corrosion-resistant handles are ideal.
- Soft-close: Reduces noise, protects cabinet integrity.
- Stainless steel: Prevents rust.
- Adjustable feet: Helps level cabinet on uneven floors.
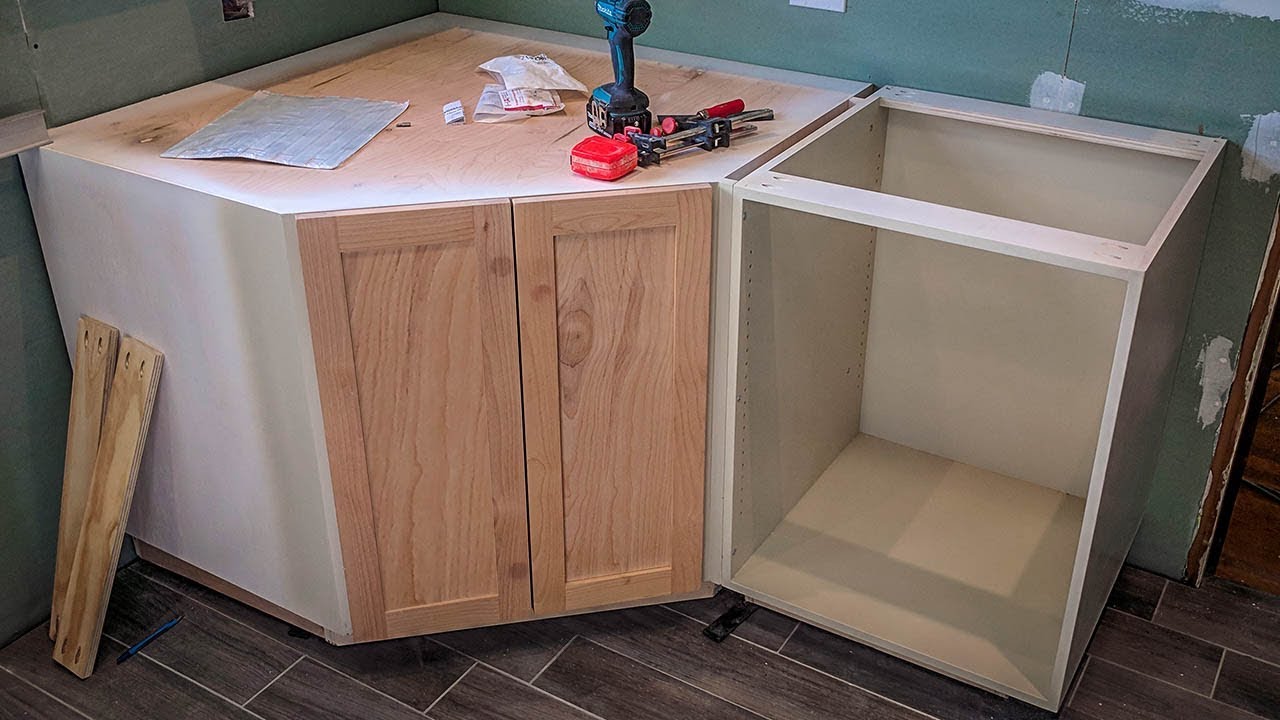
Credit: www.youtube.com
Cutting And Assembling Cabinet Components
Precision in cutting and assembly is crucial for a quality cabinet. Accurate angles ensure the cabinet fits snugly in the corner and supports the sink securely.
Measuring And Cutting Panels
Use a circular saw or table saw for straight cuts. For angled cuts (typically 45° for L-shaped cabinets), a miter saw provides accuracy.
- Mark all cuts with a pencil and square.
- Double-check measurements before cutting.
- Dry-fit panels before assembly.
Warning: Incorrect angles can result in gaps that compromise structural integrity and appearance.
Assembling The Cabinet Box
Start by assembling the base and sides. Use wood glue and screws for a strong bond. Attach the back panel, then install the face frame.
- Clamp panels during drying to prevent shifting.
- Use pilot holes to avoid splitting wood.
- Reinforce corners with metal brackets if needed.
Installing Internal Supports
Corner sink cabinets require extra bracing to support the sink. Add cross supports under the sink cutout.
- Use 2×4 lumber for braces.
- Secure with screws and wood glue.
- Test for stability by applying downward pressure.
Preparing For Plumbing
Cut openings for water supply lines, drainpipes, and vent stacks. Use a hole saw for clean, round holes.
- Position holes for easy access.
- Smooth edges with sandpaper.
- Seal cut edges to prevent moisture damage.
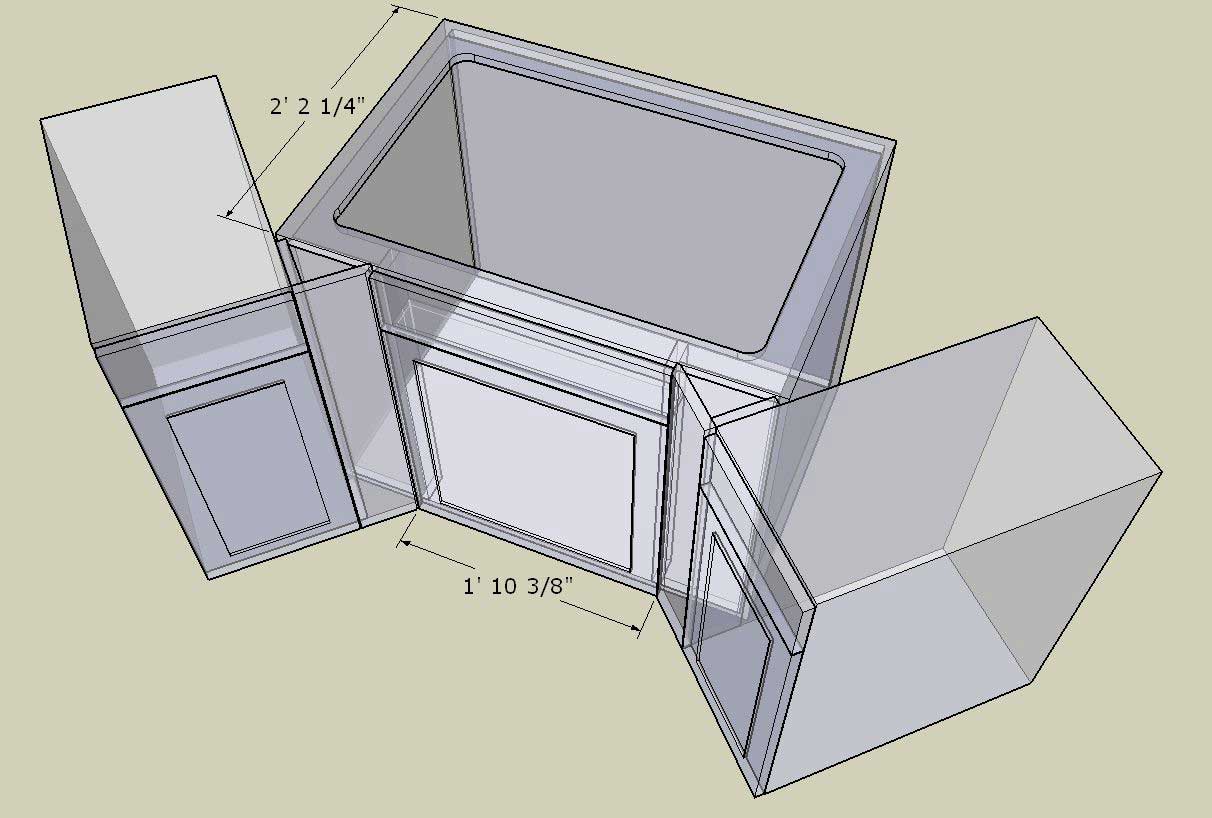
Credit: woodweb.com
Fitting The Sink And Countertop
Proper installation of the sink and countertop ensures watertight seals and long-term durability. This stage requires careful handling and precise alignment.
Installing The Countertop
Measure and cut the countertop to fit the cabinet’s shape. Laminate, solid surface, and stone are popular choices.
- Laminate: Affordable, easy to cut.
- Solid surface: Durable, seamless look.
- Stone: Elegant, but heavy, requires extra support.
Pro Tip: When installing a heavy stone countertop, reinforce the cabinet base with additional bracing to prevent sagging.
Cutting The Sink Opening
Mark the sink cutout using the manufacturer’s template. Use a jigsaw for curved edges.
- Tape the countertop to prevent chipping.
- Test-fit the sink before final installation.
- Sand edges for a smooth finish.
Mounting The Sink
Apply silicone sealant around the cutout. Lower the sink into place, ensuring it sits flush.
- Tighten mounting clips evenly.
- Wipe away excess sealant.
- Allow to cure per manufacturer instructions.
Connecting Plumbing Fixtures
Install faucet, sprayer, and soap dispenser as needed. Connect supply lines and drainpipes, ensuring all fittings are tight.
- Use Teflon tape on threaded connections.
- Check for leaks before finishing the cabinet.
- Consider linking to the guide How To Install A Drop-In Kitchen Sink for detailed sink installation tips.
Real-world Examples And Case Studies
Learning from real projects can help you avoid common pitfalls and achieve superior results.
Example 1: L-shaped Cabinet In A Small Kitchen
A homeowner with a 10×10 kitchen built a custom L-shaped corner sink cabinet to maximize space. Using birch plywood, they created a 36″x36″ cabinet with a double-bowl sink. The project required careful plumbing rerouting and custom pull-out shelves for cleaning supplies.
Result: Increased storage by 15% and improved workflow around the sink area.
Example 2: Blind Corner Cabinet With Lazy Susan
In a mid-century kitchen remodel, a blind corner base was constructed for a round sink. The builder installed a Lazy Susan to access deep corner storage, using moisture-resistant MDF. The cabinet included adjustable feet for leveling on an uneven floor.
Result: Enhanced accessibility and easier maintenance.
Example 3: Commercial Kitchen Retrofit
A restaurant upgraded its prep area with a large corner sink cabinet built from marine-grade plywood. Heavy-duty supports were added to handle a triple-bowl sink and commercial faucet. Stainless steel hardware ensured durability.
Result: Improved hygiene and workflow in a high-traffic environment.
| Project Type | Cabinet Shape | Sink Type | Unique Feature | Outcome |
|---|---|---|---|---|
| Residential | L-Shaped | Double Bowl | Pull-Out Shelves | +15% Storage |
| Residential | Blind Corner | Round | Lazy Susan | Easy Access |
| Commercial | L-Shaped | Triple Bowl | Heavy-Duty Bracing | Improved Workflow |
Plumbing Considerations For Corner Sink Cabinets
Plumbing is often the most challenging aspect of corner sink cabinet installation. Careful planning and execution are essential to prevent leaks and ensure code compliance.
Routing Supply Lines
Corner cabinets may require longer supply lines due to their position. Use flexible braided hoses for easier routing.
- Ensure shutoff valves are accessible.
- Secure lines to cabinet walls to prevent movement.
- Avoid sharp bends to prevent kinks.
Installing Drainpipes
Corner sink drains typically need custom fittings to reach the main waste line. Use PVC or ABS pipes, and maintain proper slope for drainage.
- Use 45° elbows for smooth transitions.
- Install air admittance valves if venting is difficult.
- Test drainage before finalizing installation.
Venting And Code Compliance
Proper venting prevents slow drainage and odors. Check local codes for vent placement and minimum pipe diameters.
- Consult a plumber for complex venting.
- Use stack vents if possible.
- Reference Wikipedia Plumbing Guide for code requirements.
Integrating Accessories
Consider adding a sink sprayer, garbage disposal, or soap dispenser for convenience.
- Ensure electrical outlets are accessible for disposals.
- Plan for adequate space under the sink for accessories.
- For step-by-step accessory installation, see How To Install A Sink Sprayer.
Finishing And Installing Cabinet Doors
Finishing touches make your cabinet blend seamlessly with the kitchen and improve durability.
Selecting Door Styles
Choose doors that complement your kitchen style: shaker, slab, or raised panel. Consider moisture-resistant finishes for longevity.
- Shaker: Simple, classic.
- Slab: Modern, easy to clean.
- Raised panel: Traditional, adds depth.
Painting And Sealing
Apply primer and paint or stain to all surfaces. Use polyurethane for extra protection.
- Sand between coats for smoothness.
- Seal edges and joints thoroughly.
- Choose low-VOC products for health and safety.
Mounting Doors And Hardware
Install hinges and handles, ensuring smooth operation and alignment.
- Use a template for handle placement.
- Adjust hinges for proper gap and swing.
- Test doors for clearance and fit.
Final Quality Checks
Inspect for gaps, misalignments, and finish imperfections. Address issues before reattaching plumbing and countertop.
- Check all joints for strength.
- Ensure plumbing access is clear.
- Clean surfaces and hardware.
Comparing Corner Sink Base Cabinet Designs
Selecting the right cabinet design depends on kitchen layout, usage, and personal preferences. Below is a comparison of popular corner sink cabinet types.
| Design Type | Space Efficiency | Ease of Access | Plumbing Complexity | Recommended For |
|---|---|---|---|---|
| L-Shaped | High | Moderate | Medium | Large Kitchens |
| Blind Corner | Moderate | High | High | Small Kitchens |
| Diagonal | Low | Easy | Low | Modern Designs |
Common Mistakes And How To Avoid Them
Understanding common pitfalls can help you sidestep costly errors and achieve a professional finish.
Inaccurate Measurements
Failing to measure correctly can lead to gaps, poor fit, and plumbing conflicts.
- Double-check all measurements.
- Dry-fit components before final assembly.
- Use a checklist for each step.
Insufficient Support
A weak cabinet frame can lead to sagging, especially with heavy sinks and countertops.
- Add extra bracing under the sink.
- Use high-quality materials for structural parts.
- Inspect for wobble before installing the countertop.
Poor Moisture Protection
Water damage is a leading cause of cabinet failure.
- Seal all edges and joints.
- Use moisture-resistant paints and finishes.
- Avoid particleboard in high-moisture areas.
Ignoring Plumbing Access
Difficult-to-access plumbing can make repairs expensive and time-consuming.
- Plan for removable panels or doors.
- Keep supply lines and drains visible.
- Test access before final installation.
Frequently Asked Questions
What Is The Best Material For A Corner Sink Base Cabinet?
The best material is plywood with a hardwood face frame. Plywood is both strong and water-resistant, making it ideal for areas exposed to moisture. For finishes, hardwood like maple or oak provides durability and a premium look.
How Do I Ensure My Sink Won’t Leak In A Corner Cabinet?
To prevent leaks, use silicone sealant around all sink edges and fittings. Install a waterproof membrane under the sink area and regularly inspect plumbing connections for drips. If you notice any moisture, address it immediately to prevent damage.
Can I Install A Garbage Disposal In A Corner Sink Cabinet?
Yes, but plan carefully. Ensure there’s enough space for the disposal unit and access for maintenance. Use flexible plumbing fittings and install an electrical outlet nearby. See How To Install A Garbage Disposal for detailed instructions.
What Are The Challenges With Plumbing In Corner Cabinets?
The main challenges are complex routing and limited access. Corner cabinets often require longer supply lines and custom drain fittings. Make sure you have removable panels for easy access, and consult a plumber for difficult venting situations.
Is It Possible To Retrofit An Existing Cabinet For A Corner Sink?
Retrofitting is possible but can be labor-intensive. You’ll need to modify the cabinet structure, reroute plumbing, and possibly reinforce for sink weight. It’s essential to check for enough space and accessibility before starting.
Building a corner sink base cabinet is a project that rewards careful planning, precise execution, and attention to detail. By following expert guidance, selecting quality materials, and avoiding common mistakes, you can create a functional, attractive centerpiece for your kitchen.
Remember to consult professionals for complex plumbing or structural concerns, and enjoy the satisfaction of a custom solution that enhances both style and workflow.