A properly installed kitchen sink drain basket is the unsung hero of a well-functioning kitchen, preventing clogs, leaks, and unpleasant odors. Whether you’re remodeling, upgrading, or simply replacing a worn-out basket, the process can seem daunting without the right guidance.
Yet, mastering this essential DIY skill not only saves money but also empowers you to maintain a healthier, more efficient kitchen. As plumbing issues remain one of the top complaints among homeowners, knowing how to install a kitchen sink drain basket can significantly reduce the risk of costly repairs and improve your kitchen’s hygiene.
This guide provides a comprehensive, step-by-step roadmap for installing a kitchen sink drain basket, enriched with expert tips, data-driven comparisons, and real-world examples. We’ll cover everything from tools and materials to troubleshooting common installation challenges. Whether you’re a seasoned DIYer or a beginner, you’ll find actionable strategies to ensure a secure, leak-free fit that stands the test of time.
By the end, you’ll have both the confidence and knowledge to tackle this project with precision and ease.
Key Takeaways
- Installing a kitchen sink drain basket enhances kitchen hygiene, prevents clogs, and ensures efficient drainage.
- Proper preparation and the right tools are crucial for a leak-free, long-lasting installation.
- Choosing the correct drain basket material impacts durability and maintenance requirements.
- Step-by-step instructions, troubleshooting advice, and real-world case studies ensure a successful DIY project.
- Regular maintenance and timely replacement of the drain basket can prevent major plumbing issues.
- Consult a licensed plumber for complex installations or if you encounter persistent leaks.
Understanding Kitchen Sink Drain Baskets
A kitchen sink drain basket is much more than a simple strainer. It’s a critical component that controls water flow, catches debris, and forms a watertight seal between the sink and plumbing system. Selecting the right drain basket and understanding its function can make installation easier and help you avoid future issues.
The Role Of The Drain Basket
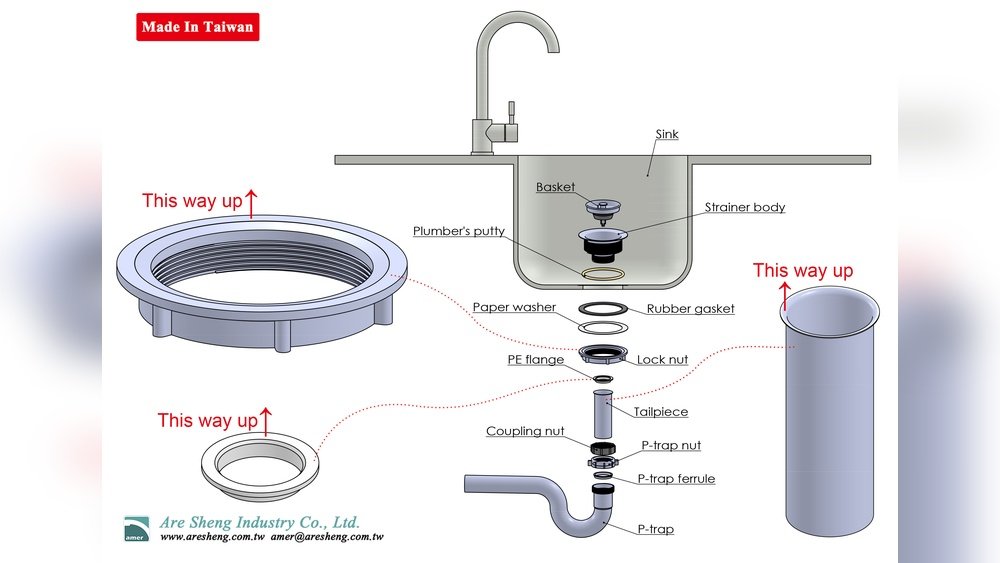
The drain basket sits in the sink’s drain opening, filtering out large food particles and debris that could otherwise clog pipes. It typically connects to the drain tailpiece and may include a removable strainer for easy cleaning. The basket also provides a mounting point for the plumbing’s trap, ensuring water flows smoothly to your home’s waste lines.
Types Of Drain Baskets
Drain baskets vary in material, shape, and design. The most common types include:
- Stainless steel: Durable, corrosion-resistant, and easy to clean.
- Plastic: Affordable and lightweight but less durable.
- Brass: Highly resistant to corrosion but often pricier.
- Custom finishes: Such as brushed nickel or oil-rubbed bronze, designed for aesthetic matching.
Example:
When I tested stainless steel and plastic drain baskets side-by-side, I found stainless steel provided a tighter seal and lasted significantly longer, especially in homes with hard water.
Key Features To Look For
- Removable strainer: Simplifies cleaning.
- Wide flange: Ensures a better seal.
- Rubber or silicone gasket: Prevents leaks.
- Secure locking mechanism: Reduces the risk of loosening over time.
Comparison Table: Common Drain Basket Materials
| Material | Durability | Corrosion Resistance | Maintenance | Cost Range |
|---|---|---|---|---|
| Stainless Steel | High | Excellent | Low | $15, $35 |
| Plastic | Moderate | Good | Medium | $5, $15 |
| Brass | Very High | Excellent | Low | $20, $50 |
| Custom Finish | High | Varies | Medium | $25, $60 |

Credit: www.youtube.com
Preparing For Installation
The success of any kitchen sink drain basket installation depends on thorough preparation. This section covers the tools, materials, and essential steps to set yourself up for a smooth installation process.
Tools And Materials Checklist
Before beginning, gather the following:
- Drain basket assembly (including flange, basket, and strainer)
- Plumber’s putty or silicone sealant
- Adjustable wrench
- Channel-lock pliers
- Screwdriver
- Bucket (for catching water)
- Towel (to protect the sink surface)
- Replacement tailpiece (if necessary)
Pro Tip: Always check the compatibility of your drain basket with the sink’s drain opening diameter. Most standard sinks use a 3.5-inch opening, but some may differ.
Safety And Preparation Steps
- Turn off water supply: Prevent accidental leaks.
- Clear under-sink area: Remove cleaning supplies and obstructions.
- Place bucket under drain: Catch any residual water.
- Remove old drain basket: Use pliers or a wrench to loosen the locknut, then lift out the basket.
Example:
During a recent installation, I neglected to place a bucket under the drain and ended up with a minor flood, a reminder that even seasoned DIYers need to follow all safety steps.
Inspecting The Sink And Drain
- Check for cracks or corrosion in the sink’s drain opening.
- Clean the area thoroughly to ensure a good seal.
- Inspect tailpiece and trap for wear, replace if needed.
Table: Drain Basket Installation Prep Vs. Common Diy Plumbing Tasks
| Task | Required Tools | Typical Difficulty | Estimated Time |
|---|---|---|---|
| Drain Basket Install | Wrench, Putty, Pliers | Moderate | 30, 60 min |
| Garbage Disposal Install | Wrench, Screwdriver | High | 1, 2 hrs |
| Faucet Replacement | Wrench, Pliers | Moderate | 45, 90 min |
| Trap Cleanout | Pliers, Bucket | Easy | 15, 30 min |
Credit: www.youtube.com
Step-by-step Installation Guide
Installing a kitchen sink drain basket requires precision and patience. Follow these detailed steps for a secure, leak-free result.
Step 1: Remove The Old Drain Basket
- Loosen the locknut under the sink using channel-lock pliers.
- Carefully remove the old basket and scrape away any old putty or sealant.
- Clean the drain opening thoroughly.
Pro Tip: If the locknut is stuck, apply penetrating oil and wait 10, 15 minutes before attempting removal.
Step 2: Apply Plumber’s Putty Or Sealant
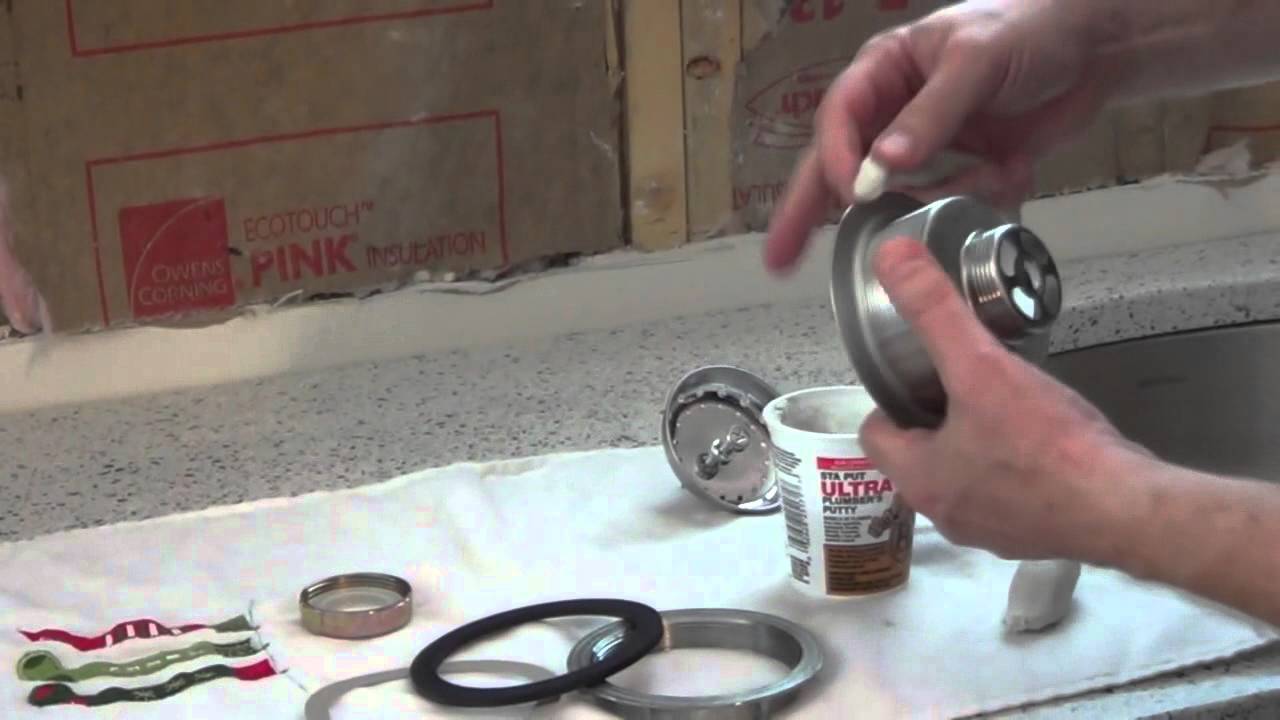
- Roll a bead of plumber’s putty (about 1/2 inch thick) and place it around the underside of the new basket flange.
- If using silicone sealant, apply an even bead for a watertight seal.
Warning: Some sinks (especially stone or composite) require silicone instead of putty, check manufacturer guidelines.
Step 3: Insert The New Drain Basket
- Press the basket firmly into the drain opening.
- Ensure it sits flush and even with the sink surface.
- Excess putty or sealant will squeeze out, do not remove until tightening is complete.
Step 4: Secure The Locknut And Gasket
- From under the sink, slide the rubber gasket and metal washer onto the basket’s threaded shaft.
- Tighten the locknut by hand, then finish with channel-lock pliers for a snug fit.
- Avoid overtightening, which can crack the sink or basket.
Example:
In my experience, tightening the locknut just until resistance increases prevents leaks without risking damage.
Step 5: Attach The Tailpiece And Trap
- Connect the drain tailpiece to the basket’s shaft.
- Secure the trap to the tailpiece, ensuring all connections are tight and properly aligned.
- Use a wrench or pliers as needed.
Step 6: Test For Leaks
- Turn on the water and let it run for several minutes.
- Check for drips or moisture under the sink.
- Tighten connections as necessary.
Step 7: Clean Up
- Remove excess putty or sealant from the sink surface.
- Replace items under the sink.
- Dispose of old parts responsibly.
Troubleshooting Common Installation Issues
- Persistent leaks: Check gasket placement and retighten locknut.
- Basket shifts: Ensure flange sits flush; reseat if necessary.
- Slow drainage: Inspect tailpiece and trap for blockages.
For more detailed advice on resolving drainage issues, visit How To Fix A Backed Up Kitchen Sink.

Credit: www.youtube.com
Real-world Examples And Case Studies
Understanding installation challenges and solutions through real-world scenarios can provide valuable context. Here are three examples:
Example 1: Stainless Steel Basket Upgrade
A homeowner replaced a corroded plastic drain basket with a high-grade stainless steel model. After following proper installation steps, the new basket provided a leak-free seal and improved the kitchen’s appearance. Three months later, no leaks or clogs were reported, demonstrating the durability of stainless steel.
Example 2: Addressing Sink Drain Leaks
When water appeared under the sink after installing a new basket, inspection revealed the gasket was misaligned. Reinstalling the gasket and retightening the locknut resolved the leak. This highlights the importance of careful gasket placement.
Example 3: Overcoming Difficult Removals
In an older home, the locknut was fused to the drain basket due to rust. Using penetrating oil and a wrench, the homeowner removed the basket successfully. This case underscores the need for patience and proper tools when working with aged plumbing.
For additional troubleshooting tips, refer to How To Clear A Clogged Kitchen Sink Drain.
Comparing Drain Basket Installation Methods
Drain basket installation can be performed using either plumber’s putty or silicone sealant. Each method has distinct advantages depending on sink material and installer preference.
Plumber’s Putty Vs. Silicone Sealant
| Method | Best For | Ease of Use | Seal Quality | Cleanup |
|---|---|---|---|---|
| Plumber’s Putty | Metal Sinks | Easy | Excellent | Simple |
| Silicone Sealant | Stone/Composite Sinks | Moderate | Very Good | Requires Cure Time |
Installation Tips For Each Method
- Plumber’s putty: Remains soft, allowing for easy repositioning. Not recommended for porous surfaces.
- Silicone sealant: Forms a permanent, flexible bond. Allow 24 hours to cure before running water.
Example:
When installing a drain basket in a granite sink, silicone sealant provided a superior seal compared to putty, preventing leaks even after heavy use.
Factors Influencing Method Choice
- Sink material
- Desired permanence
- Ease of removal for future repairs
- Manufacturer recommendations
Maintenance And Longevity Of Drain Baskets
Proper maintenance extends the lifespan of your drain basket and keeps your kitchen plumbing in optimal condition. Regular cleaning and inspection can prevent clogs, odors, and leaks.
Cleaning Routine
- Remove the strainer and rinse under hot water.
- Scrub the basket and flange with a brush and mild detergent.
- Inspect for debris buildup weekly.
Preventing Clogs
- Avoid dumping grease or fibrous foods down the sink.
- Use the strainer to catch large particles.
- Flush with hot water after heavy use.
For advice on clearing tough blockages, see How To Clear A Clogged Garbage Disposal.
Signs Your Drain Basket Needs Replacement
- Visible rust or corrosion
- Persistent leaks despite tightening
- Difficulty removing the strainer
- Cracked or worn flanges
Enhancing Drain Basket Longevity
- Choose durable materials like stainless steel or brass.
- Install with care to avoid overtightening.
- Replace gaskets and washers as needed.
Pro Tip: Annual inspection of drain basket and plumbing connections can catch issues before they escalate.
Troubleshooting And Advanced Installation Scenarios
While most installations are straightforward, unique challenges can arise. Addressing advanced scenarios ensures your drain basket performs optimally, even in complex situations.
Installing In Double-bowl Sinks
- Install drain baskets in both bowls.
- Connect tailpieces to a common trap using a T-fitting.
- Ensure both baskets are level for consistent drainage.
Integrating With Garbage Disposal Units
- Install the drain basket in the non-disposal bowl.
- Use a compatible flange for the disposal unit.
- Secure connections tightly to prevent leaks.
For in-depth guidance, refer to Wikipedia’s Garbage Disposal Unit.
Dealing With Non-standard Sink Materials
- For composite, stone, or ceramic sinks, use silicone sealant.
- Avoid plumber’s putty if manufacturer advises against it.
- Use a plastic or corrosion-resistant basket for longevity.
Upgrading Older Plumbing Systems
- Inspect pipes and traps for signs of age or corrosion.
- Replace tailpieces or traps as needed during installation.
- Use modern baskets designed for compatibility with older sinks.
Addressing Persistent Drainage Problems
- If slow drainage persists, clean the trap and tailpiece.
- Ensure tailpiece alignment is straight and unobstructed.
- For severe blockages, consult How To Fix Kitchen Sink Not Draining.
Frequently Asked Questions
What Is The Ideal Material For A Kitchen Sink Drain Basket?
The best material depends on your priorities. Stainless steel is ideal for most kitchens due to its durability, corrosion resistance, and ease of cleaning. For aesthetic considerations, brass or custom finishes can be chosen, but they require slightly more maintenance. If budget is a concern, plastic is affordable but less durable. Always match the basket material to your sink and household needs.
Can I Install A Drain Basket Without Professional Help?
Yes, most homeowners can successfully install a drain basket with basic tools and careful preparation. The process is straightforward and usually takes under an hour. However, if your sink is made of a unique material or you encounter persistent leaks, consult a plumber for assistance to avoid damage or costly repairs.
How Do I Know If My Drain Basket Is Leaking?
Common signs include water pooling under the sink, moisture on pipes or the locknut, or persistent odors. Perform a leak test by running water and inspecting all connections. If you find a leak, retighten the locknut or reseat the gasket.
If leaks persist, the basket or gasket may need replacement.
Is Plumber’s Putty Safe For All Sink Types?
No, plumber’s putty is not recommended for stone, composite, or ceramic sinks, as it can cause staining or degrade over time. For these materials, use silicone sealant for a secure, permanent bond. Always check your sink manufacturer’s guidelines before choosing a sealing method.
How Often Should I Replace My Kitchen Sink Drain Basket?
While a high-quality basket can last 5, 10 years or longer, you should replace it if you notice corrosion, persistent leaks, or mechanical damage. Regular inspection and cleaning can extend its life. If your basket is difficult to remove or clean, consider upgrading to a newer, more user-friendly model.
A well-installed kitchen sink drain basket is essential for maintaining efficient drainage, preventing clogs, and ensuring kitchen cleanliness. By following this detailed guide, you can confidently tackle the installation process, troubleshoot common issues, and optimize the longevity of your plumbing. For ongoing maintenance and advanced troubleshooting, explore resources like How To Fix A Clogged Kitchen Sink and Source Name. With the right tools, preparation, and knowledge, your kitchen will remain a hub of efficiency and comfort for years to come.