Upgrading your kitchen with a double sink and garbage disposal is one of the most impactful DIY projects for home cooks and busy households. The combination streamlines food prep, makes cleaning up more efficient, and can even boost your home’s resale value. Yet, many homeowners hesitate, worried about the complexity of installation. The truth? With proper guidance, the right tools, and a step-by-step approach, you can confidently tackle this rewarding project yourself.
Having installed several double sinks with disposals over the years, I’ve seen firsthand the dramatic difference they make. Not only does the double basin allow for multitasking, like washing veggies in one side and stacking dirty dishes in the other, but a garbage disposal helps keep the plumbing running smoothly and your kitchen free of food scraps.
This comprehensive guide walks you through every stage, from planning and removing your old sink to connecting plumbing and wiring your disposal, all while highlighting key safety tips and troubleshooting advice.
Key Takeaways
- Installing a double sink with garbage disposal enhances kitchen functionality and home value.
- Proper planning, measuring, and gathering the right materials are crucial for a smooth installation.
- The process involves sink and disposal assembly, plumbing, electrical work, and leak testing.
- Safety precautions, such as turning off water and power, are essential to avoid accidents.
- Real-world examples and troubleshooting tips will help you overcome common installation challenges.
:max_bytes(150000):strip_icc()/garbage-disposal-installation-1824830-hero-1dcd7b5b05d44a2cb367e31692500c8c.jpg)
Credit: www.thespruce.com
Planning Your Double Sink And Garbage Disposal Installation
Before picking up a wrench, thoughtful planning is essential. The installation’s success hinges on choosing the right products, understanding your plumbing and electrical setup, and preparing your workspace.
Assessing Your Kitchen Layout
Begin by examining your existing sink, countertop space, and cabinetry:
- Measure the cabinet width and depth to ensure the double sink and disposal fit comfortably.
- Check for adequate clearance under the sink for both basins, plumbing traps, and the disposal unit.
- Identify the location of your dishwasher drain and water supply lines; this impacts the configuration.
If you’re replacing a single sink, verify that the new double basin’s cutout matches your countertop or plan for minor modifications.
Selecting The Right Sink And Disposal
There’s a wide range of sink materials (stainless steel, composite granite, porcelain) and disposal power ratings (measured in horsepower):
| Sink Material | Pros | Cons | Best For |
|---|---|---|---|
| Stainless Steel | Durable, affordable, easy to clean | Can scratch, noisy | Most kitchens |
| Composite Granite | Resistant to stains, scratches, heat | Heavier, more expensive | Modern/high-end kitchens |
| Porcelain | Classic look, smooth surface | Prone to chipping | Traditional kitchens |
For garbage disposals, 1/2 HP is standard for most homes, while 3/4 HP and above are recommended for heavy use or frequent entertaining.
Tools And Materials Checklist
Gathering all tools and components before starting saves time and frustration. You’ll need:
- Double kitchen sink and mounting hardware
- Garbage disposal unit with flange
- Sink strainer basket (for the non-disposal basin)
- Plumber’s putty or silicone sealant
- Plumbers tape (Teflon tape)
- PVC drain pipe kit (including P-traps, extension tubes, tee fitting)
- Dishwasher drain connection kit (if applicable)
- Adjustable wrenches, pipe wrench, screwdriver set
- Pipe cutter or hacksaw
- Bucket and towels
- Safety gear (gloves, goggles)
- Electrical cord kit (if disposal isn’t pre-wired)
- Wire nuts, voltage tester
- Outlet box and switch (if adding new wiring)
Pro Tip: Label each part as you unpack it. This will simplify assembly, especially when following manufacturer instructions.
Permits And Safety Considerations
- Check local codes: Some areas require a permit for disposal installation or new wiring.
- Turn off water and power: Shut off water valves and circuit breakers before starting work.
- Consult a professional: If unsure about electrical or plumbing modifications, hire a licensed contractor.
Removing The Old Sink And Preparing For Installation
Switching from a single to double sink with disposal involves careful removal and prep. Rushing this stage can lead to leaks or countertop damage.
Disconnecting Plumbing And Electrical
- Place a bucket under the sink to catch residual water.
- Turn off water supply valves and disconnect the hot and cold lines with an adjustable wrench.
- Loosen the slip nuts on the drain trap (P-trap) and remove it.
- If you have a dishwasher, disconnect its drain hose from the sink tailpiece.
- For an existing disposal, unplug it or turn off its dedicated breaker and disconnect wiring.
Removing The Old Sink
- Use a utility knife to cut through any sealant around the sink rim.
- From underneath, release mounting clips or screws.
- Carefully lift the sink out, get help if it’s heavy or awkward.
- Scrape away old putty or adhesive from the countertop opening and clean thoroughly.
Example: When I replaced my own kitchen sink, I found hidden water damage around the old rim. Cleaning and drying the area thoroughly before installing the new sink prevented future issues.
Modifying The Countertop Opening
If the new double sink requires a larger or differently shaped cutout:
- Mark the template (usually included with the sink) on the countertop.
- Use a jigsaw to carefully cut along the lines, supporting the countertop to prevent chipping.
- Dry-fit the new sink to ensure a snug, even fit.
Warning: Always wear goggles and a dust mask when cutting countertops, especially laminate or stone.
Preparing The Workspace
- Lay out all parts and tools within easy reach.
- Place a drop cloth to catch debris and protect your flooring.
- Double-check that all water and power sources are off.

Credit: www.youtube.com
Installing The Double Sink: Step-by-step Guide
Now that you’ve prepped the space, it’s time to install the new double basin. Attention to detail here ensures a watertight, professional result.
Securing The Sink Basin
- Apply a bead of plumber’s putty or silicone sealant around the underside of the sink rim (check manufacturer preference).
- Lower the sink into the countertop opening.
- From below, attach and tighten mounting clips or brackets evenly.
- Wipe away excess putty squeezed out around the edge.
Pro Tip: Some sinks require you to install the faucet and accessories before dropping the basin in place, read your instructions carefully.
Installing The Sink Strainer
- For the basin without a disposal, roll a rope of plumber’s putty around the strainer’s underside.
- Press the strainer into the drain hole from above.
- From below, slide on the rubber gasket and locknut, tightening securely.
- Remove excess putty from the sink bowl.
Mounting The Faucet And Accessories
- Install the faucet, soap dispenser, or air gap (for dishwashers) while access is open.
- Use Teflon tape on threaded connections to prevent leaks.
- Connect supply lines to the faucet’s tailpieces; hand-tighten, then snug with a wrench.
Attaching The Garbage Disposal Flange
- For the disposal side, assemble the mounting flange and ring per instructions.
- Pack plumber’s putty under the flange and press it firmly into the sink opening.
- From below, attach the mounting ring and snap ring, tightening screws evenly.
- The disposal unit will twist and lock onto this assembly later.
Real-world Example: Undermount Vs. Drop-in Sinks
A homeowner in Seattle opted for an undermount double sink with granite countertops. Their main challenge was aligning the mounting brackets beneath a heavy stone surface. By dry-fitting all components before final assembly and recruiting a helper for lifting, they achieved a seamless, flush installation.
:max_bytes(150000):strip_icc()/garbage-disposal-installation-1824830-hero-1dcd7b5b05d44a2cb367e31692500c8c.jpg)
Credit: www.thespruce.com
Plumbing The Double Sink And Garbage Disposal
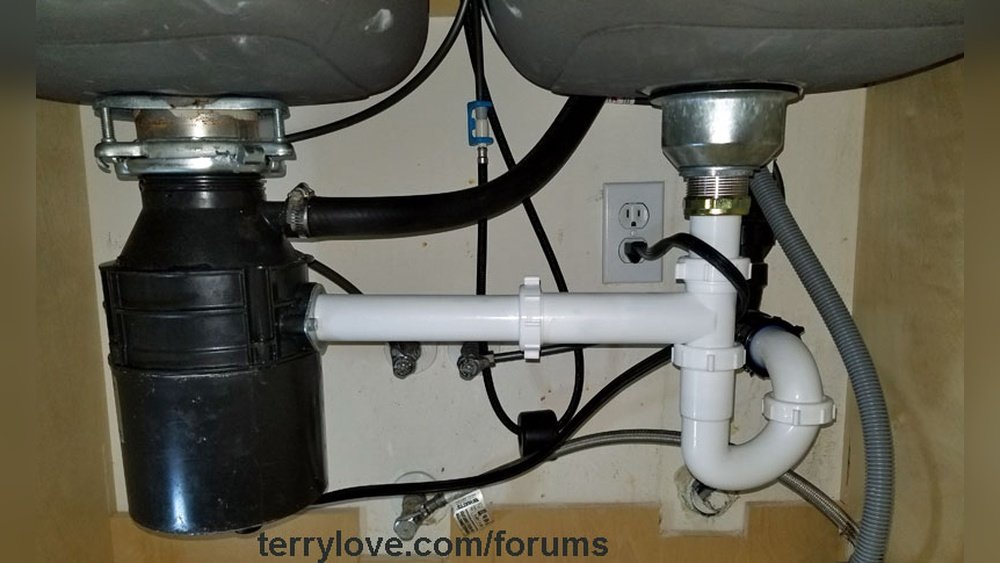
Proper plumbing is the heart of this project. A double sink with disposal requires a Y-shaped or T-shaped drain configuration, ensuring smooth water flow and preventing cross-basin backups.
Connecting Drain Pipes
- Dry-fit the PVC tailpieces to both sink drains.
- Use a T-fitting or double waste tee to join the two drain lines.
- Attach the P-trap to the waste outlet, connecting it to the home’s main drain pipe.
- Ensure all connections are snug but avoid overtightening, which can crack plastic fittings.
| Component | Function | Tips |
|---|---|---|
| P-Trap | Prevents sewer gases from entering the home | Keep trap arm level for best flow |
| Waste Tee | Joins both sink drains into one outlet | Dry-fit before gluing or tightening |
| Extension Tube | Bridges gaps between drains and trap | Cut to length as needed |
Hooking Up The Dishwasher Drain (if Present)
- If your dishwasher drains through the sink, connect its hose to the disposal’s dishwasher inlet.
- Knock out the plastic plug inside the disposal inlet before attaching the hose.
- Secure with a hose clamp for a leak-free connection.
Installing The Garbage Disposal Unit
- Lift the disposal unit and align it with the mounting ring under the sink.
- Twist and lock into place using the supplied wrench or tool.
- If required, connect the discharge tube to the waste tee or P-trap.
- Tighten all fasteners and check alignment.
Sealing And Leak Testing
- Fill both sink basins and check for leaks at every joint.
- Tighten connections as needed, using plumber’s tape on threaded fittings.
- Run water and activate the disposal (if already wired) to ensure smooth operation and drainage.
Pro Tip: Use a flashlight to inspect for slow drips after filling the sink. Even a tiny leak can cause cabinet damage over time.
Case Study: Avoiding Cross-basin Backups
A common problem with double sinks is wastewater backing up into the non-disposal basin. In a recent DIY project, a homeowner solved this by ensuring the disposal discharge connected directly to the main drain line, rather than through a long horizontal run. This simple adjustment prevented clogs and improved drainage.
Wiring And Powering The Garbage Disposal
Safe electrical work is critical for disposal installation. If you’re not comfortable with wiring, consult a licensed electrician.
Verifying Electrical Requirements
- Most disposals require a dedicated 120V outlet under the sink.
- If none exists, you may need to run a new circuit from your breaker panel.
- Check that your disposal’s amperage matches the circuit rating.
Hardwired Vs. Plug-in Disposals
- Hardwired: Connects directly to the home’s electrical system.
- Plug-in: Uses a standard grounded power cord and outlet.
| Type | Installation Complexity | Flexibility | Best For |
|---|---|---|---|
| Hardwired | Requires electrical skills | Permanent | New builds, major remodels |
| Plug-in | Easy DIY | Simple replacement | Most homeowners |
Wiring The Disposal
- If using a plug-in model, install a GFCI outlet if not already present.
- For hardwired units, connect black (hot), white (neutral), and green (ground) wires using wire nuts.
- Mount the switch above the counter or inside a cabinet for easy access.
- Use a voltage tester to confirm power is off before working on wiring.
Testing The Disposal Unit
- Plug in or restore power at the breaker.
- Run cold water and briefly activate the disposal.
- Listen for smooth, quiet operation and check for vibration.
Warning: Never put your hand inside the disposal while it’s connected to power.
Example: Upgrading Electrical For A Disposal
A homeowner in Austin found their under-sink outlet was not GFCI-protected, a code requirement in many areas. By upgrading to a GFCI outlet, they improved safety and passed inspection on the first try. Always verify local electrical codes before beginning work.
Troubleshooting Common Issues
Even with careful planning, you may encounter problems during or after installation. Here’s how to address the most frequent challenges.
Leaks At Drain Connections
- Ensure all washers and gaskets are seated properly.
- Tighten slip nuts gradually; overtightening can damage plastic fittings.
- Apply plumber’s tape to threaded joints.
Disposal Won’t Turn On
- Check that the unit is plugged in or wired correctly.
- Verify the circuit breaker or GFCI outlet is not tripped.
- Press the reset button on the bottom of the disposal.
If you need to clear a jam, see this guide: How To Clear A Clogged Garbage Disposal.
Slow Drainage Or Backups
- Inspect the P-trap and waste tee for debris.
- Ensure the disposal discharge connects directly to the main drain.
- Avoid putting fibrous foods (like celery) into the disposal.
For severe clogs, refer to: How To Clear A Clogged Kitchen Sink Drain.
Dishwasher Doesn’t Drain
- Confirm the knockout plug inside the disposal inlet was removed.
- Check for kinks or clogs in the dishwasher drain hose.
Garbage Disposal Vibrates Excessively
- Make sure the mounting ring is fully locked and unit is supported.
- Check for loose mounting bolts or missing splash guard.
Pro Tip: If the disposal hums but doesn’t spin, it may be jammed. Use the included hex wrench in the bottom socket to free the impeller.
Maintenance Tips And Best Practices
Proper care extends the life of your new sink and disposal, keeps your kitchen hygienic, and prevents costly repairs.
Regular Cleaning
- Rinse both sink basins daily to avoid buildup.
- Clean the disposal weekly with a mix of ice cubes and rock salt, followed by citrus peels to freshen.
Preventing Clogs
- Avoid sending large bones, grease, or fibrous vegetables down the disposal.
- Run cold water before, during, and after using the disposal.
If your kitchen sink backs up, see: How To Fix A Backed Up Kitchen Sink.
Checking For Leaks
- Inspect under-sink plumbing monthly for moisture or corrosion.
- Tighten connections as needed and replace worn gaskets.
Safe Usage
- Never grind glass, metal, or plastic in the disposal.
- Keep hands and utensils clear of the disposal while running.
When To Call A Professional
- For persistent leaks, electrical issues, or major plumbing changes.
- If your installation requires new electrical circuits or complex countertop modifications.
Real-world Examples: Success Stories And Lessons Learned
Example 1: Efficient Family Kitchen Upgrade
The Smiths, a family of five, installed a double sink with disposal to accommodate their busy meal prep and cleanup. By choosing a stainless steel sink and 3/4 HP disposal, they achieved both durability and quiet operation. Their tip: “Pre-assemble all drain parts before final tightening to avoid misalignment.”
Example 2: Small Space, Big Impact
In a compact city apartment, a homeowner opted for a compact double basin and a space-saving 1/2 HP disposal. Careful measuring ensured the unit fit under a narrow cabinet. They recommend: “Dry-fit every component before sealing, especially in tight spaces.”
Example 3: Overcoming A Clog-prone Drain
One DIYer battled frequent clogs after their double sink/disposal install. After consulting How To Fix Kitchen Sink Not Draining, they rerouted the disposal outlet to connect directly to the main drain, solving the issue and restoring fast drainage.
Cost, Time, And Value Comparison
Understanding the investment in time, money, and long-term benefits helps you plan realistically.
| Option | DIY Cost (USD) | Pro Install Cost (USD) | Estimated Time | Typical Home Value Impact |
|---|---|---|---|---|
| Double Sink Only | $200, $400 | $350, $700 | 3, 4 hrs | Moderate |
| Double Sink + Disposal | $300, $600 | $500, $1,200 | 4, 6 hrs | High |
| Disposal Only | $100, $250 | $200, $400 | 1, 2 hrs | Low |
Sources: Home Depot, market research.
Pro Tip: Investing in a high-quality sink and disposal can yield a return on investment (ROI) of 60, 80% if you sell your home, according to the National Association of Realtors.
Frequently Asked Questions
What Size Garbage Disposal Is Best For A Double Sink?
For most homes, a 3/4 HP garbage disposal is ideal for a double sink setup. It handles moderate to heavy food waste efficiently and reduces the risk of jams. If you entertain frequently or cook large meals, consider a 1 HP unit for extra power.
Can I Install A Garbage Disposal With A Septic System?
Yes, but it’s important to select a septic-safe garbage disposal. These models often include enzyme injection systems to help break down food waste. However, frequent use can still stress your septic system. Consult your local regulations and septic maintenance provider before installation.
How Do I Keep My Double Sink With Disposal From Smelling Bad?
Regularly clean your disposal by grinding ice cubes and citrus peels. For the sink, flush with hot water and a small amount of baking soda weekly. Avoid putting grease or fatty foods down the drain, as they can cause odors.
If smells persist, check for trapped food in the P-trap.
Is Professional Installation Recommended?
While many DIYers can successfully install a double sink with disposal, professional installation is best if you’re uncomfortable with plumbing or electrical work. Complex modifications, new wiring, or countertop adjustments should always be handled by licensed contractors to ensure code compliance and safety.
What Maintenance Tasks Should I Schedule Annually?
Annually, inspect all under-sink plumbing for leaks, corrosion, or loose fittings. Tighten connections and replace gaskets as needed. Clean the disposal with a commercial cleaner or vinegar and baking soda. If you notice persistent drainage issues, schedule a plumbing inspection.
Upgrading your kitchen with a double sink and garbage disposal is a transformative project that pays dividends in convenience and home value. With careful planning, attention to detail, and the right resources, you can achieve professional-quality results and enjoy a cleaner, more efficient kitchen for years to come.