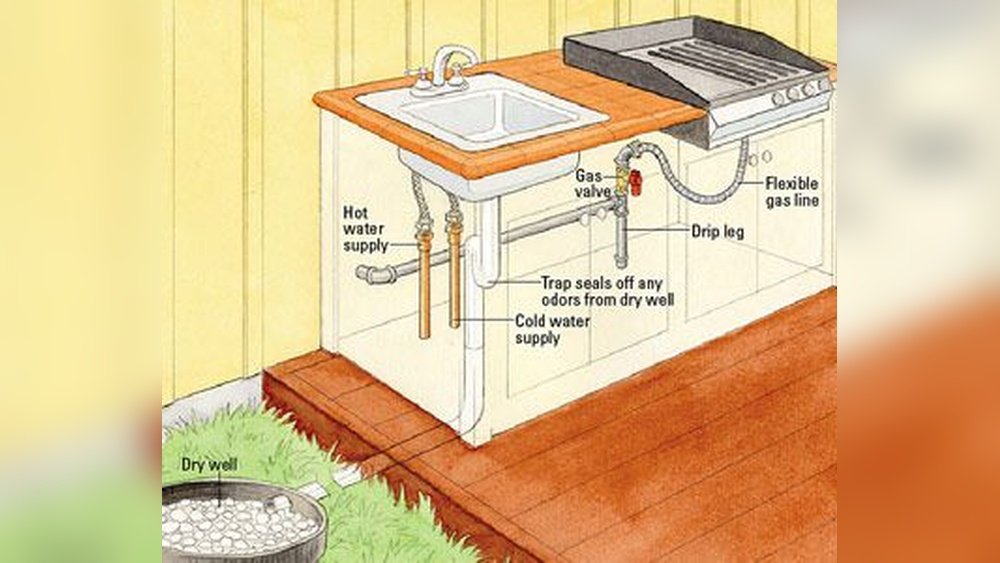
Having an outdoor sink is very useful. You can wash your hands, clean vegetables, or rinse tools without going inside. Installing an outdoor sink may seem hard. But with the right steps, anyone can do it. This guide will help you install an outdoor sink easily and correctly.
Why Install an Outdoor Sink?
An outdoor sink saves time and effort. If you garden, cook outside, or have a patio, it is very handy. You can clean things outside and keep your home cleaner. It also helps with outdoor parties and barbecues.

Credit: www.heimatverein-nordheim.de
What You Need Before Starting
Before you start, gather all tools and materials. This will make the work faster and easier.
Tools Required:
- Drill with drill bits
- Adjustable wrench
- Pipe wrench
- Screwdriver
- Measuring tape
- Pipe cutter or hacksaw
- Level
- Teflon tape (plumber’s tape)
- Bucket or container (for water testing)
Materials Needed:
- Outdoor sink (stainless steel or durable material)
- Faucet designed for outdoor use
- Water supply pipes (PVC, copper, or PEX)
- Drain pipes and fittings
- Water supply shut-off valve
- Mounting stand or cabinet (optional)
- Pipe connectors and fittings
Step 1: Choose the Location
Pick a good place for your outdoor sink. It should be near a water source. Also, find a spot with easy drainage. Make sure the area is flat and stable.
Think about how you will use the sink. Close to the garden? Near the grill? Choose a place that fits your needs.
Step 2: Prepare the Area
Clear the area of dirt and debris. If needed, level the ground. You may place a stand or cabinet to hold the sink. Make sure it is strong and steady.
Use a level tool to check if the surface is even. This helps water drain properly.
Step 3: Install the Faucet on the Sink
Most outdoor sinks come without a faucet. Install the faucet first. Follow these steps:
- Insert the faucet through the hole on the sink.
- Use the provided washers and nuts to secure it underneath.
- Tighten the nuts with a wrench, but don’t overtighten.
- Wrap Teflon tape around the faucet threads to prevent leaks.
Step 4: Connect the Water Supply
Turn off the main water supply before working with pipes. Find the nearest water line outside your house.
Install a shut-off valve on the water line. This lets you stop water flow if needed.
Use the right pipes to connect the valve to your sink faucet. PVC, copper, or PEX pipes work well outdoors.
Follow these tips:
- Measure pipe lengths carefully.
- Cut pipes cleanly with a pipe cutter or saw.
- Use pipe connectors to join pipes.
- Wrap Teflon tape on all threaded connections.
Step 5: Set Up the Drain
Your sink needs a drain to carry away used water. Connect the sink drain to a drain pipe.
Here is how to do it:
- Attach the drain flange to the sink bottom with plumber’s putty.
- Connect the drain pipe to the flange.
- Run the drain pipe to a safe place. This could be a garden area or a sewer line.
- Make sure the drain pipe slopes downward. This helps water flow out easily.
Step 6: Test Your Work
Turn the water supply back on slowly. Open the faucet and check for leaks.
If you see water dripping, tighten connections or add more Teflon tape.
Check the drain by running water through the sink. Make sure water flows out well.
Step 7: Final Touches
Clean the area around your sink. Remove tools and extra materials.
You can add shelves or hooks near the sink. This helps keep cleaning tools handy.
If you want, paint or stain the stand to protect it from weather.
Tips for Maintaining Your Outdoor Sink
- Check pipes and faucet for leaks regularly.
- In winter, drain water to avoid frozen pipes.
- Clean the sink surface often to prevent stains.
- Cover the faucet when not in use to protect it.

Credit: www.youtube.com
Common Problems and Solutions
| Problem | Cause | Solution |
|---|---|---|
| Water leaks at faucet | Loose connection or missing Teflon tape | Tighten connections and wrap Teflon tape |
| Drain water flows slowly | Drain pipe clogged or too flat | Clean pipe and adjust slope |
| No water from faucet | Shut-off valve closed or pipe blockage | Open valve and check pipes |
| Pipe freezes in winter | Water left in pipes during cold weather | Drain pipes before winter |
Frequently Asked Questions
What Materials Are Needed To Install An Outdoor Sink?
You need a sink basin, faucet, plumbing pipes, water supply, and drainage system. Tools like a wrench, drill, and sealant help with installation.
How Long Does It Take To Install An Outdoor Sink?
Installation usually takes 2 to 4 hours for a basic setup. Complex plumbing or electrical work may take longer.
Can I Install An Outdoor Sink Without Professional Help?
Yes, many outdoor sinks are DIY-friendly with clear instructions. Basic plumbing skills are helpful for connecting water and drainage.
What Is The Best Location For An Outdoor Sink?
Choose a spot near water supply and drainage lines. Also, consider convenience and shelter from harsh weather.
Conclusion
Installing an outdoor sink is a great way to make your outside space more useful. Follow these simple steps carefully. Take your time and check your work as you go. With some basic tools and materials, you can have a working outdoor sink in your yard.
Remember to keep your sink clean and check for leaks often. This will keep it working well for years.
Enjoy the convenience of washing hands, cleaning tools, and prepping food right outside your home.