Many people notice their kitchen faucet has slow water flow, especially in older homes or after installing a new faucet. This often leads to frustration: rinsing dishes takes longer, filling pots is slow, and sometimes even washing hands doesn’t feel satisfying. One common cause is the flow restrictor inside the faucet. Designed to save water and meet regulations, it can sometimes reduce water pressure more than you want. If you’re thinking about removing the flow restrictor from your kitchen faucet, this guide will show you how – safely, thoroughly, and with tips to avoid common mistakes.
Why Faucets Have Flow Restrictors
Before you start, it helps to know why these devices exist. Flow restrictors are small plastic or metal parts installed in most modern faucets. Their main job is to limit how much water comes out, usually to about 1.5 to 2.2 gallons per minute in the US. This helps:
- Save water and lower utility bills
- Meet local plumbing codes
- Protect the environment by reducing waste
However, if your home has low water pressure, or if the restrictor gets clogged with sediment, it can make your faucet almost unusable.
When Should You Remove A Flow Restrictor?
You shouldn’t remove a flow restrictor for every problem. Sometimes, cleaning it is enough. But you might consider taking it out if:
- The water flow is weak even after cleaning the aerator
- Other faucets in your home have good pressure
- You need more water for tasks like filling pots or cleaning
Important: Removing a flow restrictor may increase your water usage and can sometimes void your faucet’s warranty. Always check your manufacturer’s instructions first.
Tools And Materials You’ll Need
Getting ready before you start makes the job easier. Here’s what you’ll likely need:
- Adjustable wrench or channel lock pliers
- Flathead screwdriver (small size)
- Needle-nose pliers
- Towel or rag (to protect faucet finish)
- Bowl or cup (to hold small parts)
- Old toothbrush (for cleaning)
- Flashlight (if your kitchen is dim)
For most kitchen faucets, you don’t need any special plumbing skills. Just be gentle and patient.
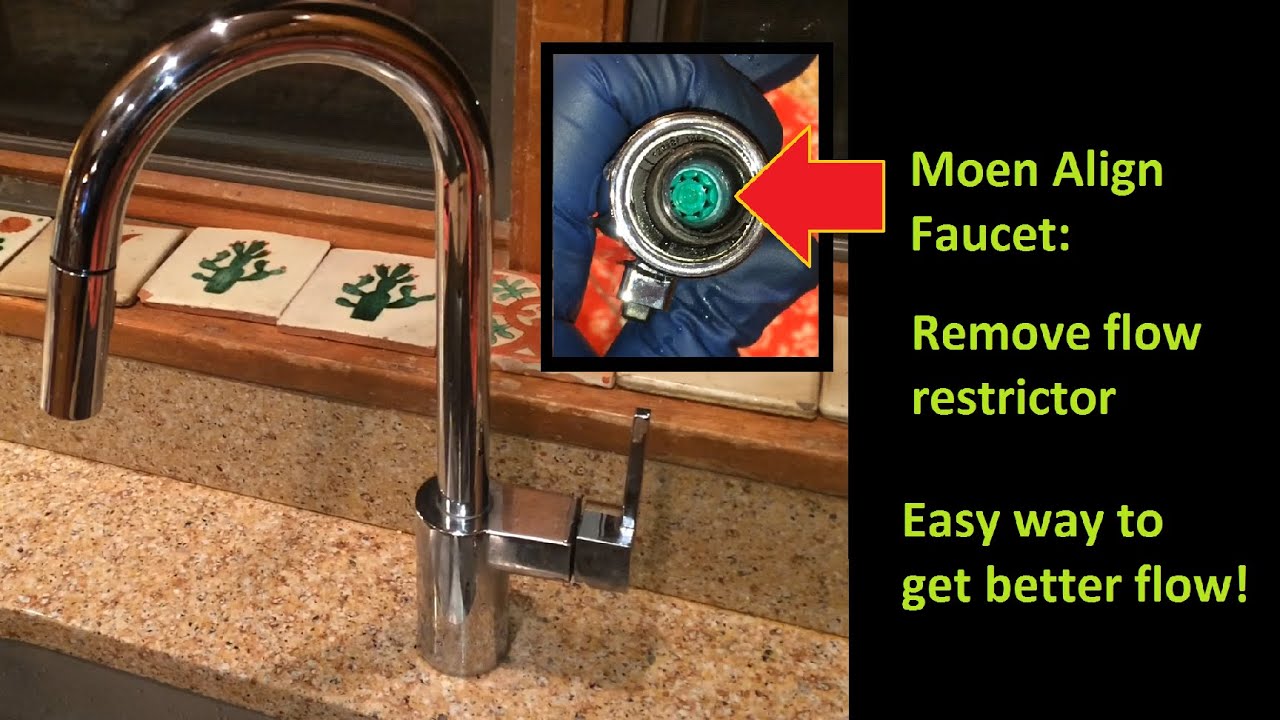
How To Identify The Flow Restrictor
Every faucet is a little different. On most kitchen faucets, the flow restrictor is found inside the aerator – the small piece at the tip of the faucet spout. Some newer faucets have it deeper inside, or even behind the spray head if you have a pull-down model.
Here’s how to locate it:
- Standard faucet: Look at the tip of the spout. The aerator is a small, round screen assembly.
- Pull-out/pull-down faucet: The restrictor might be inside the spray head or just behind it.
If you’re not sure, search for your faucet’s brand and model online for a diagram. Brands like Moen, Delta, and Kohler have manuals on their websites.
Credit: www.youtube.com
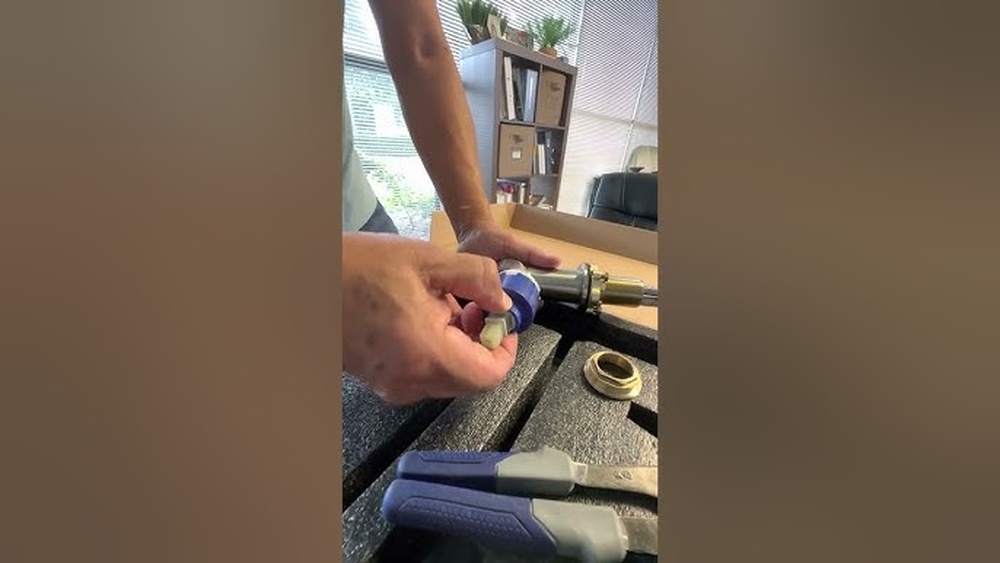
Step-by-step: Removing The Flow Restrictor
Let’s break down the removal process. Take your time with each step, and keep small parts in a bowl so nothing gets lost.
1. Turn Off The Faucet
This sounds obvious, but water can spray if the faucet is not off. You do not need to shut off the water supply for this task.
2. Remove The Aerator
Wrap a towel around the faucet tip to avoid scratches. Use your hand first to unscrew the aerator (the tip where water comes out). Turn it counterclockwise.
- If it’s too tight, use an adjustable wrench or pliers, but keep the towel in place to protect the finish.
- For pull-down faucets, unscrew the spray head as directed in your manual.
3. Disassemble The Aerator
Once removed, you’ll see several parts inside:
- A metal or plastic shell
- A rubber washer or gasket
- A mesh screen
- The flow restrictor (often a small plastic disk with holes)
Lay the parts out in the order you take them out. This makes reassembly easier.
4. Remove The Flow Restrictor
The restrictor usually sits behind the screen. Use a small flathead screwdriver or needle-nose pliers to gently pry it out.
- Don’t force it. If it’s stuck, wiggle gently.
- If the restrictor is inside a spray head, check your manual for the best removal method.
5. Clean All Parts
Before putting things back together, clean the parts. Use an old toothbrush to scrub away mineral deposits or debris. Rinse everything well.
6. Reassemble The Aerator (without The Restrictor)
Put the aerator back together in reverse order, skipping the restrictor. Make sure the screen and washer are seated properly.
7. Reinstall The Aerator
Screw the aerator back onto the faucet by hand. Turn on the water slowly and check for leaks.
- If water sprays out the sides, the washer may be out of place. Remove and adjust as needed.
What To Expect After Removing The Flow Restrictor
With the restrictor gone, you’ll probably notice:
- Stronger water flow: Filling pots and washing dishes becomes faster.
- Change in water pattern: The stream may be less smooth or splash more.
- More water usage: Your bills may go up slightly if you use the faucet often.
If your faucet starts to drip or leak, the aerator may not be seated correctly. Recheck the assembly.
Are There Downsides To Removing The Flow Restrictor?
While it’s tempting to boost your water flow, there are some things to keep in mind:
- Higher water bills: More flow means more water used.
- Wasting water: You may use more than you need, which is bad for the environment.
- Voiding warranty: Some faucet brands may void their warranty if you remove parts.
- Splashing: The stream can become more forceful, causing splashing.
Pro Tip: If you find the flow is too strong, you can put the restrictor back in or look for a “middle ground” restrictor with slightly larger holes.
How To Tell If The Flow Restrictor Is The Real Problem
Not all slow water issues are due to the restrictor. Here’s a quick comparison of common causes for low kitchen faucet pressure:
| Cause | Symptoms | How to Fix |
|---|---|---|
| Clogged Aerator | Weak flow, uneven spray | Clean or replace aerator |
| Clogged Flow Restrictor | Very weak flow, even after cleaning aerator | Remove and clean or replace restrictor |
| Blocked Supply Line | One faucet affected, others fine | Check and clear supply hoses |
| Whole-House Low Pressure | All faucets affected | Check main valve, call plumber |
If you’re not sure, check other faucets. If they all have low flow, the problem is probably in your home’s plumbing, not just the restrictor.
How Different Faucets Handle Flow Restrictors
Not all kitchen faucets are built the same. Here’s how the restrictor placement can vary between popular types:
| Faucet Type | Restrictor Location | Removal Difficulty |
|---|---|---|
| Standard (fixed spout) | Inside aerator at spout tip | Easy |
| Pull-out spray | Inside spray head or hose | Moderate |
| Pull-down spray | Inside or behind spray head | Moderate |
| Touchless | Inside aerator or behind sensor | Moderate to difficult |
If your faucet is not listed, check the manufacturer’s website for diagrams.
Common Mistakes When Removing A Flow Restrictor
Many beginners make the same errors. Here are two non-obvious mistakes to avoid:
- Losing Small Parts: The aerator contains tiny washers and screens. Losing them can cause leaks or poor spray patterns. Work over a bowl, and organize parts as you remove them.
- Using Too Much Force: Forcing the aerator or restrictor can damage the threads or break the plastic. If it’s stuck, soak the part in vinegar to dissolve mineral buildup, then try again.
Extra Tip: If your aerator is stuck and won’t budge, wrap a rubber band around it for extra grip, or use a strap wrench. Don’t use pliers directly on the metal – it will scratch.
Practical Tips For A Smooth Removal
- Photograph each step: If you’re not confident, take a photo as you disassemble. This helps with reassembly.
- Soak in vinegar: Hard water deposits can glue parts together. Soak the aerator in white vinegar for 30 minutes to loosen.
- Buy a replacement: Aerators are cheap. If you damage yours, a new one costs just a few dollars at any hardware store.
Cleaning Versus Removing The Restrictor
Sometimes, just cleaning the flow restrictor is enough. If it’s clogged with grit or mineral deposits, scrubbing or soaking it in vinegar often restores flow. Removing the restrictor entirely gives the strongest stream, but may not always be necessary.
When to clean: If your water flow decreased recently and you have hard water, try cleaning first.
When to remove: If you want maximum flow and don’t mind using more water.
Will Removing The Flow Restrictor Cause Damage?
In most cases, removing the restrictor won’t hurt your faucet if you do it gently and reassemble the aerator properly. But it can cause:
- More splashing
- Higher water bills
- Potential leaks if washers aren’t put back correctly
If you notice leaks or odd spray patterns, check that all the parts are aligned and the aerator is not cross-threaded.
How To Put The Flow Restrictor Back
Changed your mind or worried about water usage? Most restrictors can be reinstalled easily:
- Remove the aerator again.
- Drop the restrictor back in its original position (behind the screen).
- Reassemble and screw back onto the faucet.
If you lost or damaged the restrictor, you can buy replacements online or at hardware stores. Be sure to match the size and style for your faucet.

Credit: www.reddit.com
Legal And Environmental Considerations
In some states and cities, plumbing codes require faucets to have flow restrictors. Removing them may violate local rules. If you rent your home, always check with your landlord first.
Environmental impact: Every gallon of water you use comes from somewhere. Removing restrictors increases your water use, which can hurt local water supplies, especially in drought-prone areas.
For more about water conservation and regulations, see the official guide on the EPA WaterSense program.
Troubleshooting: What If You Still Have Low Water Flow?
If removing the restrictor doesn’t help, here are some possible causes and fixes:
- Clogged supply lines: Mineral deposits or debris can block the hoses under your sink. Shut off the water, disconnect, and flush them out.
- Faulty cartridge: Single-lever faucets have cartridges that can clog or fail. Replacing the cartridge can restore pressure.
- Whole-house pressure issue: If all faucets are weak, your main supply valve may not be fully open, or you may need a plumber to check your system.
How To Choose The Right Solution
Removing a flow restrictor is just one way to improve kitchen faucet performance. Sometimes, cleaning, replacing, or upgrading your faucet may give better results with less hassle.
Here’s a quick comparison of solutions:
| Solution | Cost | Difficulty | Water Usage |
|---|---|---|---|
| Clean restrictor | Free | Easy | Low |
| Remove restrictor | Free | Easy | High |
| Replace faucet | $$ | Moderate | Depends on model |
| Upgrade aerator | $ | Easy | Medium |
If you’re concerned about water use, look for aerators with variable flow rates. Some offer a good balance between pressure and conservation.
Real-world Example: How Removing A Flow Restrictor Helped
Maria, a homeowner in Texas, installed a new kitchen faucet. She soon noticed it took nearly two minutes to fill a pot. After reading her faucet’s manual, she found the restrictor was limiting flow to 1. 5 gallons per minute.
She removed it, and her pot filled in under 40 seconds – a big improvement. However, she also noticed her water bill went up slightly, so she decided to reinstall a less restrictive aerator later.

Credit: diy.stackexchange.com
Expert Advice: When To Call A Plumber
If you’ve removed and cleaned the restrictor, checked the supply lines, and still have poor water flow, it’s time to call a professional. Possible hidden problems include:
- Blocked or corroded supply pipes
- Faulty shut-off valves
- Failing faucet cartridge
Trying to fix these without experience can cause leaks or damage.
Frequently Asked Questions
Can Removing The Flow Restrictor Damage My Faucet?
No, removing the restrictor usually won’t damage your faucet if you do it carefully and reassemble the aerator properly. However, if you lose washers or cross-thread the aerator, leaks or spray problems can happen.
Will My Water Bill Go Up If I Remove The Restrictor?
Yes, most likely. With no restrictor, your faucet will use more water every time you turn it on. How much more depends on your habits, but expect a slight increase in your bill.
Is It Legal To Remove Flow Restrictors?
This depends on your local laws. Some areas require faucets to meet water-saving standards, and removing restrictors may violate those rules. Check with your city or landlord before removing.
Can I Just Clean The Restrictor Instead Of Removing It?
Yes. If your water flow dropped suddenly, cleaning the restrictor and aerator can often fix the problem without removing it completely.
Where Can I Buy A Replacement Aerator Or Restrictor?
You can find replacement parts at hardware stores or online. Bring your old part to match the size. Big brands like Moen, Delta, and Kohler sell aerators and restrictors for their faucets.
Removing a flow restrictor from your kitchen faucet can bring back strong water flow and make everyday tasks easier. Just remember to weigh the benefits against higher water use and possible code issues. With the right tools and a little care, it’s a simple job that most people can do in less than 30 minutes. If you run into problems, don’t hesitate to ask a professional for help.