Wrapping a rolling pin might seem like a simple task, but for many home bakers and professionals, the right technique can make a huge difference. Whether you want to keep dough from sticking, maintain hygiene, or extend the life of your rolling pin, learning the best way to wrap it is a valuable kitchen skill.
This guide explores every aspect of how to wrap a rolling pin, including reasons, materials, step-by-step methods, maintenance, troubleshooting, and expert tips. You’ll find practical advice, comparisons, and real examples to help you choose and use the best wrapping methods for any situation.
Why Wrap A Rolling Pin?
Many people wonder why they should bother wrapping a rolling pin at all. The answer depends on several factors, ranging from baking efficiency to food safety. Here are the main reasons:
- Prevent Dough from Sticking: Some doughs, especially pastry or cookie dough, can be very sticky. Wrapping the rolling pin creates a barrier that makes rolling out even the softest dough easier and cleaner.
- Hygiene: Wooden rolling pins can absorb oils and residues from dough. Wrapping helps keep the surface clean and reduces the need for heavy scrubbing, which can damage the wood.
- Protect Rolling Pin Surface: Especially with wooden rolling pins, wrapping prevents scratches, dents, or stains from certain ingredients.
- Even Thickness and Texture: Wrapping, especially with cloth or silicone, can help achieve a smoother, more even dough, important for delicate pastries.
- Allergy Prevention: If you’re baking in a shared kitchen or for people with allergies, wrapping your rolling pin can prevent cross-contamination.
- Convenience: Clean-up is much faster when you can simply remove and wash or discard the wrap.
Many professional bakers never use a rolling pin without some kind of barrier. Once you try it, you’ll likely wonder how you ever baked without wrapping your rolling pin.
Materials For Wrapping A Rolling Pin
The material you choose plays a big role in how effective your wrapping will be. Here are the most common options, with their pros and cons:
1. Parchment Paper
Parchment paper is a favorite in many kitchens. It’s non-stick, disposable, and easy to find.
Pros:
- Non-stick surface
- Easy clean-up (just throw away)
- Cheap and widely available
Cons:
- Can tear if handled roughly
- Not reusable
2. Plastic Wrap (cling Film)
Plastic wrap is another common choice for both home and professional kitchens.
Pros:
- Good barrier for sticky dough
- Hygienic, single-use
- Flexible, fits any shape
Cons:
- Can bunch up or tear
- Not environmentally friendly
3. Cloth Covers
Some people use special rolling pin covers made from cotton or muslin. These are washable and reusable.
Pros:
- Eco-friendly, reusable
- Provides a slightly textured finish (good for some pastries)
- Gentle on dough
Cons:
- Needs regular washing
- Can stain over time
4. Silicone Baking Mats Or Sleeves
Silicone sleeves are relatively new. They slide over the rolling pin and provide a smooth, non-stick surface.
Pros:
- Extremely non-stick
- Reusable for years
- Dishwasher safe
Cons:
- More expensive
- Not always easy to find the right size
5. Wax Paper
Wax paper is similar to parchment but coated with wax, making it more water-resistant.
Pros:
- Non-stick
- Cheap
Cons:
- Can tear
- Not heat resistant (not for hot doughs)
6. Cheesecloth
Cheesecloth is a loose-woven cotton cloth. It’s especially good for very soft doughs or when you want a textured finish.
Pros:
- Gentle on delicate dough
- Reusable and washable
Cons:
- Absorbs moisture and oil
- May need replacing more often
7. Reusable Plastic Or Nylon Sleeves
These are similar to silicone sleeves but made from different plastics.
Pros:
- Durable
- Washable
Cons:
- Harder to find
- Can slip if not fitted properly
Choosing the right material is about balancing convenience, cost, environmental impact, and the type of baking you do most often.

Credit: fullcirclehome.com
Step-by-step Guide: How To Wrap A Rolling Pin
Let’s walk through the process for each main material. You’ll get clear, practical steps, plus tips for best results.
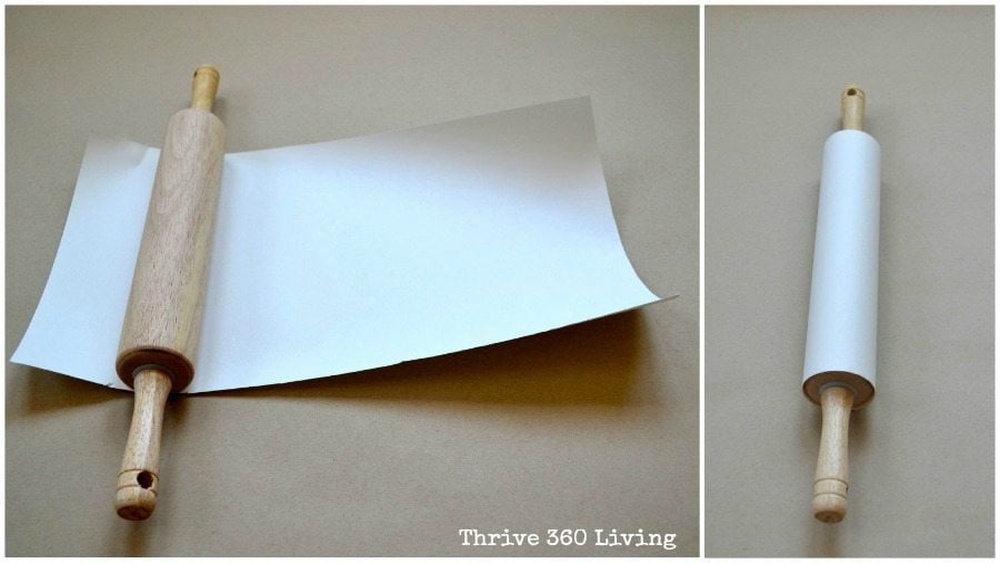
Wrapping With Parchment Paper
- Tear a Sheet: Pull off a piece of parchment long enough to cover the rolling pin and hang over the ends by a few inches.
- Center the Pin: Lay the parchment on your work surface and place the rolling pin in the middle.
- Roll and Secure: Roll the pin back and forth so the paper wraps tightly. Tuck or fold the ends under, or use a small piece of tape at each end if needed.
- Trim Excess: If the parchment bunches at the ends, trim it so it doesn’t interfere with rolling.
Expert Tip: For very sticky dough, lightly dust the parchment with flour before wrapping.
Wrapping With Plastic Wrap
- Cut a Sheet: Use a piece long enough to cover the pin and overlap at the ends.
- Wrap Tightly: Hold one end against the pin and roll, stretching the plastic a little so it sticks to itself.
- Seal the Ends: Twist or fold the ends against the pin. The natural cling usually keeps it in place.
Non-Obvious Insight: If the plastic wrap slides, try wrapping in two layers in opposite directions.
Wrapping With Cloth Covers
- Choose a Clean Cover: Make sure it’s dry and free from lint.
- Slide Over the Pin: Most cloth covers are like a tube. Slide it over the rolling pin, smoothing any wrinkles.
- Secure if Needed: Some covers have elastic at the ends. If not, tuck the ends under or use a small rubber band at each end (avoid tight bands that cut the dough).
Example: Professional bakers often keep several covers ready so they can change them for different doughs.
Wrapping With Silicone Sleeves
- Select the Right Size: Silicone sleeves must fit snugly. Too loose, and they’ll slip.
- Slide On: Stretch the sleeve over the rolling pin, making sure it’s smooth and even.
- Check for Wrinkles: Smooth out any bubbles to avoid uneven dough.
Pro Tip: If your sleeve is new, wash it first to remove any manufacturing residue.
Wrapping With Wax Paper
- Tear a Sheet: Similar to parchment, but be gentler as wax paper tears easily.
- Wrap and Fold: Roll the pin so the paper wraps around, then fold or tuck the ends.
Extra Advice: Wax paper can slip more than parchment. If that’s a problem, use a dab of water to help it stick at the ends.
Wrapping With Cheesecloth
- Cut a Piece: Use a double layer if the cloth is very thin.
- Wrap Around: Lay the cheesecloth flat, place the pin, and roll.
- Secure: Tuck ends under or use a small tie.
Non-Obvious Insight: Cheesecloth is great for sticky, high-moisture doughs like some gluten-free recipes.
Wrapping With Reusable Plastic Or Nylon Sleeves
- Choose the Right Sleeve: Make sure it’s made for your pin size.
- Slide On: Fit the sleeve, smoothing out wrinkles.
- Test Before Use: Roll on a clean surface to make sure it doesn’t slide off.
Practical Tip: Nylon sleeves are often used in commercial bakeries for their durability.
Comparing Rolling Pin Wrapping Materials
To help you decide, here’s a practical comparison of the most popular wrapping materials:
| Material | Non-Stick Level | Reusable | Ease of Use | Cost | Environmental Impact |
|---|---|---|---|---|---|
| Parchment Paper | Excellent | No | Easy | Low | Disposable |
| Plastic Wrap | Good | No | Moderate | Low | Disposable |
| Cloth Cover | Good | Yes | Easy | Medium | Reusable |
| Silicone Sleeve | Excellent | Yes | Moderate | High | Reusable |
| Wax Paper | Good | No | Easy | Low | Disposable |
| Cheesecloth | Moderate | Yes | Moderate | Low | Reusable |
If you bake often, investing in a silicone sleeve or cloth cover is smart for the environment and your wallet. For occasional use, parchment paper is hard to beat.
Choosing The Best Wrapping Method For Different Doughs
Different doughs have different needs. Here’s how to match your wrap to your recipe.
Pastry Dough (pie, Tart)
- Best Choice: Parchment paper or silicone sleeve.
- Why: These doughs are buttery and sticky. Non-stick materials help keep layers intact and prevent sticking.
Bread Dough
- Best Choice: Cloth cover or cheesecloth.
- Why: Bread dough is less sticky and benefits from a gentle, absorbent wrap.
Cookie Dough
- Best Choice: Plastic wrap or parchment paper.
- Why: Many cookie doughs are sticky, but not as fragile as pastry.
Gluten-free Doughs
- Best Choice: Cheesecloth or silicone sleeve.
- Why: Gluten-free doughs can be very soft and sticky. Gentle wraps prevent tearing.
Fondant Or Sugar Paste
- Best Choice: Silicone sleeve.
- Why: Provides the smoothest finish, essential for cake decorating.
Specialty Doughs (e.g., Sourdough, Rye)
- Best Choice: Cloth cover.
- Why: These doughs tend to be less sticky, and cloth helps absorb any extra moisture.
Here’s a quick overview:
| Dough Type | Ideal Wrap | Why |
|---|---|---|
| Pastry | Parchment/Silicone | Non-stick, preserves layers |
| Bread | Cloth/Cheesecloth | Gentle, absorbs moisture |
| Cookies | Plastic/Parchment | Easy release |
| Gluten-Free | Cheesecloth/Silicone | Prevents tearing |
| Fondant | Silicone | Smooth finish |
| Sourdough | Cloth | Minimal sticking |
Troubleshooting Common Problems
Even with the best wrap, things can go wrong. Here’s how to solve the most frequent issues.
The Wrap Keeps Slipping
- Make sure you’re using the right size. For sleeves, a snug fit is critical.
- With paper or plastic, try wrapping in two layers or using a small piece of tape at each end.
- If using a cloth, a rubber band at each end (not too tight) can help.
Dough Still Sticks
- Dust the wrap lightly with flour or powdered sugar.
- For very sticky doughs, chill the dough before rolling.
- Try switching to a silicone sleeve for maximum non-stick performance.
Wrap Tears Or Bunches
- Be gentle when wrapping. Don’t pull too tightly.
- Use a thicker material or double-layer cheesecloth if needed.
- Trim excess wrap to prevent bunching at the ends.
Rolling Pin Gets Dirty Anyway
- If dough gets under the wrap, check for gaps at the ends.
- Always start with a clean, dry rolling pin.
- Replace disposable wraps often, and wash reusable wraps thoroughly.
Uneven Dough Thickness
- Make sure the wrap is smooth and even.
- Consider using rolling pin rings (thickness guides) for perfect results.
Cleaning And Maintenance Of Wrapped Rolling Pins
Keeping your rolling pin and wraps clean is essential for food safety and long life.
For Disposable Wraps (parchment, Plastic, Wax)
- Discard after each use.
- Wipe the rolling pin with a damp cloth to remove any residue.
For Cloth Covers And Cheesecloth
- Wash in hot, soapy water after each use.
- Dry thoroughly before storing to prevent mildew.
- Replace if stained or worn.
For Silicone And Nylon Sleeves
- Wash in the dishwasher or by hand with warm, soapy water.
- Dry completely before storing.
For The Rolling Pin Itself
- Wooden pins: Wipe with a damp cloth. Avoid soaking in water to prevent cracking.
- Metal or marble pins: Wash with soap and water, dry well to prevent rust or water spots.
Non-Obvious Tip: Occasionally oil wooden rolling pins with food-grade mineral oil. This prevents drying and cracking.
Expert Tips For The Best Results
- Chill Your Rolling Pin: For pastry and other sticky doughs, a cold pin helps prevent sticking. You can even chill the wrapped pin in the fridge for 10-15 minutes.
- Double Wrapping: For ultra-sticky dough, use both a silicone sleeve and a dusting of flour or powdered sugar.
- Keep Multiple Wraps Ready: If you bake a lot, have several cloth covers or sleeves on hand to avoid cross-flavoring between recipes.
- Use Rolling Pin Guides: These are rubber rings or bands that fit on either end of the pin, ensuring even thickness. They work well with any wrap.
- Practice Makes Perfect: The more you wrap and roll, the faster and neater you’ll get.

Credit: www.youtube.com
Sustainability And Environmental Impact
Many people are concerned about the waste from single-use wraps. Here’s how to be more eco-friendly in your kitchen:
- Choose cloth covers or silicone sleeves whenever possible.
- If using paper, select brands with recycled content or compostable materials.
- Reuse cheesecloth when possible, washing thoroughly between uses.
- Avoid plastic wrap for everyday use; reserve it for very sticky doughs or special occasions.
Real-world Example: Professional Bakeries
In professional kitchens, efficiency and consistency are everything. Many bakeries use silicone sleeves because they’re durable, easy to clean, and don’t need to be replaced often. Cloth covers are also common for bread and other less-sticky doughs. Disposable wraps like parchment or wax paper are used mostly for high-fat pastries or when cross-contamination is a concern (such as gluten-free baking).
One bakery in Paris reported that switching to silicone sleeves reduced their rolling pin cleaning time by 80% and saved hundreds of euros per year on disposable wraps.
Credit: www.artbarblog.com
Frequently Asked Questions
What Is The Best Material To Wrap A Rolling Pin With?
The best material depends on your baking needs. For most people, parchment paper is the easiest for occasional use, while a silicone sleeve is ideal for frequent baking. Cloth covers are good for bread and less sticky doughs.
How Do I Prevent My Rolling Pin Wrap From Slipping?
Make sure the wrap fits snugly. For sleeves, choose the correct size. For paper or plastic, wrap tightly and secure the ends with tape or a rubber band if needed.
Can I Use A Wrapped Rolling Pin For All Types Of Dough?
Yes, but you may need to choose different wraps for different doughs. For example, use silicone for fondant and parchment for pastry. Adjust as needed for best results.
Is It Safe To Use Plastic Wrap With Hot Dough?
No, plastic wrap can melt or release chemicals when exposed to heat. Use it only with cold or room-temperature dough.
How Do I Clean Reusable Rolling Pin Wraps?
Cloth and cheesecloth wraps should be washed in hot, soapy water and dried well. Silicone sleeves can go in the dishwasher or be washed by hand. Always dry thoroughly before storing.
For more expert baking tips, check out our post on baking tools for beginners.
If you want to learn more about the science of non-stick surfaces and kitchen safety, visit Serious Eats for in-depth articles from professional chefs.
Wrapping a rolling pin is a small step that can make a big difference in your baking experience. With the right materials and techniques, you’ll enjoy smoother rolling, easier clean-up, and better results every time you bake. Happy baking!