A loose kitchen faucet base can be more than just annoying—it can lead to leaks, water damage, and even mold if not fixed. Many homeowners notice their single handle kitchen faucet moving when they use it, but they’re unsure how to solve it. The good news is, tightening a loose faucet base is a project you can do yourself, saving money and keeping your kitchen in top condition. This guide will show you exactly how to tighten a loose single handle kitchen faucet base, why it happens, the tools you need, and what to do if problems arise. With practical steps, real-world tips, and answers to common questions, you’ll feel confident tackling this issue on your own.
Why Does A Single Handle Kitchen Faucet Base Become Loose?
A loose faucet base is a common problem, especially in busy kitchens. Over time, several factors can cause the base to move or wiggle when you touch the faucet handle.
1. Daily Use And Vibration
Every time you turn the handle or move the spout, small vibrations travel down to the base. Over months or years, these vibrations can loosen the mounting nut or screws holding the faucet in place.
2. Improper Installation
If the faucet was not tightened enough during installation, it may become loose much faster. Sometimes, plumbers or DIYers miss tightening the mounting hardware fully due to limited space under the sink.
3. Water Damage Or Corrosion
Water can drip or leak under the sink, causing rust or corrosion on metal parts. Corroded nuts lose their grip, making the base less stable.
4. Worn Out Hardware
Washers, gaskets, or nuts can wear out from age. Worn hardware cannot keep the faucet tight, so the base starts to shift.
Understanding why your faucet base is loose will help you fix it the right way—and prevent it from happening again.
Tools And Materials Needed
Before starting, gather all the tools and materials you’ll need. Having everything ready will make the process smoother.
- Adjustable wrench: For tightening nuts.
- Basin wrench: Special tool to reach nuts under the sink (especially in tight spaces).
- Flashlight or headlamp: To see clearly under the sink.
- Bucket or towel: To catch water drips or protect cabinet base.
- Screwdriver: Some faucets use screws instead of nuts.
- Plumber’s putty or silicone sealant: Optional, to seal the base if needed.
- Replacement hardware: (If nuts or washers are damaged or missing.)
- Cleaning supplies: Cloth and mild cleaner to wipe the area.
Pro Tip: A basin wrench is not expensive and makes the job much easier. If you don’t have one, consider borrowing or buying it from a hardware store.
Safety First: Preparing Your Workspace
Before working under the sink, take a few safety steps.
1. Turn Off Water Supply
Find the two water supply valves (hot and cold) under your sink. Turn them clockwise to shut off the water. This prevents accidental leaks.
2. Clear The Area
Remove everything from under the sink. Give yourself as much room as possible to work.
3. Dry The Area
Use a towel to dry up any water or moisture. This helps prevent slips and protects your cabinet.
4. Check For Electrical Hazards
If you have a garbage disposal, unplug it. Water and electricity do not mix.
Taking a few minutes for safety makes the process smoother and helps you avoid damage or injury.
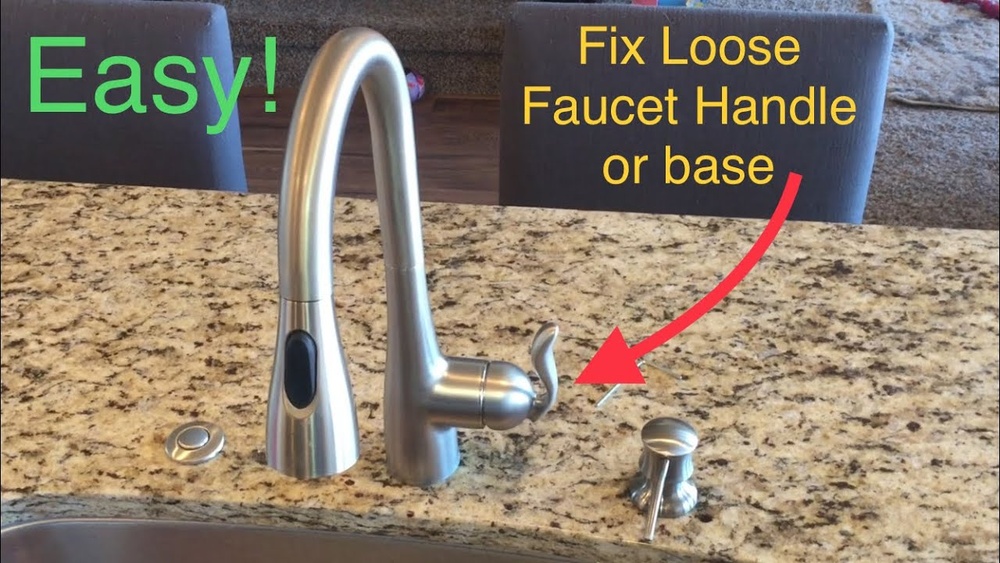
How To Tighten A Loose Single Handle Kitchen Faucet Base: Step-by-step
Tightening your faucet base is a simple process if you follow these clear steps. The exact method depends on your faucet model, but the basics are the same.
Step 1: Locate The Mounting Hardware
First, look under your sink. You’ll see the faucet pipes coming down through a hole in the countertop or sink. Right above where the pipes meet the sink, you’ll find the mounting nut or screws that hold the faucet base in place.
Common types of mounting hardware:
- Large metal or plastic nut (most common)
- Two or more screws (less common)
- U-shaped bracket with bolts
Use your flashlight to get a clear view. If space is tight, a small mirror can help you see behind pipes.
Step 2: Check The Condition Of The Hardware
Before tightening, check the hardware for any signs of corrosion, cracks, or missing pieces. If you notice rust or broken parts, you may need to replace them. Tightening a damaged nut won’t solve the problem for long.
Tip: If you see green or white powder around the nut, that’s corrosion. Clean it off with a cloth before tightening.
Step 3: Tighten The Mounting Nut Or Screws
Now, use your basin wrench or adjustable wrench to turn the mounting nut clockwise. Go slowly and check the faucet base above the sink as you tighten.
- If your faucet has screws, use a screwdriver to turn them clockwise.
- Do not overtighten—just snug enough so the base does not move, but not so tight that you crack the sink or strip the threads.
Practical tip: Ask a friend to hold the faucet steady from above while you tighten the nut below. This keeps the faucet straight and prevents twisting.
Step 4: Test The Faucet Base
Once you’ve tightened the hardware, go back above the sink. Try to move the faucet base gently side to side. It should feel solid and not wobble. If it still moves, check under the sink again—the nut may need another small turn.
Step 5: Seal The Base (optional)
If you notice water leaking around the base, apply a thin bead of plumber’s putty or silicone sealant around the bottom edge of the faucet base before tightening. This helps prevent future leaks.
- Plumber’s putty is easy to shape and remove later.
- Silicone sealant is more permanent and waterproof.
Wipe away any extra putty or sealant with a damp cloth.
Step 6: Turn Water Supply Back On
Slowly turn both water valves counterclockwise to restore water supply. Check for any leaks under the sink and around the faucet base. If everything is dry and the base is solid, you’re done.
Important: If you notice leaking, turn off the water and check your work. Sometimes the nut needs a bit more tightening, or the sealant needs to dry.
What If The Faucet Base Still Feels Loose?
Sometimes, tightening the nut or screws is not enough. If your faucet base still moves, consider these possible issues:
1. Stripped Threads:
The threads on the mounting nut or faucet body may be stripped (worn down), so the nut cannot hold tight. You’ll need to replace the hardware.
2. Broken Or Missing Washer:
Washers help spread pressure and keep the faucet stable. If the washer is broken or missing, replace it with a new one of the same size.
3. Cracked Sink Or Countertop:
A damaged mounting surface can prevent the base from tightening. Check for cracks and repair or reinforce as needed.
4. Incorrect Hardware:
If someone replaced the nut or screws with the wrong size, the base won’t stay tight. Use hardware made for your faucet model.
If you need to replace hardware, take the old parts to a hardware store to find exact matches.
Comparing Common Mounting Hardware
Different faucet models use different mounting hardware. Here’s a simple comparison to help you identify yours:
| Hardware Type | Common Faucets | Strengths | Weaknesses |
|---|---|---|---|
| Large Mounting Nut | Most single handle faucets | Easy to tighten, good stability | Can corrode over time |
| Mounting Screws | Some high-end or European models | Simple to adjust, less space needed | Can strip threads if overtightened |
| U-Bracket with Bolts | Heavy faucets, commercial style | Very secure, less likely to loosen | Harder to access, may require two people |
Knowing your hardware type helps you choose the right tool and method for tightening.
When To Call A Professional
Most loose faucet bases can be fixed in under 30 minutes with simple tools. But there are times when it’s smart to call a plumber:
- The mounting nut is frozen or rusted and won’t turn
- The threads are stripped and you can’t find replacement parts
- You see water damage, mold, or signs of a leak inside your cabinet
- You feel uncomfortable working in tight spaces under the sink
Professional plumbers have special tools and experience to handle tough cases. If you run into trouble, don’t risk making it worse—get expert help.
Preventing A Loose Faucet Base In The Future
Once you’ve fixed your faucet, a few simple steps can help keep it tight for years.
1. Check The Base Annually
Every year, feel around the base of your kitchen faucet. If you notice any movement, tighten it before it gets worse.
2. Look For Leaks
Check for water under the sink and around the faucet base. Fix small leaks right away to prevent corrosion.
3. Clean Hardware
When cleaning under the sink, wipe dust and moisture off the mounting hardware. This reduces the risk of rust.
4. Use The Faucet Gently
Avoid pulling or pushing the faucet sideways with force. Use the handle gently to reduce vibration.

Credit: www.youtube.com
Common Mistakes To Avoid
Even simple repairs can go wrong if you miss small details. Here are frequent mistakes homeowners make when tightening a kitchen faucet base:
- Forgetting to Turn Off Water:
Always shut off supply valves before starting.
- Overtightening the Nut:
Too much force can crack your sink or strip threads. Tighten just until the base is snug.
- Using the Wrong Tools:
A basin wrench is designed for tight spots. Using pliers or other tools can damage hardware.
- Ignoring Corrosion:
Don’t just tighten a rusty nut—replace it to prevent future problems.
- Not Checking for Leaks Afterward:
Always test with water running to catch any new leaks.
Avoid these mistakes, and your repair will last much longer.
Real-world Example: Fixing A Loose Faucet Base
Let’s see how these steps work in a real home:
Maria noticed her kitchen faucet wiggled every time she turned it on. She looked under the sink and found a large metal mounting nut. With a flashlight and a basin wrench, she turned the nut clockwise. After two turns, she checked the faucet above the sink—it was solid and no longer moved.
She wiped away some old water stains, turned the water back on, and the faucet stayed tight. Maria now checks her faucet base every spring to make sure it doesn’t loosen again.
This simple fix saved Maria from calling a plumber and prevented more serious leaks.
Comparing Diy Vs. Professional Faucet Tightening
Wondering if you should do it yourself or hire a pro? Here’s a quick comparison:
| Aspect | DIY | Professional |
|---|---|---|
| Cost | Low (tools only) | Moderate to high (service fee) |
| Time | 30-60 minutes | Depends on schedule |
| Skill Needed | Basic DIY skills | Expertise for complex cases |
| Best For | Simple loose bases, minor leaks | Severe corrosion, stripped threads, hidden leaks |
Most homeowners can handle tightening the base themselves. If you’re not sure, start with DIY—if it’s more complicated, call a plumber.
Typical Costs For Faucet Repair
The price of repairing a loose faucet base depends on whether you do it yourself or hire help.
- DIY cost:
Most people already have an adjustable wrench or screwdriver at home. A basin wrench costs about $10–$15 at hardware stores. Replacement nuts or washers are usually under $5. Your total cost is likely under $20.
- Professional plumber:
A plumber may charge $70–$150 for a service call, depending on location and complexity. If you have other plumbing work, they may fix the faucet base for a small extra fee.

Credit: www.wowowfaucet.com
How Long Does It Take To Tighten A Faucet Base?
For most people, this repair takes 20–30 minutes. If you need to replace hardware, it may take up to an hour, especially if you need to make a trip to the hardware store. Professional plumbers can often do the job faster.
Two Key Insights Most Beginners Miss
1. The Problem Often Starts With A Small Leak
Many people don’t notice their faucet base is loose until water leaks under the sink. By then, corrosion may have already damaged hardware. Checking your faucet base every few months can prevent costly repairs.
2. Not All Faucets Use The Same Hardware
Some models use special mounting systems or have hidden screws. Always check the manufacturer’s website or manual for your faucet model before starting. This can save you time and frustration.

Credit: www.reddit.com
Advanced Tip: Upgrading Hardware For A Longer Lasting Fix
If your faucet base loosens again and again, consider replacing old metal nuts with brass or stainless steel hardware. These materials resist corrosion better than standard steel or plastic. Some new faucets even include improved mounting systems designed to stay tight for years.
When Replacement Is Better Than Repair
If your faucet is very old, leaks from other places, or the finish is worn out, it may be more cost-effective to replace the entire faucet. Modern faucets are more efficient, use better materials, and often include lifetime warranties.
According to the Environmental Protection Agency, replacing old faucets with WaterSense models can save thousands of gallons of water per year. For more on efficient fixtures, check out the EPA WaterSense program.
Troubleshooting: If The Faucet Still Wobbles
If you’ve tried all the steps above but your faucet base still moves, try these troubleshooting ideas:
- Check if the countertop hole is too large for the faucet base. Use a special mounting plate to cover the gap.
- Look for hidden screws under decorative caps on the faucet base. Pry the cap off gently with a flathead screwdriver.
- Make sure the faucet is centered in the hole before tightening. An off-center faucet is hard to keep tight.
- If the base is plastic, it may be cracked inside where you can’t see. Consider replacing with a metal base.
Environmental And Health Benefits Of A Tight Faucet Base
A firm faucet base is not just about convenience. A tight, well-sealed faucet prevents leaks, which can:
- Reduce water waste (saving money and natural resources)
- Prevent mold and mildew, which can affect indoor air quality
- Protect your cabinets and countertops from rot and water damage
A small repair can make your kitchen safer and more sustainable.
Frequently Asked Questions
How Do I Know If My Single Handle Kitchen Faucet Base Is Too Loose?
If your faucet base moves when you use the handle, or if you see water pooling around the bottom, it’s too loose. A solid base should not shift or wiggle at all during normal use.
What Is The Best Tool For Tightening A Faucet Base Nut?
A basin wrench is the best tool for most kitchen faucets. It’s designed to fit around the mounting nut and reach into tight spots. An adjustable wrench can work if you have enough space.
Can I Use Plumber’s Tape Instead Of Putty To Seal The Base?
Plumber’s tape (Teflon tape) is for threaded pipe connections, not for sealing the faucet base. Use plumber’s putty or silicone sealant around the base to stop leaks.
How Often Should I Check And Tighten My Faucet Base?
Check your faucet base at least once a year, or any time you notice movement or a small leak. Early attention stops problems from getting worse.
What Should I Do If The Mounting Nut Is Stuck?
Spray a little penetrating oil (like WD-40) on the nut and wait 10–15 minutes. This helps loosen rust or corrosion. If it still won’t budge, use a basin wrench for extra leverage, or call a plumber for help.
—
A loose single handle kitchen faucet base is a simple fix if you know the right steps. With basic tools, a few safety tips, and regular checks, you can keep your kitchen faucet solid and leak-free for years. Remember, acting early prevents bigger problems and saves you time and money.
If you ever feel unsure, don’t hesitate to ask a professional for help. Taking care of your faucet base means a safer, more efficient kitchen for your whole family.