Are you tired of your Delta kitchen faucet slowing down your water flow? That little flow restrictor inside might be the reason your faucet isn’t delivering the strong stream you want.
Removing it can instantly boost your water pressure and make everyday tasks easier. In this guide, you’ll learn exactly how to remove the flow restrictor safely and quickly—no plumber needed. Keep reading, and by the end, you’ll have a simple fix that saves you time and frustration every time you use your kitchen sink.
Credit: www.deltafaucet.ca
Tools Needed
Removing the flow restrictor from a Delta kitchen faucet requires some basic tools. These tools help you open the faucet parts carefully. Having the right tools makes the job easier and faster. You can avoid damage to your faucet and save time.
Adjustable Wrench
An adjustable wrench fits many sizes of nuts and bolts. It helps loosen or tighten faucet parts. Choose a wrench with a comfortable grip for better control.
Needle-nose Pliers
Needle-nose pliers reach into tight spaces. They can grasp small parts like the flow restrictor. Use them to carefully pull out the restrictor without breaking it.
Flathead Screwdriver
A flathead screwdriver helps pry off parts gently. Use it to remove covers or clips hiding the flow restrictor. Be gentle to avoid scratching the faucet.
Towel Or Rag
Wrap a towel around the faucet before using tools. This protects the faucet’s finish from scratches. It also helps you hold the faucet securely.
Bucket Or Bowl
Place a bucket or bowl under the faucet. It catches any water that may drip during removal. Keeps your workspace clean and dry.
Locate The Flow Restrictor
Locating the flow restrictor in a Delta kitchen faucet is the first step to removing it. The flow restrictor controls water flow to save water and energy. Finding it can seem tricky, but the process is simple with clear guidance.
The flow restrictor usually sits inside the faucet’s aerator or cartridge. Knowing where to look helps avoid damage to your faucet parts. This section explains how to find the flow restrictor quickly and safely.
Check The Faucet Aerator
The aerator is the small screen at the faucet tip. Unscrew it carefully using your hand or pliers with a cloth. Inside the aerator, you will often find the flow restrictor as a plastic or rubber disk. It limits the water coming out.
Remove The Faucet Spout
Some Delta faucets have the flow restrictor inside the spout. Twist or pull the spout gently to remove it. Look inside the open spout for a small plastic piece. This part is the flow restrictor blocking excess water flow.
Inspect The Cartridge Area
The cartridge controls water mix and flow. Remove the handle and any decorative parts to see it. The flow restrictor might be inside or near the cartridge. Look for a small plastic ring or disk that fits tightly.
Turn Off Water Supply
Turning off the water supply is the first step before removing the flow restrictor from your Delta kitchen faucet. It stops water from flowing while you work. This prevents water spills and keeps the area dry and safe.
Shutting off the water supply is quick and easy. Knowing how to do it properly saves time and avoids damage.
Locate The Shut-off Valves
Look under the sink for two small valves. One controls hot water, the other controls cold water. These valves connect to the faucet pipes.
Turn The Valves Clockwise
Use your hand to turn each valve clockwise. Turn until it stops. This closes the valves and stops water flow.
Check If Water Is Off
Open the faucet to test. No water should come out. If water flows, turn the valves tighter or check the main water supply.
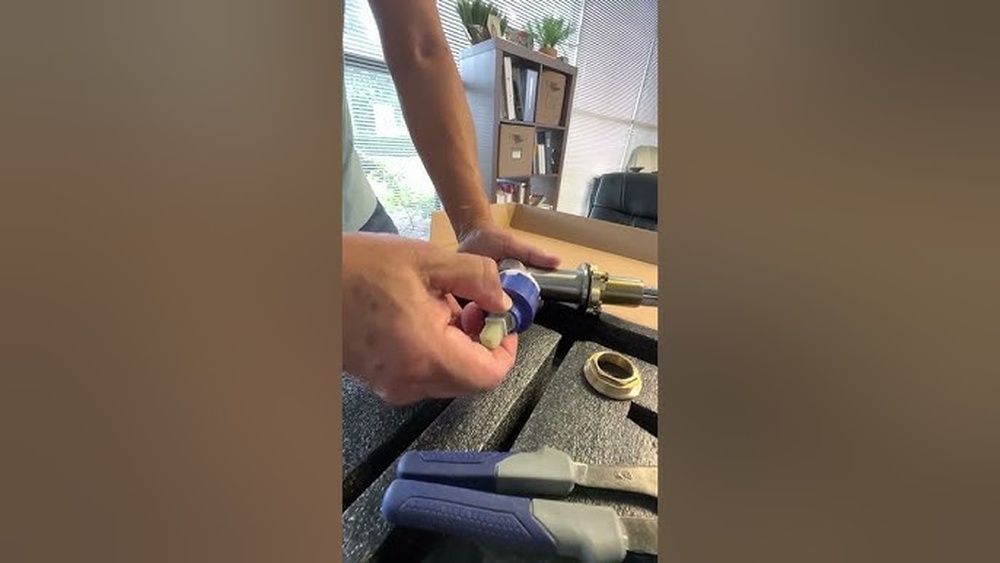
Remove Faucet Aerator
Removing the faucet aerator is the first step in taking out the flow restrictor from a Delta kitchen faucet. The aerator controls the water flow and mixes air into the water stream. It is usually located at the tip of the faucet spout. Taking off the aerator gives clear access to the flow restrictor inside.
Using the right method to remove the aerator prevents damage to the faucet. Handle it gently to keep all parts safe. You might need simple tools for easier removal. Knowing how to remove the aerator helps in cleaning or replacing parts later.
Locate The Faucet Aerator
Look at the end of the faucet spout. The aerator is a small, round piece screwed on the tip. It may have a metal or plastic exterior. Check carefully to see how it is attached.
Unscrew The Aerator By Hand
Try to twist the aerator counterclockwise using your fingers. Most aerators are hand-tightened. If it turns easily, keep twisting until it comes off. Do not force it too hard.
Use A Tool For Stubborn Aerators
If the aerator is stuck, use a rubber jar opener or cloth for grip. A pair of adjustable pliers can help too. Wrap the aerator with cloth to avoid scratches. Turn slowly to loosen it.
Keep Track Of Small Parts
Inside the aerator, there are small screens and washers. Place them carefully on a clean surface. These parts are important for the faucet’s function. Losing them can cause leaks or poor water flow.
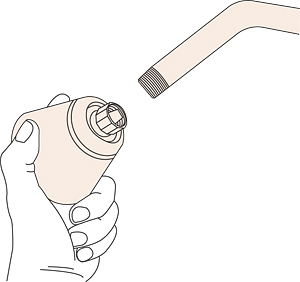
Extract The Flow Restrictor
Extracting the flow restrictor from your Delta kitchen faucet helps increase water flow. The flow restrictor limits water to save energy and water. Removing it allows more water to pass through the faucet.
This process is simple and takes only a few minutes. You need basic tools and a little patience. Follow the steps carefully to avoid damaging the faucet parts.
Turn Off The Water Supply
Before starting, shut off the water supply under the sink. This prevents water from spraying out when you remove parts.
Use the shutoff valves below the sink. Turn them clockwise until tight.
Remove The Faucet Aerator
The aerator is at the tip of the faucet spout. Unscrew it by hand or use pliers with a cloth to avoid scratches.
Place the aerator on a clean surface to keep small parts safe.
Locate And Extract The Flow Restrictor
Inside the aerator housing, find the small plastic flow restrictor. It looks like a small disk or ring.
Use a toothpick or needle to gently lift and remove the restrictor. Avoid using sharp metal tools that can damage the aerator.
Clean And Reassemble The Aerator
Rinse the aerator parts under water to clean any debris. Check for damage or wear on the rubber washer.
Put the aerator back together without the flow restrictor. Screw it tightly onto the faucet by hand.
Turn On The Water And Test
Open the water supply valves slowly. Turn on the faucet and check for leaks.
The water flow should feel stronger now. Test both hot and cold water to ensure proper function.

Credit: www.youtube.com
Clean The Aerator Components
Start by removing the aerator from the faucet. Carefully take apart the aerator components and clean each piece gently. This helps clear any dirt or buildup that may block water flow.
Disassemble The Aerator
Start by unscrewing the aerator from the faucet tip. Use your hand or a wrench wrapped in cloth. This protects the finish from scratches. Place the aerator parts on a clean surface. Keep track of each piece for easy reassembly.
Soak The Parts In Vinegar
Fill a small bowl with white vinegar. Submerge the aerator pieces fully. Let them soak for 30 minutes to dissolve mineral buildup. Vinegar is safe and effective for cleaning. It loosens debris and improves water flow.
Scrub The Components
After soaking, use a soft brush or old toothbrush. Gently scrub each part to remove remaining dirt. Pay attention to the mesh screen and flow restrictor area. Avoid using harsh tools that may damage parts.
Rinse And Dry Thoroughly
Rinse all parts under running water. Ensure no vinegar or debris stays on the pieces. Shake off excess water and dry with a soft cloth. Proper drying prevents rust and keeps components in good shape.
Reassemble And Test
Put the aerator parts back together carefully. Screw the aerator onto the faucet firmly but not too tight. Turn on the water to check flow and leaks. Clean aerator parts help maintain smooth water flow.
Reassemble The Faucet
Reassembling the faucet is the final step after removing the flow restrictor. It is important to put every part back correctly. This ensures the faucet works well without leaks or problems. Take your time and follow each step carefully.
Clean All Parts Before Reassembly
Wipe all parts with a clean cloth. Remove any dirt or debris. Clean parts fit better and prevent leaks. Check for any damage or wear before putting parts back.
Replace The Cartridge Correctly
Insert the cartridge into the faucet body carefully. Align it with the slots inside. Push it gently but firmly into place. Make sure it sits evenly to avoid water flow issues.
Secure The Retaining Clip
Place the retaining clip over the cartridge. This holds the cartridge in place. Press the clip until it snaps securely. Without this, the cartridge may shift or come loose.
Reattach The Faucet Handle
Slide the handle onto the cartridge stem. Align it straight for easy operation. Tighten the handle screw with a screwdriver. Check that the handle moves smoothly up and down.
Test The Faucet For Leaks
Turn on the water supply slowly. Observe the faucet for drips or leaks. Operate the handle to check water flow. Fix any leaks by tightening parts or adjusting alignment.
Test Water Flow
Testing the water flow is an important step after removing the flow restrictor from your Delta kitchen faucet. It helps you see if the water pressure has improved. It also checks for leaks or other issues.
Testing water flow is simple. You only need to turn on the faucet and watch the water. This step ensures your faucet works well and safely.
Check Water Pressure
Turn the faucet on fully. Watch how strong the water flows from the spout. The water should be steady and strong. Weak flow means the restrictor might still be inside or another problem exists.
Look For Leaks
Observe around the faucet base and underneath the sink. Water leaks can happen if parts are loose. Tighten any loose connections to stop leaks. Leaks waste water and can cause damage.
Test Hot And Cold Water
Turn both the hot and cold water handles. Make sure the flow is good for both. Sometimes removing the restrictor affects one side more. Check each side separately to be sure.
Repeat The Test
Test the water flow several times. This helps catch any problems early. If the flow is still low, check if the restrictor is fully removed. Sometimes small debris blocks the water flow too.
Safety Tips
Removing the flow restrictor from a Delta kitchen faucet can improve water flow. Safety is important during this task. Careful steps help avoid damage and injury. Follow these safety tips for a smooth process.
Turn Off The Water Supply
Always shut off the water supply before starting. This prevents water leaks and flooding. Locate the shut-off valves under the sink. Turn them clockwise to close.
Wear Protective Gloves
Wear gloves to protect your hands from sharp edges. Faucets and tools can cause cuts. Gloves also improve grip on small parts.
Use Proper Tools
Use the right tools for removing the restrictor. Avoid makeshift tools that can slip or break. A small wrench or pliers usually work best.
Handle Parts Gently
Be gentle when removing the restrictor. Excessive force can damage the faucet. Take your time to loosen parts carefully.
Keep Small Parts Safe
Place small parts on a clean surface. Avoid losing screws or washers. Use a bowl or tray to hold pieces securely.

Credit: www.reddit.com
Frequently Asked Questions
How Do I Identify The Flow Restrictor In A Delta Faucet?
The flow restrictor is a small, plastic disc inside the faucet’s aerator. Remove the aerator by unscrewing it to locate the restrictor.
Is Removing The Flow Restrictor Safe For My Faucet?
Yes, removing it is safe but may increase water flow and usage. Ensure your plumbing can handle higher water pressure.
What Tools Do I Need To Remove The Flow Restrictor?
You only need a wrench or pliers to unscrew the aerator and tweezers or needle-nose pliers to remove the restrictor.
Will Removing The Flow Restrictor Void My Warranty?
Removing the restrictor may void your Delta faucet warranty. Check your warranty terms before proceeding with removal.
Conclusion
Removing the flow restrictor from your Delta kitchen faucet can improve water flow. Take your time and follow the steps carefully to avoid damage. Use simple tools and gentle force for best results. Clean the parts before reassembling for smooth operation.
This small fix can make a big difference in your daily kitchen use. Keep your faucet working well with regular checks and simple care. Now, enjoy better water pressure every time you use your sink. Easy and effective—just the way it should be.