Displaying rolling pins is more than just organizing a kitchen tool. It can be a way to show your personality, add warmth to your kitchen, and highlight a tool that’s been central to baking for generations. Whether you collect antique rolling pins, prefer modern designs, or simply want a practical storage solution, learning how to display rolling pins can transform your kitchen space.
Let’s explore every idea, technique, and tip to help you create a display that’s both beautiful and functional.
Why Display Rolling Pins?
Rolling pins are not only practical tools; they are objects with history and character. Many bakers have favorite rolling pins passed down through families. Some rolling pins feature unique designs, carvings, or materials like marble, wood, or ceramic. When displayed, rolling pins can:
- Add a rustic or vintage touch to your kitchen
- Show off craftsmanship and material diversity
- Make baking tools easy to reach
- Spark conversations with guests
- Help preserve antique or special rolling pins
Displaying them well combines style and convenience. Before you start, think about your space, your collection, and your goals.
Choosing The Best Display Method
There is no single right way to display rolling pins. The best method depends on:
- Available wall space
- Number of rolling pins
- Kitchen style (modern, farmhouse, vintage)
- Frequency of use
- Material and weight of pins
Let’s explore the main display methods, comparing their pros and cons.
| Display Method | Best For | Space Needed | Style Suitability |
|---|---|---|---|
| Wall Rack | Large collections | Medium/Large | Farmhouse, rustic, traditional |
| Shelf Display | Small to medium groups | Small/Medium | Modern, classic, eclectic |
| Hanging Hooks | Easy access | Small | Practical, casual |
| Glass Cabinet | Antique/rare pins | Medium/Large | Elegant, vintage |
| Countertop Stand | Frequent use | Small | Minimalist, functional |
Wall Rack Display
Wall racks are a popular way to display rolling pins. This method keeps pins visible and easy to reach. You can buy ready-made racks or build your own.
Types Of Wall Racks
1. Horizontal Bar Racks
Pins rest on bars, held in place by grooves or brackets. This is ideal for displaying pins side by side.
2. Vertical Peg Racks
Pins are placed vertically on pegs. This saves horizontal space and shows off different pin lengths.
3. Custom Wooden Racks
You can design racks to fit your collection. Some racks feature decorative backs, painted motifs, or carved wood.
Installation Tips
- Choose a wall free from moisture and heat.
- Use strong anchors for heavy pins (marble or glass).
- Space bars or pegs so pins do not touch each other.
- Place racks at a comfortable height for easy access.
Pros And Cons
Pros:
- Showcases entire collection
- Easy to organize by type or size
- Adds a decorative element
Cons:
- Takes up wall space
- Pins can collect dust
- May not suit very modern kitchens
Example
A baker with 12 rolling pins might use a three-tier horizontal rack, placing pins by material: wood, marble, and ceramic. A small sign or label can add a personal touch.
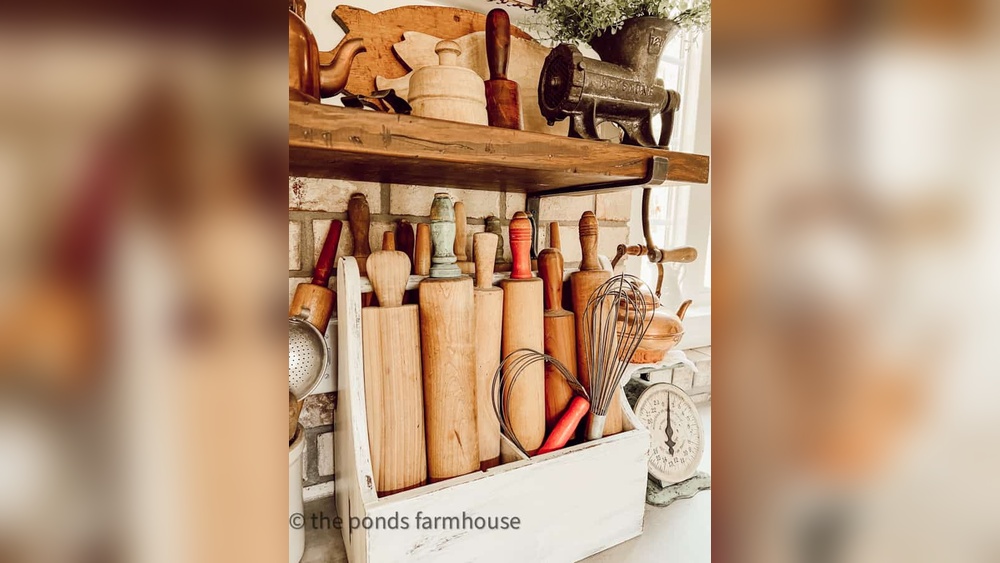
Shelf Display
Shelves are flexible and allow for creative arrangements. You can use single shelves, floating shelves, or tiered shelving.
Arranging Pins On Shelves
- Lay pins flat, spaced evenly.
- Stand pins upright in jars or holders.
- Mix pins with small baking items (cookie cutters, bowls).
- Add plants or decor for visual interest.
Choosing Shelf Material
- Wood: Warm, rustic feel.
- Metal: Modern, industrial look.
- Glass: Clean, elegant appearance.
Safety Considerations
- Use shelf brackets strong enough for heavy pins.
- Ensure shelves are level to prevent rolling pins from slipping.
- Avoid placing shelves near stove or sink.
Pros And Cons
Pros:
- Flexible placement
- Can display other kitchen items
- Easy to change arrangement
Cons:
- Pins may roll if not secured
- Limited display for large collections
Example
On a floating shelf, you might arrange five rolling pins, alternating wood and marble, with a small plant at one end. This adds both function and beauty.
Hanging Hooks
Hanging pins on hooks is a practical choice, especially for kitchens with limited space. Hooks can be attached to walls, cabinet sides, or even underneath shelves.
Types Of Hooks
- Screw-in Metal Hooks: Strong, easy to install.
- Decorative Hooks: Adds style, available in many shapes.
- Magnetic Hooks: Good for lightweight pins.
Installation
- Space hooks at least 5 inches apart.
- Use hooks with rubber coating for fragile pins.
- Hang pins with handles facing down for easy grab.
Pros And Cons
Pros:
- Saves counter and shelf space
- Easy access for daily use
- Can be installed almost anywhere
Cons:
- Not suitable for heavy pins
- Pins may swing and hit surfaces
Example
A row of hooks under a cabinet holds four rolling pins, making them easy to grab for baking. Decorative hooks add charm.
Glass Cabinet Display
For collectors of antique or rare rolling pins, glass cabinets offer both protection and style. Cabinets keep pins dust-free and safe from kitchen moisture.
Choosing A Cabinet
- Select cabinets with adjustable shelves.
- Look for locking doors if pins are valuable.
- Choose lighting for added visibility.
Arranging Pins
- Place pins horizontally or vertically.
- Use stands or holders for single pins.
- Group by material, era, or maker.
Pros And Cons
Pros:
- Protects pins from damage
- Shows off rare or valuable items
- Adds elegance to the room
Cons:
- Requires space
- Less convenient for daily use
Example
A vintage glass cabinet with interior lighting displays a set of hand-painted rolling pins from the 1900s, grouped by color and era.
Countertop Stand
Countertop stands are ideal for bakers who use rolling pins often. Stands can be simple or decorative, holding one or several pins upright.
Types Of Stands
- Wooden Block Stands: Pins fit into drilled holes.
- Ceramic Holders: Smooth, easy to clean.
- Metal Racks: Modern look, often holds multiple pins.
Placement Tips
- Place stands near your baking area.
- Choose non-slip bases for safety.
- Rotate pins for even wear.
Pros And Cons
Pros:
- Easy access
- Suitable for daily bakers
- Compact footprint
Cons:
- Limited display for large collections
- Pins exposed to kitchen mess
Example
A ceramic stand on the countertop holds two wooden rolling pins, ready for use. The stand’s design matches the kitchen’s color scheme.
Creative Display Ideas
If you want to make your rolling pin display unique, try these creative methods:
1. Shadow Box Frames
Mount rolling pins in deep frames with glass fronts. Add background fabric or artwork for extra flair.
2. Ladder Racks
Use a vintage wooden ladder as a rack. Lay pins across the rungs for a rustic look.
3. Mason Jar Stands
Place pins upright in large mason jars. This adds farmhouse charm and is easy to move.
4. Pegboards
Hang pins on pegs, mixing with other baking tools. Pegboards offer flexible arrangements.
5. Basket Displays
Arrange pins in woven baskets, either upright or flat. Works well for casual, country-style kitchens.
Non-obvious Insights
- Lighting matters: Good lighting can make rolling pins stand out, especially rare or decorative pins. Consider under-cabinet lights or spotlights for wall displays.
- Mixing materials: Displaying pins made from different materials (wood, marble, metal) adds texture and visual interest.
Organizing Rolling Pins By Material And Size
Organizing your pins helps with both display and use. You can sort pins by material, size, or era.
| Material | Benefits | Display Suggestion |
|---|---|---|
| Wood | Classic, warm | Wall rack or shelf |
| Marble | Heavy, elegant | Glass cabinet or countertop stand |
| Ceramic | Decorative, fragile | Glass cabinet or shadow box |
| Metal | Modern, cool | Hanging hooks or pegboard |
Grouping pins by size is helpful if you bake different items. Place smaller pins together for cookies, larger pins for bread or pastries.
Using Rolling Pins As Kitchen Decor
Rolling pins can be more than tools—they can be design elements. Try these ideas:
- Above-the-sink display: Install a small shelf or rack above your sink for a decorative touch.
- Backsplash accent: Mount rolling pins in a pattern along your backsplash.
- Themed display: Use pins with similar colors or motifs (flowers, animals).
- Gallery wall: Combine rolling pins with framed baking photos or recipe cards.
Practical Advisor Tips
- Avoid placing pins where they’ll get wet or greasy.
- Clean pins before displaying, especially antiques.
- Use display methods that allow easy removal for cleaning.

Credit: www.amazon.com
Maintaining And Cleaning Displayed Rolling Pins
To keep your display looking great, regular maintenance is key.
Cleaning Tips
- Wood pins: Wipe with a damp cloth, then dry. Use mineral oil for shine and protection.
- Marble pins: Clean with mild soap and water, avoid harsh chemicals.
- Ceramic pins: Use a soft cloth, avoid abrasive cleaners.
- Metal pins: Wipe dry, polish if needed.
Common Mistakes
- Placing pins near heat sources (stove, oven) can damage wood.
- Using harsh cleaners can fade decorative finishes.
- Ignoring dust buildup makes displays look dull.
Storage Tips
- Rotate pins occasionally to prevent uneven fading.
- Check brackets and hooks for loosening.
- Inspect glass cabinets for moisture buildup.
Safety And Accessibility
If you display rolling pins in a busy kitchen, safety is important.
- Use strong mounts for heavy pins.
- Avoid high shelves if you have children or limited mobility.
- Check regularly that pins are secure.
If you use pins often, make sure they are easy to reach. Don’t place daily-use pins behind glass or above head height.
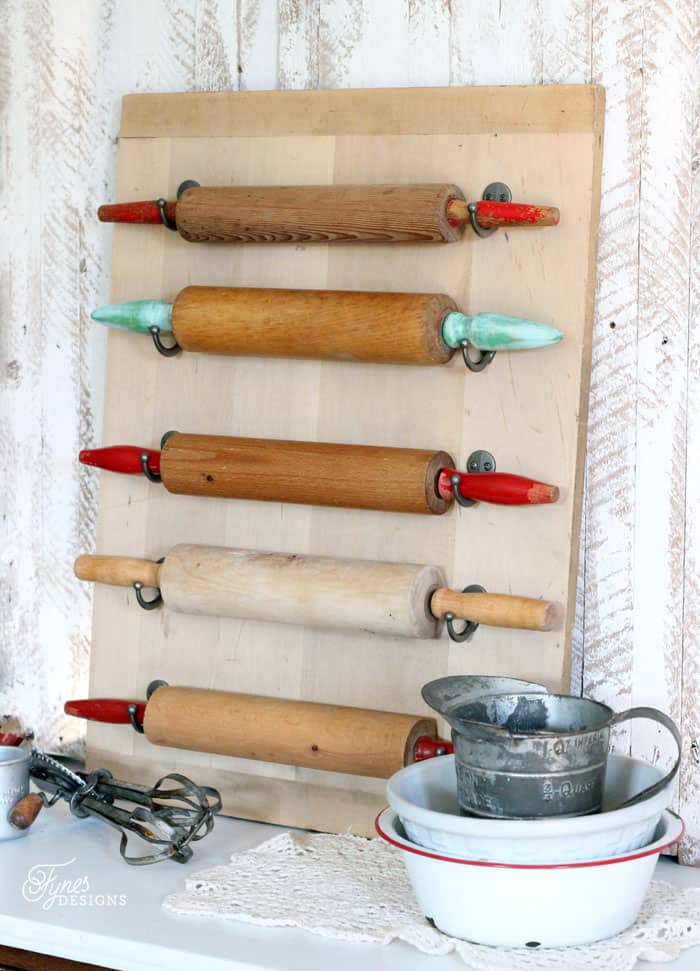
Credit: www.fynesdesigns.com
Displaying Rolling Pins In Small Kitchens
Small kitchens require careful planning. Try these strategies:
- Use vertical space (walls, cabinet sides).
- Choose multi-purpose displays (shelves with hooks).
- Display only your favorite pins, store others.
Example
A small kitchen with no wall space might use a pegboard on the pantry door, holding three rolling pins and baking tools.
Mixing Rolling Pins With Other Kitchen Items
Combining rolling pins with other items adds depth to your display.
- Place pins beside baskets of flour or bread.
- Mix pins with vintage baking tools (whisks, sieves).
- Create a baking corner with rolling pins, recipe books, and measuring cups.
Comparison Table: Rolling Pin Display With Other Kitchen Tools
| Display Type | Rolling Pins Only | Mixed Tools |
|---|---|---|
| Visual Appeal | Simple, focused | Rich, varied |
| Functionality | Easy to grab pins | Easy access to all tools |
| Theme | Pin-centered | Baking-centered |
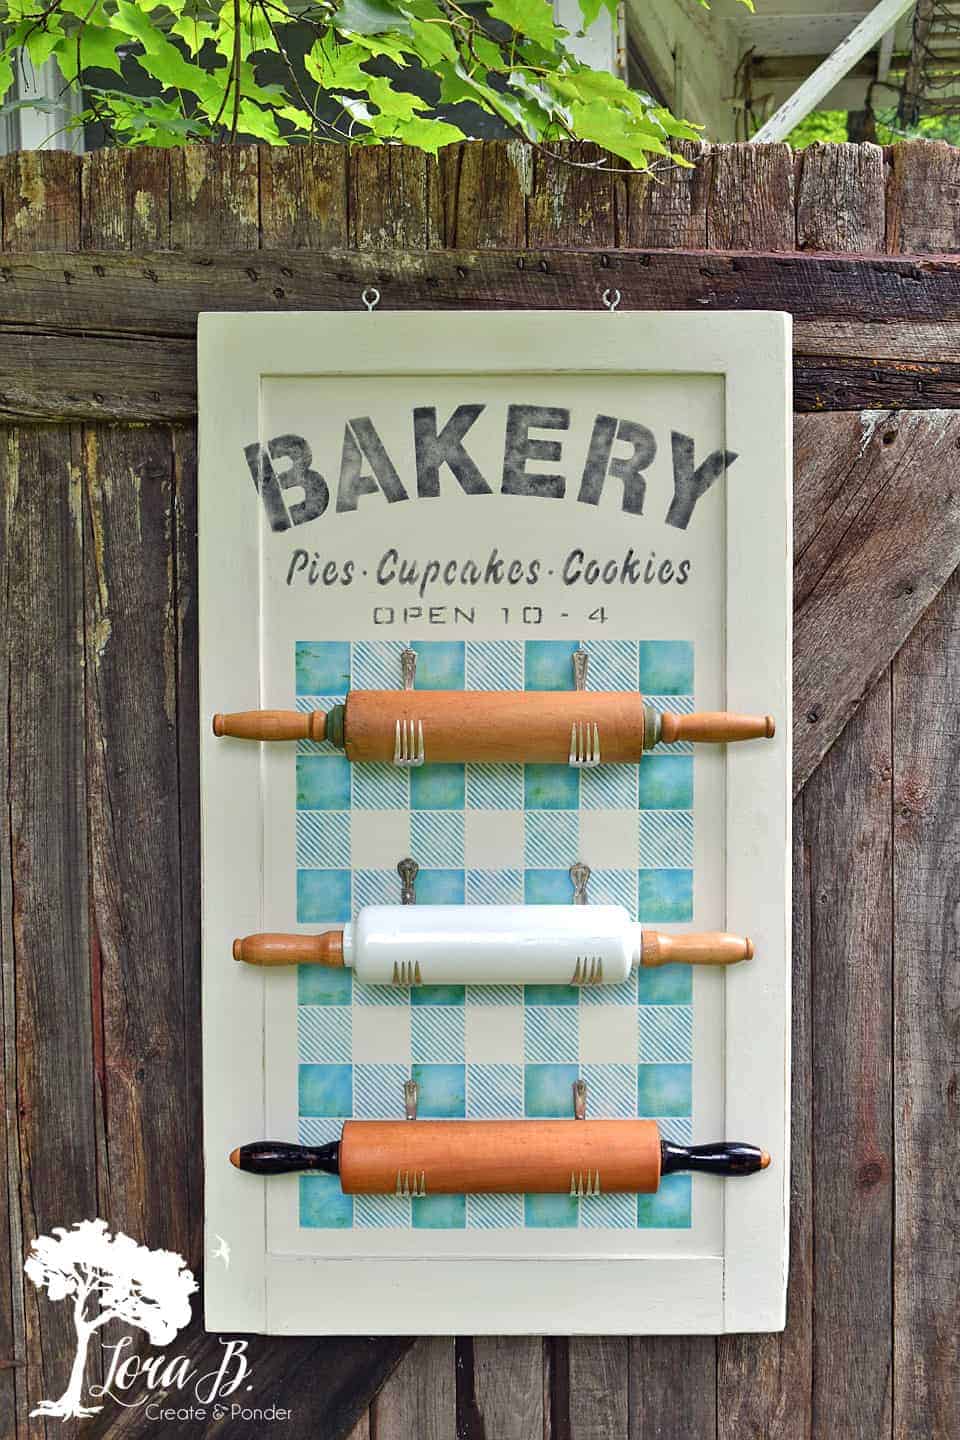
Credit: lorabloomquist.com
Showcasing Antique And Rare Rolling Pins
Antique rolling pins need special care. Displaying them properly protects their value.
- Use glass cabinets or shadow boxes.
- Avoid direct sunlight to prevent fading.
- Add labels with pin history or maker.
Example
A rare ceramic rolling pin from the 1800s is displayed in a shadow box with a small plaque, explaining its origin.
Displaying Rolling Pins For Retail Or Commercial Spaces
Bakeries, kitchen stores, or cafes may want to display rolling pins to attract customers.
- Use wall racks behind counters.
- Arrange pins with baked goods for visual appeal.
- Rotate displays to highlight new products.
Data
Studies show that displays with real baking tools increase customer engagement by 15% (Kitchen Retail Study, 2023).
Diy Rolling Pin Display Projects
Building your own display can be rewarding and cost-effective.
Steps To Build A Wall Rack
- Measure your wall space.
- Choose wood or metal for rack.
- Cut bars or pegs to size.
- Attach bars or pegs to rack base.
- Mount rack securely to wall.
Tips
- Use sandpaper to smooth wood.
- Paint or stain for style.
- Test rack with heavy pins before final installation.
Common Mistakes
- Not measuring pin lengths before building.
- Using weak brackets or anchors.
- Overcrowding pins.
Rolling Pin Display Ideas For Different Kitchen Styles
Your kitchen’s style can guide your display choices.
Farmhouse
- Use wooden racks, baskets, or ladder displays.
- Mix rolling pins with rustic decor.
Modern
- Choose metal or glass shelves.
- Display fewer pins, focus on clean lines.
Vintage
- Use glass cabinets or shadow boxes.
- Add antique baking tools for character.
Minimalist
- Select one or two pins, use simple stands.
- Keep display uncluttered.
Using Rolling Pins As Gifts Or Heirlooms
Displayed rolling pins make great gifts or family heirlooms.
- Mount pins in decorative boxes for gifting.
- Include a note about pin history or recipes.
- Display gifted pins in a prominent spot.
Example
A grandmother passes down a rolling pin, displayed in a shadow box with her favorite pie recipe.
How To Display Rolling Pins For Photography Or Social Media
Many bakers want to share their displays online. Good photography can make your pins shine.
Tips
- Use natural light for clear photos.
- Arrange pins with baking ingredients (flour, eggs).
- Focus on unique details (carvings, color).
- Avoid clutter in the background.
Data
Instagram posts with kitchen displays get 20% more engagement when pins are included (Social Media Bake Study, 2022).
Where To Find Rolling Pin Display Inspiration
For more inspiration, visit kitchen museums, antique shops, or baking blogs. Pinterest and Instagram have thousands of display ideas. You can also learn from famous bakers and decorators.
One useful resource is Food Network, which features kitchen tours and display tips from top chefs.
Frequently Asked Questions
What Is The Best Way To Display Rolling Pins In A Small Kitchen?
In small kitchens, vertical displays such as wall racks or pegboards use less space. Hanging pins on hooks under cabinets or on pantry doors is also effective. Try displaying only a few favorite pins and storing the rest.
How Do I Protect Antique Rolling Pins When Displaying Them?
Antique pins are best displayed in glass cabinets or shadow boxes. Keep them away from sunlight and moisture. Clean gently, and avoid harsh chemicals. Add labels or plaques to share their history.
Can I Mix Rolling Pins With Other Kitchen Tools In A Display?
Yes, mixing rolling pins with tools like whisks, cookie cutters, or measuring cups adds interest. Try creating a baking-themed corner or shelf for a cozy look.
What Materials Work Best For Rolling Pin Racks?
Wood is classic and sturdy, while metal offers a modern style. Glass racks or shelves give elegance. Choose materials that match your kitchen and can support the weight of your pins.
How Should I Clean Displayed Rolling Pins?
Clean pins according to their material. Wood pins need a damp cloth and mineral oil. Marble and metal pins can be wiped with mild soap and water. Ceramic pins require gentle cleaning. Always dry pins well before displaying.
Displaying rolling pins blends function, history, and style. Whether you’re organizing a few favorite pins or showing off a rare collection, the right display can make your kitchen warmer and more beautiful. Take time to choose a method that fits your space and style, and enjoy the charm these simple tools bring.
For more kitchen tips, see our post on organizing baking tools.