If you’re ready to take on a home plumbing project, learning how to pipe a kitchen sink can save you both money and time. Many homeowners feel nervous about plumbing, but with the right guide, you can replace or install sink pipes confidently. This article will walk you through every step, highlight common mistakes, and offer practical tips—even if you’re new to DIY repairs.
Why Piping A Kitchen Sink Matters
A well-installed kitchen sink pipe system prevents leaks, bad smells, and costly water damage. Faulty piping can lead to mold, ruined cabinets, and even pest problems. According to the Environmental Protection Agency, household leaks waste nearly 1 trillion gallons of water every year in the United States alone.
Proper piping is not just about function—it’s about protecting your home.
Tools And Materials You’ll Need
Before you start, gather your tools and materials. Here’s what you’ll need for most standard kitchen sink setups:
- Adjustable wrench
- Pipe wrench (optional for tight fittings)
- Basin wrench
- Bucket
- Plumber’s putty
- Pipe tape (Teflon tape)
- PVC pipes and fittings (P-trap, tailpiece, extension pipe, elbows as needed)
- PVC glue (if permanent joints are used)
- Hacksaw (for cutting pipe)
- Slip-joint pliers
- Measuring tape
- Marker
Choosing the right pipe material is important. Most kitchen sinks use PVC pipes. These are affordable, easy to cut, and resistant to corrosion. Metal pipes, like chrome-plated brass, are sometimes used for visible sections but are more expensive and harder to work with.
Credit: www.youtube.com
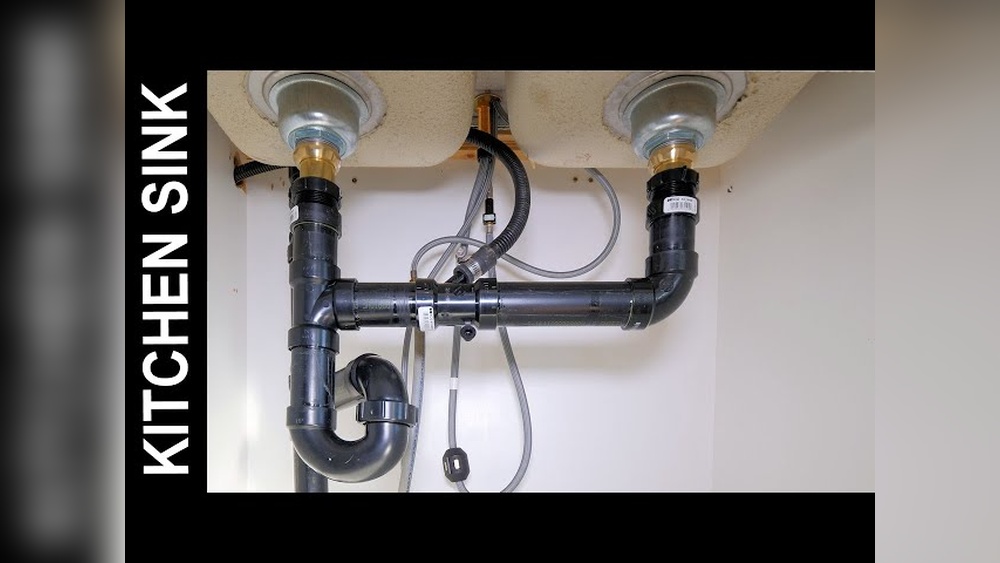
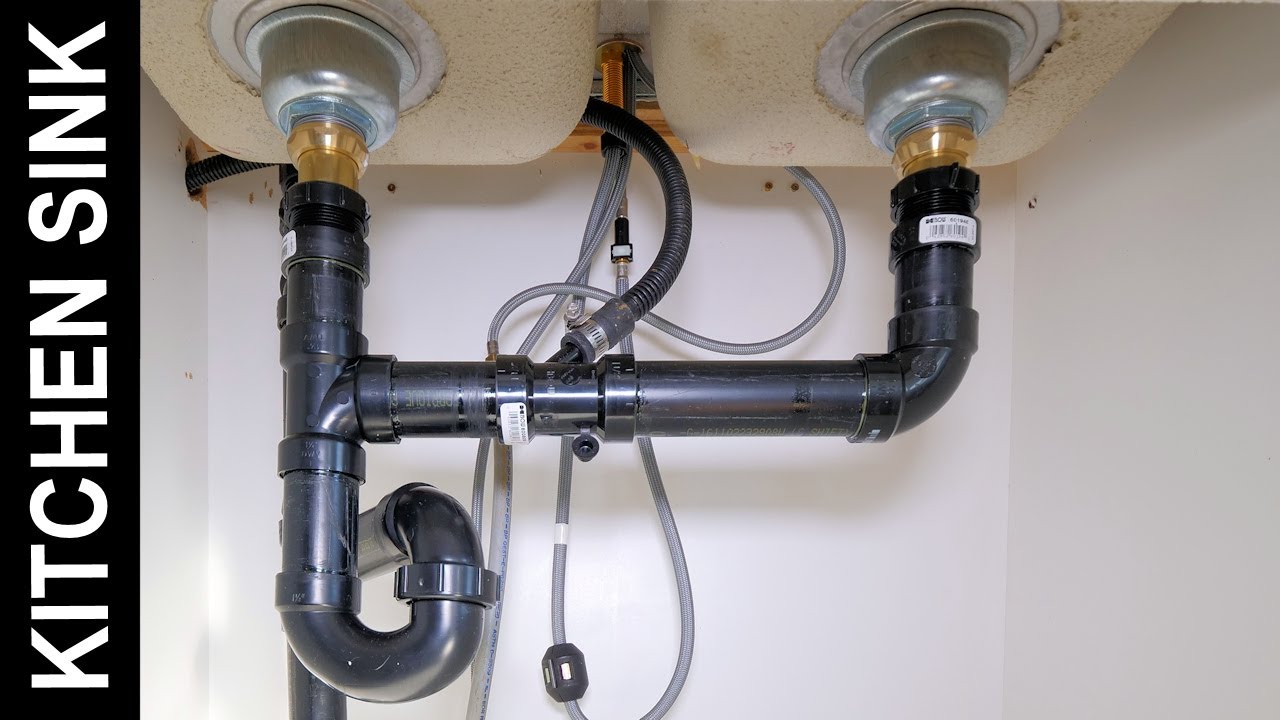
Understanding The Sink Plumbing System
To pipe a kitchen sink correctly, you need to understand the system’s parts and how they work together. Here’s a quick breakdown:
- Sink Strainer: Sits in the drain hole, catching food bits.
- Tailpiece: Connects the strainer to the rest of the pipe system.
- P-trap: The curved section that holds water, blocking sewer gases.
- Trap Arm: Connects the P-trap to the wall drain.
- Drain Stub-out: The pipe in the wall where waste flows out.
The following table compares common kitchen sink pipe materials:
| Material | Durability | Cost | Ease of Installation |
|---|---|---|---|
| PVC | High | Low | Easy |
| ABS | Moderate | Low | Easy |
| Chrome-plated Brass | Medium | Medium | Moderate |
| Stainless Steel | High | High | Hard |
For most DIY projects, PVC is the easiest and most reliable choice.
Step-by-step Guide: How To Pipe A Kitchen Sink
Let’s move to the hands-on part. Whether you’re installing a new sink or replacing old pipes, these steps will help you get it right.
1. Remove Old Pipes (if Needed)
Place a bucket under the sink to catch any water left in the pipes. Use your adjustable wrench to loosen the slip nuts on the P-trap and tailpiece. Carefully remove the old pipes. If they’re stuck, a few gentle taps with the wrench can help. Clean the sink drain and wall drain opening.
Pro Tip: Take a picture of the old setup before removing anything. This can be a lifesaver if you need a reference later.
2. Install The Sink Strainer
Apply a ring of plumber’s putty around the underside of the new strainer. Press it into the sink drain hole, then secure it from below with the locknut. Tighten the locknut using your basin wrench for a snug fit. Wipe away any excess putty that squeezes out.
3. Attach The Tailpiece
Connect the tailpiece to the bottom of the sink strainer. Hand-tighten the slip nut, then give it a gentle turn with pliers. Don’t over-tighten—this can crack plastic pipes.
4. Dry-fit The Pipes
Before gluing or final tightening, dry-fit all pipes to ensure a good layout. Connect the tailpiece to the P-trap, then the P-trap to the wall drain using the trap arm. If your sink has a garbage disposal, attach the discharge pipe to the disposal first.
Here’s a useful table for common pipe sizes and their uses:
| Pipe Size | Use in Kitchen Sink | Notes |
|---|---|---|
| 1 1/2 inch | Standard drain pipe | Fits most kitchen sinks |
| 1 1/4 inch | Small bar/prep sinks | Less common in kitchens |
| 2 inch | Main drain line | Behind the wall, not under sink |
5. Measure And Cut Pipes
Use your measuring tape to check the length needed for each pipe section. Mark the pipes, then cut with a hacksaw. Smooth rough edges with sandpaper or a utility knife to prevent leaks.
Non-obvious tip: It’s better to cut pipes slightly longer than needed. You can always trim more, but you can’t add back.
6. Assemble The P-trap
Slide the slip nuts and washers onto the pipe ends before connecting. Assemble the P-trap so the curved section sits directly under the tailpiece. The trap arm should slope slightly toward the wall drain—this helps water flow out and prevents clogs.
7. Connect To The Wall Drain
Attach the trap arm to the wall drain stub-out. Hand-tighten the slip nut, then secure it gently with pliers. If you’re using threaded metal pipes, wrap the threads with pipe tape to prevent leaks.
8. Tighten And Check Alignment
Make sure all parts fit snugly. The pipes should not be under stress or pulled tight. A little movement is normal, but too much can lead to leaks.
9. Test For Leaks
Remove the bucket, then run water for several minutes. Check every joint and fitting for leaks. If you see drips, tighten the connections a bit more. For persistent leaks, take apart the joint and check the washer or seal.
Pro Tip: Place a dry paper towel under the pipes. Even small leaks will show up as wet spots.
10. Final Touches
If everything is dry and secure, clean up any excess putty or debris. Run hot and cold water to make sure both sides drain properly.
:max_bytes(150000):strip_icc()/how-to-install-a-sink-drain-2718789-hero-24e898006ed94c9593a2a268b57989a3.jpg)
Credit: www.thespruce.com
Common Mistakes To Avoid
Even experienced DIYers can make mistakes when piping a kitchen sink. Here are some of the most common errors:
- Over-tightening slip nuts. This can crack plastic fittings.
- Forgetting washers. Missing washers lead to leaks at joints.
- Improper pipe slope. Pipes must slope downward (about 1/4 inch per foot) for proper drainage.
- Using the wrong pipe size. Check your local code and sink requirements.
- Cross-threading metal pipes. Always start threading by hand to avoid damaging threads.
Tips For Double Bowl Sinks And Garbage Disposals
If you have a double bowl sink or a garbage disposal, the piping is a bit more complex. Here’s what to keep in mind:
- Double bowl sinks need a T-fitting or a center outlet waste kit to connect both bowls to the P-trap.
- Garbage disposals must be connected to the sink drain with a special discharge pipe.
- Always install the P-trap after combining the two drains.
Here’s a quick comparison of single bowl vs. double bowl sink piping:
| Type | Number of Drains | Piping Complexity | Special Parts |
|---|---|---|---|
| Single Bowl | 1 | Simple | Standard P-trap |
| Double Bowl | 2 | Moderate | T-fitting, extra pipes |
When To Call A Professional
Some plumbing jobs are too complex or risky for DIY. Call a professional if:
- Your drain line is clogged deep in the wall.
- You see signs of water damage or mold.
- The pipes don’t align due to unusual sink or cabinet design.
- Local plumbing codes require licensed work.
A plumber’s help can prevent costly errors, especially if you need to move drain lines or work in tight spaces.
Safety And Local Codes
Always check local plumbing codes before starting. Some areas require specific pipe types or installation methods. Use safety glasses when cutting pipe, and never mix different pipe materials without proper adapters.
If you want to learn more about plumbing codes, the National Geographic offers an overview of water systems and regulations.
Two Overlooked Details Beginners Miss
First, many people forget to leave clean-out access in their drain system. This small feature allows you to clear clogs easily in the future.
Second, always consider venting. Every sink needs a vent to prevent gurgling and slow drainage. If your old setup has a vent pipe, make sure not to block or disconnect it while working.
For more tips on plumbing and fixing leaks, you might also find our article on [how to fix a leaky faucet](how-to-fix-a-leaky-faucet) helpful.
Frequently Asked Questions
What Is The Best Pipe Material For A Kitchen Sink Drain?
PVC is the most popular choice for kitchen sink drains. It’s affordable, easy to work with, and resists corrosion. Metal pipes like chrome-plated brass are used for visible areas but are harder to cut and more expensive.
Do I Need A Plumber To Pipe My Kitchen Sink?
Not always. Simple replacements or installations can be done by most DIYers. However, if you need to move pipes, work with very old plumbing, or deal with frequent clogs, a licensed plumber is best.
Why Does My Kitchen Sink Smell Bad Even After Piping?
Bad odors are usually caused by a dry or faulty P-trap, or by food trapped in the drain. Make sure the P-trap is holding water and check for leaks. Running hot water with a bit of baking soda can help clear mild smells.
How Do I Prevent Leaks At The Joints?
Always use the correct washers, don’t over-tighten slip nuts, and make sure pipes are aligned. For metal threads, use pipe tape to seal the connection. Test your work with water before finishing.
Can I Use Flexible Pipes For My Kitchen Sink?
Flexible pipes can help in tight spaces but are more prone to leaks and clogs. Use them only when traditional pipes won’t fit, and check your local codes, as some areas don’t allow them for permanent installations.
Piping a kitchen sink isn’t as hard as it looks. With patience, the right tools, and a step-by-step approach, you can enjoy a leak-free, smoothly draining sink for years to come.
:max_bytes(150000):strip_icc()/how-to-install-a-sink-drain-2718789_hero_5078-64538f6f90d545c7af0728e4bf8f894e.jpg)
Credit: www.thespruce.com