
A stainless steel kitchen sink is a popular choice for many homes because it is durable, easy to clean, and looks modern. But even the best sink needs proper sealing to prevent water leaks and damage. Over time, the seal around your sink can wear out, causing water to drip under the countertop. This can lead to mold, cabinet damage, and even costly repairs. Learning how to caulk a stainless steel kitchen sink is a simple skill that saves you money and keeps your kitchen safe.
Many homeowners believe caulking is messy or difficult. In reality, you can get professional results with the right steps, tools, and a bit of patience. This guide explains everything you need to know, from choosing the right caulk to finishing with a smooth, clean line.
You’ll also find expert tips, common mistakes to avoid, and answers to questions people often ask. Whether you’re installing a new sink or re-sealing an old one, this article will help you get it right the first time.
Why Caulking A Stainless Steel Kitchen Sink Matters
Moisture is one of the biggest threats to your kitchen cabinets and countertops. When water leaks through gaps around your sink, it can quickly damage wood, cause mold, and even rot the area under your sink. Caulking creates a watertight barrier that blocks water, crumbs, and bacteria from getting under the rim. A fresh bead of caulk also makes your kitchen look clean and finished.
Many people ignore old, cracked, or moldy caulk, not realizing the risks. Regular inspection and maintenance of your sink caulking can add years to your countertop and cabinet life. It’s a small job with a big impact.
Even small leaks can cause hidden damage. For example, water that seeps through a tiny gap can slowly swell wooden cabinets or soften particleboard. Once the wood is wet, it starts to break down, and mold spores find a perfect place to grow.
Many homeowners only discover this damage when they notice musty smells or see water stains. By the time that happens, repairs can be expensive and time-consuming.
A fresh, neat caulk line also helps keep your kitchen hygienic. Food crumbs and grease can collect in even the smallest gaps, attracting pests and making cleaning harder. By sealing the edges, you reduce hidden messes and make it easier to wipe down your counters.
In homes with kids or pets, this simple maintenance step makes a surprising difference.
Understanding The Types Of Caulk For Kitchen Sinks
Choosing the right caulk is key to a long-lasting seal. Not all caulks are the same, and using the wrong one can lead to early failure.
| Type of Caulk | Water Resistance | Flexibility | Mold Resistance | Best For |
|---|---|---|---|---|
| Silicone | Excellent | High | Excellent | Kitchen & Bathroom sinks |
| Acrylic Latex | Good | Medium | Good | Low-moisture areas |
| Polyurethane | Excellent | High | Good | Outdoor or heavy-duty use |
For a stainless steel kitchen sink, 100% silicone caulk is the top choice. It is flexible, waterproof, and resists mold and mildew. Acrylic caulk is easier to clean up but does not last as long around sinks. Polyurethane is strong but harder to work with and is often used outdoors.
Pro Tip: Choose a clear or white silicone caulk for a clean look. Some brands offer kitchen and bath formulas with added mold protection.
One thing beginners often miss is that not all silicone caulks are the same. Some are designed for windows or outdoors, while others are specifically labeled for “kitchen and bath. ” The kitchen and bath versions have extra chemicals to fight mold and mildew growth, making them much better for wet areas.
Also, make sure the caulk you choose is paintable if you want to match your counter color, though most people prefer clear or white for a stainless steel sink.
Another detail: some caulks are sold in large tubes for caulking guns, while others come in smaller squeeze tubes. Squeeze tubes are easier for small jobs or repairs, but caulking guns give better control and are less tiring for bigger projects.
Credit: horow.com
Tools And Materials You’ll Need
Having the right tools ready makes the job smoother and gives better results. Here’s what you need:
- 100% silicone caulk (kitchen & bath grade)
- Caulking gun (for tubes, or buy a squeeze tube for small jobs)
- Utility knife or razor blade
- Painter’s tape (optional, for straight lines)
- Rubbing alcohol or vinegar (for cleaning)
- Paper towels or clean rags
- Plastic caulk smoothing tool or your finger
- Latex or nitrile gloves (optional)
- Bucket with warm soapy water (for cleaning up)
Beginner’s Insight: Many first-time DIYers forget to clean the area well or use the wrong type of caulk. Always check the caulk label to make sure it’s for kitchen or bath use.
Some extra tools can make your work easier. For example, a small flashlight helps you see if you’ve missed any old caulk or dirt in dim corners. A plastic scraper is also safer than metal for removing residue because it won’t scratch your sink or counter.
If you’re worried about making a mess, use a drop cloth or old towel to protect your cabinets and floor.
Also, remember to wear old clothes or an apron. Silicone caulk can be hard to remove from fabric once it dries. Having everything within arm’s reach before you start avoids rushing during the process, which is when most mistakes happen.
Preparing To Caulk Your Stainless Steel Sink
A clean surface is the secret to a strong, lasting seal. Old caulk, grease, and even dust can stop new caulk from sticking.
Remove Old Caulk
- Use a utility knife or razor blade to carefully cut away old caulk. Be gentle to avoid scratching the sink or countertop.
- Scrape out all residue using the knife or a plastic scraper.
- Wipe the area with rubbing alcohol or vinegar to remove grease and soap.
- Allow the area to dry completely.
Non-obvious Tip: If the old caulk is stubborn, soften it with a little heat from a hair dryer or use a special caulk remover gel.
When removing old caulk, patience is important. Don’t rush—pulling or prying too hard can chip granite or damage laminate counters. If you encounter mold, wear a mask and gloves. Moldy caulk can release spores, so wipe the area with a diluted bleach solution (rinse and dry well afterward) before applying new caulk.
Some people use a toothbrush or an old credit card to help scrub away stubborn bits of caulk or dirt. After cleaning, let the area air dry for at least 30 minutes. Moisture trapped under fresh caulk can cause it to peel or develop bubbles later.
Clean And Dry The Surface
- Wash the area with warm, soapy water.
- Rinse well and dry with a clean towel.
- Double-check for dust, crumbs, or leftover debris.
Mistake to Avoid: Never apply new caulk over old or dirty surfaces. It will not stick and will peel away quickly.
One extra step: run your finger along the joint to feel for any rough patches or sticky spots. Even tiny grains of old caulk or grease can stop new caulk from bonding. If in doubt, clean the area again.
Applying Painter’s Tape For Clean Lines
For a neat finish, especially if you are new to caulking, use painter’s tape.
- Place strips of tape above and below the joint, leaving a small gap (about 1/8 inch) where the caulk will go.
- The tape will catch excess caulk and help you make a straight line.
Expert Insight: Professionals often skip tape, but for beginners, it’s the easiest way to get a straight, even bead.
Another tip: Press the tape down firmly, especially at the corners, to prevent caulk from seeping underneath. If your sink has rounded corners, cut short strips of tape and overlap them to follow the curve. Remove any air bubbles in the tape before starting, as these can lead to uneven edges. If you want a wider or narrower caulk line, adjust the gap between the tape strips.
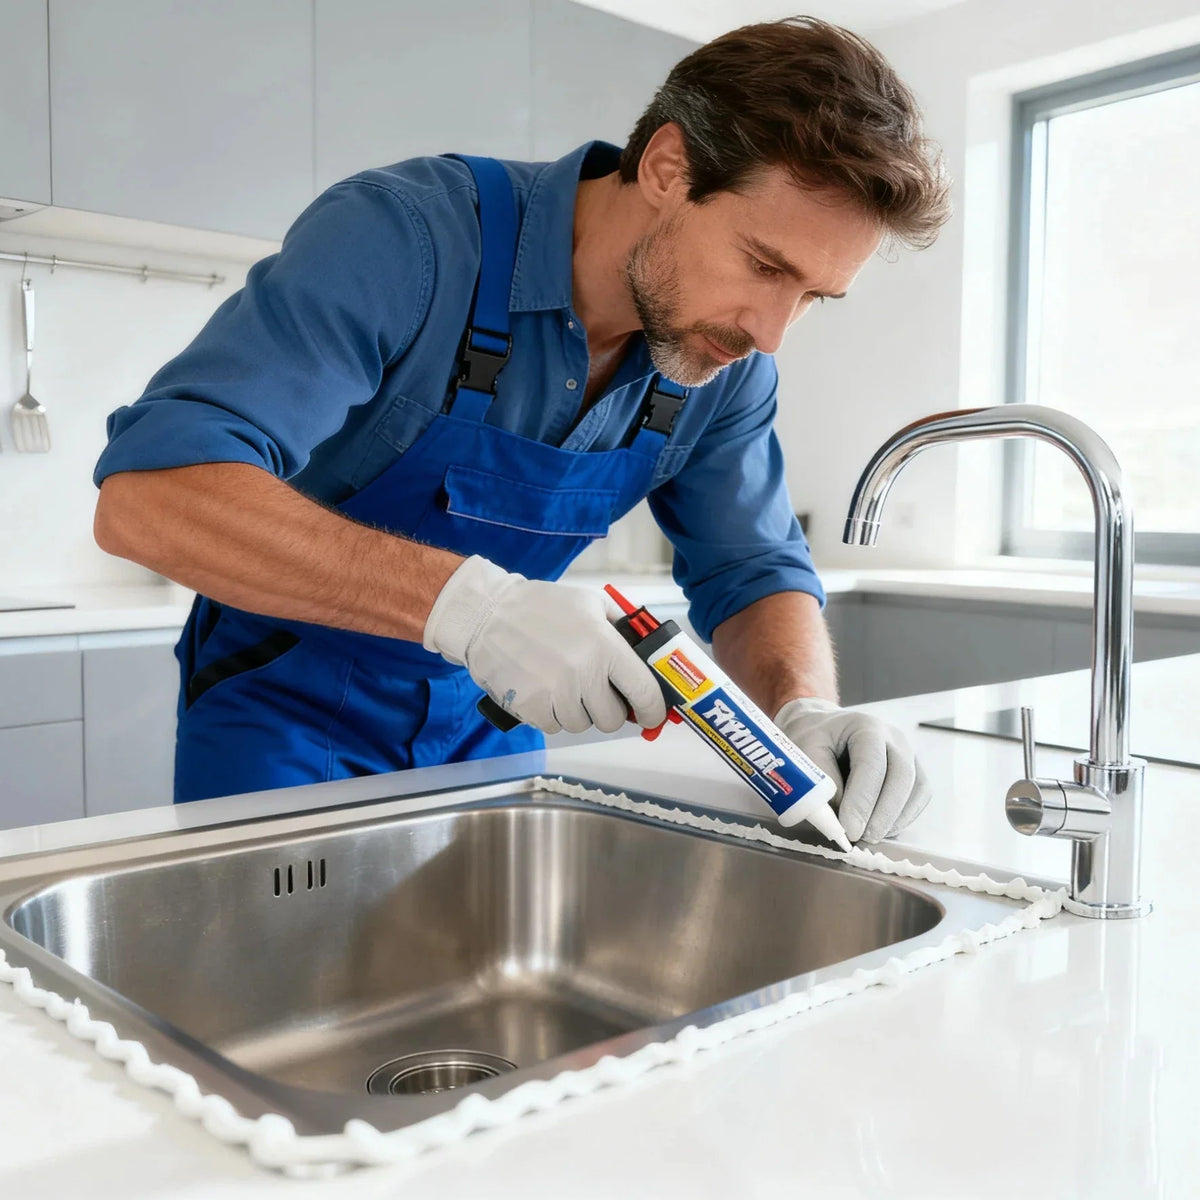
How To Caulk A Stainless Steel Kitchen Sink: Step-by-step
Now you’re ready to seal your sink. Follow these steps for a watertight, professional finish.
1. Cut The Caulk Tube Tip
- Cut the tip of the caulk tube at a 45-degree angle.
- Make a small opening (about 1/8 inch) for a thin bead; you can always cut more if needed.
Why 45 degrees?
It helps you lay the caulk smoothly into the joint.
If your first attempt at cutting the tube is too small, cut again slightly farther back. Remember, you can make the hole bigger, but not smaller. A smaller opening gives you more control, especially around tight corners.
2. Load The Caulk Into The Gun
- Pull back the plunger and insert the tube.
- Squeeze the trigger until caulk reaches the tip.
If using a squeeze tube, just open the cap.
Before you start, test the caulk flow on a piece of cardboard or paper towel. This helps you get a feel for the pressure needed and avoids surprises on your countertop.
3. Apply The Caulk Evenly
- Hold the gun at a slight angle.
- Squeeze the trigger gently and move smoothly along the gap between the sink rim and countertop.
- Try to keep a steady speed and pressure. Overlap slightly if needed, but avoid stopping and starting.
Beginner’s Insight: It’s better to apply a little extra caulk than too little. You can always wipe away extra.
If you need to pause, release the trigger to stop the flow, and restart just before your last bead ends. Practice on a hidden area if you’re nervous—confidence makes for a smoother bead.
4. Smooth The Caulk Bead
- Use a caulk smoothing tool or your finger dipped in soapy water.
- Press gently and slide along the bead to smooth it and push it into the gap.
- Remove any extra caulk that squeezes out.
An overlooked tip: keep a small bowl of soapy water nearby for dipping your finger or tool. This prevents caulk from sticking to your skin or dragging along the line. Don’t press too hard—just enough to shape the bead and fill the gap. If you see air bubbles, gently tap them out with the tool.
5. Remove The Painter’s Tape
- Pull the tape away while the caulk is still wet.
- Peel back at a sharp angle to avoid pulling up the caulk.
If you wait too long, the caulk can form a skin and lift off with the tape, creating ragged edges. If this happens, use a wet finger to touch up the line.
6. Clean Up Excess Caulk
- Wipe away any smears with a damp paper towel.
- For silicone caulk, use rubbing alcohol on a rag to remove sticky spots.
If caulk gets on the sink or counter, don’t panic. Rubbing alcohol works well on fresh silicone. For stubborn spots, gently scrape with a plastic tool.
7. Let The Caulk Cure
- Do not use the sink for at least 24 hours (check the caulk label for drying time).
- Avoid water, heavy cleaning, or placing objects near the bead.
Pro Tip: Curing times can be longer in cool or humid conditions.
If you need to use the sink, cover the caulked area with a dry cloth and avoid splashing water near it. Full curing can take up to 48 hours in some cases.
Comparing Sink Mounting Styles And Caulking Needs
Not all sinks need the same caulking method. Here’s how the mounting style affects your work:
| Sink Type | Where to Caulk | Special Considerations |
|---|---|---|
| Top-mount (drop-in) | Between rim and countertop | Easy access, visible seam |
| Undermount | Under the counter lip | Harder to reach, often caulked during installation |
| Flush-mount | Both above and below counter | Needs extra attention for a seamless look |
Most stainless steel kitchen sinks are top-mount. They are the easiest for DIY caulking. If your sink is undermount, the process is similar, but the joint is under the counter and may need special tools or a mirror for visibility.
With undermount sinks, it’s best to have a second person hold a flashlight or mirror so you can see the joint clearly. For flush-mount sinks, take your time and focus on getting a seamless look—these are often found in designer kitchens and any extra caulk will be visible.
A common mistake is forgetting to check the underside of the counter for leaks with undermount sinks. After caulking, run a little water around the edge and look for drips underneath. Fix any leaks right away to avoid long-term damage.
How To Fix Caulking Mistakes
Mistakes are common, but most are easy to fix if you act quickly.
Common Issues And Fixes
- Uneven bead: Smooth again with a wet finger or tool.
- Gaps or air bubbles: Add a little more caulk and smooth out.
- Caulk on countertop: Clean up immediately with alcohol or soapy water before it dries.
- Messy lines: Remove the bead with a knife, clean the area, and start over.
Non-obvious Insight: If you notice water leaking under the sink soon after caulking, you may have missed a spot or not used enough caulk. Reapply as needed.
If you realize your caulk line is very messy, don’t try to fix it after it dries. Dried silicone is hard to remove and patching over it rarely looks good. Instead, scrape off the bad section and redo it. It’s better to spend a few extra minutes now than to deal with leaks or mold later.
How Often Should You Re-caulk A Kitchen Sink?
Most experts recommend inspecting your sink caulk every year and replacing it every 3-5 years, or sooner if you see cracks, mold, or peeling.
Signs It’s Time To Replace Caulk
- Black spots (mold/mildew)
- Cracks or gaps appear
- Caulk is peeling or lifting
- Water leaks under the sink
Practical Tip: In high-humidity kitchens or if you use harsh cleaners, you may need to caulk more often.
If you use your sink heavily, such as for cooking large meals or washing lots of dishes, check the caulk every six months. Pay special attention after winter if your kitchen tends to be colder or damper, as temperature changes can cause caulk to shrink or crack.
Maintaining And Cleaning Caulk Around Your Sink
Keeping your caulk clean helps it last longer. Here’s how:
- Wipe the caulk line dry after using the sink.
- Clean with a mild, non-abrasive cleaner and soft sponge.
- Avoid sharp objects that can scratch or lift the caulk.
Expert Insight: Do not use bleach on caulk, as it can break down silicone over time.
To remove light stains or soap scum, mix a little vinegar and water and wipe gently. For stubborn stains, a soft toothbrush works well. Never use steel wool or abrasive pads—they can damage both the caulk and the sink finish.
Another tip: if you notice mold starting to grow, clean it right away. Most kitchen and bath caulks resist mold, but nothing is 100% mold-proof if left dirty and wet for long periods.

Credit: www.youtube.com
Safety Tips When Working With Caulk
- Work in a well-ventilated area. Silicone caulk can have strong fumes.
- Wear gloves to protect your skin.
- Keep caulk away from eyes and mouth.
- Dispose of old caulk and rags properly.
Beginner’s Insight: Some people are sensitive to silicone fumes. Open a window or use a fan if needed.
If you get caulk on your skin, wash it off quickly with soap and water. Dried caulk can be hard to remove and may irritate sensitive skin. Store unused caulk out of reach of children and pets.
Environmental Impact: Choosing Eco-friendly Options
Many caulks now come in low-VOC (volatile organic compounds) formulas, which are safer for you and the environment. Look for caulk labeled “low odor” or “low VOC” if you have allergies, pets, or want a greener choice.
Some brands also use recyclable tubes or packaging. If you finish a tube, check your local recycling rules. Proper disposal helps reduce landfill waste. Eco-friendly caulk performs just as well as traditional types and is a good choice for homes with babies, elderly, or anyone sensitive to chemicals.
Credit: www.vigafaucet.com
Expert Tips For A Long-lasting Seal
- Always buy fresh caulk. Old tubes can dry out or cure poorly.
- Store leftover caulk with a nail or screw in the tip to keep it fresh.
- Do not overwork the bead—one or two passes with the smoothing tool are enough.
- Allow full curing before cleaning or using the sink.
If you need to save a partially used tube, wrap the tip in plastic wrap and store upright. If the caulk becomes thick or hard to squeeze, it’s likely too old to use and should be replaced.
When To Call A Professional
Most people can caulk a kitchen sink themselves, but some situations need expert help:
- Large gaps or damaged countertops
- Mold that returns after cleaning
- Sinks that move or feel loose
- Repeated leaks despite new caulk
A professional can fix underlying problems and ensure a perfect seal.
If your countertop is cracked or your sink doesn’t sit flat, caulking alone won’t solve the problem. In these cases, repairs may require adjusting the sink, repairing the counter, or replacing damaged wood. Professionals also have access to commercial-grade caulks and tools for tricky jobs.
Related Reading: Learn more about how to clean a stainless steel sink for a complete kitchen care routine.
Cost Of Caulking A Stainless Steel Kitchen Sink
DIY caulking is very affordable. Here’s a typical cost breakdown:
| Item | Average Price (USD) |
|---|---|
| Silicone caulk (tube) | $5 – $8 |
| Caulk gun | $8 – $20 |
| Caulk smoothing tool | $3 – $6 |
| Painter’s tape | $3 – $6 |
If you hire a professional, expect to pay $50–$150 for labor, depending on your location and the job’s complexity.
DIYers often have most tools already, so your only real cost may be the caulk itself. One tube is usually enough for 1–2 sinks, depending on the bead size.
Frequently Asked Questions
How Long Does Caulk Last Around A Kitchen Sink?
Silicone caulk usually lasts 3–5 years if applied properly and kept clean. However, high humidity or frequent cleaning can shorten its life. Inspect the caulk once a year to catch problems early.
Can I Caulk Over Old Caulk?
It’s not recommended. New caulk sticks best to clean surfaces. Always remove old caulk fully before applying a new bead for a lasting, watertight seal.
What’s The Best Caulk For A Stainless Steel Sink?
100% silicone caulk, labeled for kitchen and bath use, is best. It stays flexible, resists mold, and handles constant water exposure. Avoid acrylic or painter’s caulks for this job.
How Do I Get A Smooth Caulk Line?
Apply painter’s tape for clean edges. Smooth the bead right away with a caulk tool or a wet finger. Remove the tape before the caulk dries for a neat, professional look.
Is Caulking A Kitchen Sink A Diy Job?
Yes, most homeowners can do it with basic tools and some patience. Follow the steps in this guide for best results. If you notice leaks or damage after caulking, call a professional.
Final Thoughts
Learning how to caulk a stainless steel kitchen sink is one of the most useful DIY skills for any homeowner. The process is straightforward, but attention to detail gives the best results. With the right tools, careful cleaning, and a little practice, you’ll have a watertight, mold-resistant seal that keeps your kitchen safe and looking fresh. Regular inspection and maintenance can prevent expensive repairs and keep your kitchen in top shape for years.
For more information about home improvement and sealing techniques, check out this helpful resource from the Family Handyman.
By following these steps and tips, you’ll never have to worry about leaks or mold under your kitchen sink again. Happy caulking!