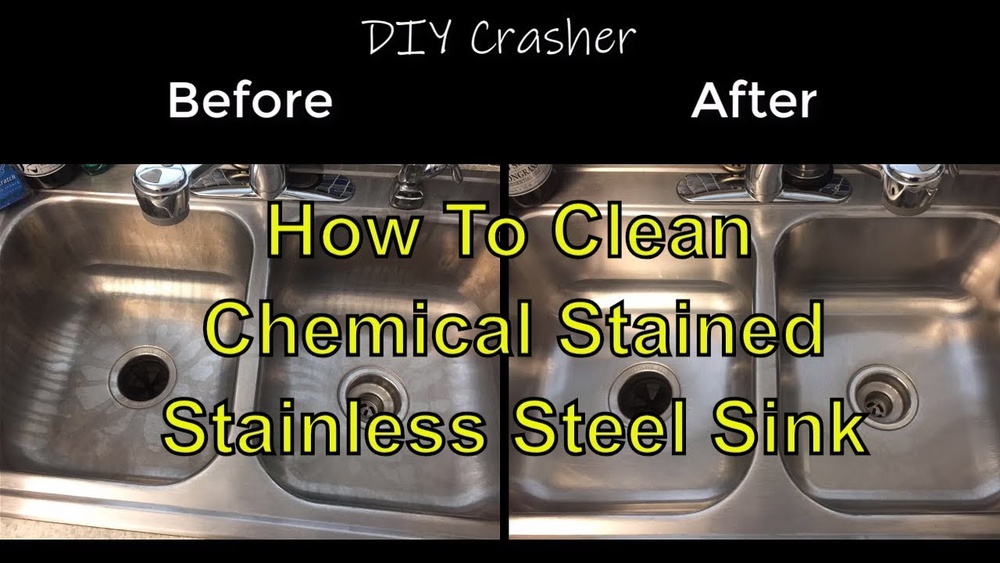
A stainless steel sink is often the heart of the kitchen. It’s strong, sleek, and resists rust. But even the best stainless steel can get chemical stains that make it look dull or damaged. These stains can come from cleaning products, hard water, or even food spills. Removing them isn’t always simple. If you use the wrong method, you might scratch the surface or make the stain worse. The good news? You can get your sink shining again with the right steps and knowledge.
This guide will show you safe ways to remove chemical stains from your stainless steel sink. We’ll cover what causes these marks, how to clean them, and how to avoid common mistakes. You’ll also get home remedies, commercial product comparisons, and expert tips to keep your sink looking like new.
Whether your sink has cloudy spots, rainbow discoloration, or stubborn marks, you’ll find everything you need here.
Understanding Chemical Stains On Stainless Steel
Before you start cleaning, it helps to know what you’re dealing with. Chemical stains on stainless steel can look different depending on the cause. Some stains are just surface marks, while others have changed the metal itself.
Common Types Of Chemical Stains
- Hard Water Spots: White, chalky stains from minerals in water. These usually show up as small dots or rings, especially around the drain or faucet area.
- Rainbow Discoloration: Iridescent colors from heat or strong chemicals. You may notice blue, purple, or gold streaks, especially if hot pans or harsh cleaners have touched the sink.
- Rust-like Marks: Orange or brown spots, usually from iron particles or harsh cleaners. Sometimes, utensils left in the sink can create these marks if they start to rust.
- Etching: Dull, rough patches where acid or bleach damaged the finish. These areas may look grayish and feel different when you run your fingers over them.
How Chemical Stains Form
Stainless steel gets its name from its ability to resist rust and stains. It does this thanks to a thin, invisible layer called the passive film. This layer protects the metal underneath. If you use harsh cleaners, leave acidic foods sitting, or let water pool, the passive film can break down. Once that happens, stains and discoloration can form quickly.
For example, leaving a wet steel wool pad in the sink overnight can cause rust-like marks because the iron reacts with moisture and damages the protective layer. Similarly, using a cleaner with bleach or letting lemon juice sit on the surface for too long can cause the steel to lose its shine and develop dull spots.
Why You Should Act Fast
Chemical stains may look harmless at first, but they can get worse over time. The longer you wait, the deeper the stain can go. In some cases, it can even lead to pitting or permanent damage. Pitting is when small holes form in the steel and, once started, they are almost impossible to fix at home. That’s why it’s best to tackle stains as soon as you notice them. Early cleaning means less effort and a better-looking sink in the long run.
Essential Tools And Materials
You don’t need expensive products to remove most chemical stains. Many solutions use items you may already have at home. Here’s what you’ll need:
- Microfiber cloths: Gentle on the steel, don’t leave lint. These are best for polishing and drying, as they trap dirt and moisture.
- Non-abrasive sponge: Won’t scratch the surface. Avoid green scrub pads, which can leave marks.
- Baking soda: Mild abrasive and natural cleaner. It’s safe for both you and your sink.
- White vinegar: Cuts through mineral deposits. Make sure to use regular white vinegar, not apple cider or cleaning vinegar.
- Mild dish soap: Lifts grease and dirt. Avoid soaps with added bleach or lemon.
- Spray bottle: For even application. This is especially helpful for vinegar or diluted cleaners.
- Soft-bristle brush: Gets into tight corners. An old toothbrush works well for seams or along the drain.
- Rubber gloves: Protects your hands from chemicals.
Some stains may require commercial stainless steel cleaners or polish. Always test any cleaner on a small, hidden area first. This helps you avoid unwanted surprises like discoloration or more severe marks.
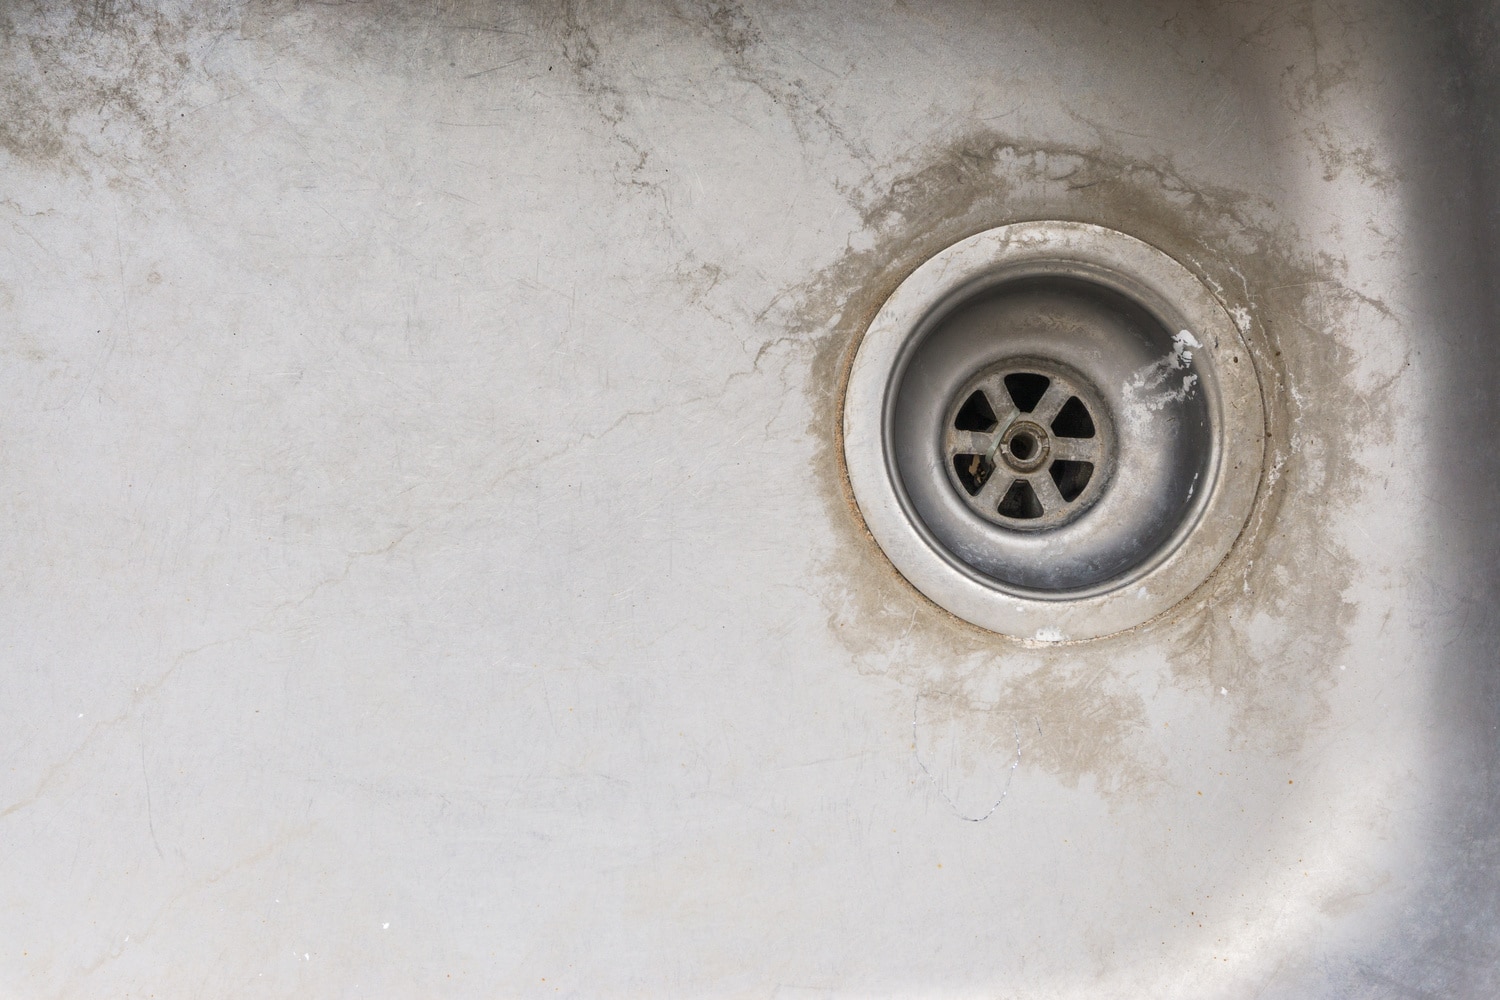
Credit: alphabuildinginspections.com
Step-by-step Guide To Remove Chemical Stains
Let’s walk through the best ways to remove different types of chemical stains from your stainless steel sink. Start with the gentlest method and move to stronger solutions if needed.
1. Initial Cleaning: Remove Loose Dirt And Residue
Before you attack the stain, wash the sink with warm water and a few drops of mild dish soap. Use a soft sponge or cloth. Rinse well and dry with a microfiber towel. This step removes oils and grime that could interfere with stain removal.
If you skip this, you might just rub dirt into the surface, which can make stains look worse or even scratch the finish. It’s a simple step, but it sets you up for better results.
2. Baking Soda Paste For Light Stains
Baking soda is safe and effective for most stains.
- Sprinkle baking soda all over the wet sink.
- Use a damp sponge to rub gently, following the grain of the steel.
- Rinse with warm water.
- Dry with a clean microfiber cloth.
Baking soda can remove surface stains and restore some shine. For small, stubborn marks, let the baking soda paste sit for 5–10 minutes before scrubbing. Avoid circular motions—always go with the grain to keep the finish looking uniform.
3. White Vinegar For Hard Water Stains
Vinegar dissolves mineral spots without damaging the steel.
- Fill a spray bottle with white vinegar.
- Spray onto the stained area and let sit for 5 minutes.
- Wipe with a soft cloth, again following the grain.
- Rinse well and dry.
If the stain remains, repeat the process or combine with the baking soda method. For thick mineral deposits, soak a paper towel with vinegar and lay it over the spot for 10–15 minutes, then wipe away. This trick is especially helpful around the faucet or drain.
4. Lemon Juice For Rainbow Discoloration
Lemon juice is a natural acid that can fix rainbow or blue stains from heat or chemicals.
- Cut a fresh lemon in half.
- Rub the cut side over the stain for about 1 minute.
- Let the juice sit for another 2 minutes.
- Rinse thoroughly and dry.
This method is gentle but effective for heat marks and light chemical stains. If you don’t have a lemon, bottled lemon juice works too, but fresh is best. For larger areas, use a soft cloth soaked in lemon juice and gently rub the area.
5. Commercial Stainless Steel Cleaner For Tough Stains
If home remedies fail, a quality cleaner can help.
- Read the product label and follow instructions exactly.
- Apply with a soft cloth or sponge.
- Rub gently, moving with the grain.
- Rinse and dry.
Never use a cleaner with chlorine bleach or strong acids. These can damage the sink’s protective layer. Some cleaners are also designed to leave a light protective film, which can help prevent new stains. Don’t overuse commercial cleaners—once a month is usually enough unless your sink gets heavy use.
6. Removing Rust-like Stains
Orange or brown marks are often from iron particles, not true rust. Here’s how to fix them:
- Make a paste with 1 tablespoon baking soda and a few drops of water.
- Apply to the stain and let sit for 10 minutes.
- Gently scrub with a soft brush or sponge.
- Rinse and wipe dry.
For stubborn stains, a dab of Bar Keepers Friend or similar non-abrasive cleaner may help. Always rinse thoroughly. You can also try a bit of toothpaste (not gel) for small spots. It’s slightly abrasive and can lift the stain without scratching.
7. Deep Cleaning For Etched Or Dull Areas
If your sink feels rough or looks dull, the finish may be etched.
- Clean the area with dish soap and water.
- Use a stainless steel polish or cream, applied with a microfiber cloth.
- Buff in small circles, then follow the grain.
- Wipe away any residue and dry.
Polishing can restore shine but won’t reverse deep etching. If the damage is severe, professional refinishing may be needed. Sometimes, etching makes the steel more vulnerable to future stains, so regular polishing is even more important after this kind of damage.
8. Final Rinse And Dry
After stain removal, always rinse the sink with clean water. Dry completely with a microfiber towel to prevent new water spots.
Don’t air-dry the sink, as minerals in the water can leave spots. Drying by hand takes only a minute but keeps your sink looking flawless.
Safety Tips For Cleaning Stainless Steel
- Never use steel wool or abrasive pads. These will scratch the surface.
- Avoid bleach and chlorine cleaners. They can cause permanent damage.
- Test any cleaner in a hidden spot first.
- Work with the grain of the steel, not against it.
- Use gloves when handling acids or commercial cleaners.
These tips will help you avoid making the stain worse or damaging your sink. If you’re unsure about a product, check the manufacturer’s website for recommendations.

Credit: www.youtube.com
What Not To Do: Common Cleaning Mistakes
Many people accidentally damage their stainless steel sinks while trying to clean them. Here are some common mistakes to avoid:
- Using abrasive powders or scouring pads. Even if the stain is stubborn, rough scrubbing can create scratches that are almost impossible to remove.
- Leaving acidic foods (like tomatoes or citrus) sitting in the sink. These can break down the protective layer and cause stains or dullness.
- Allowing standing water to dry on the surface. Water spots form easily, and minerals can build up over time.
- Mixing different cleaning products. Chemical reactions between products can create fumes or damage the steel.
- Ignoring the manufacturer’s care instructions. Each sink might have special needs based on the finish.
Mistakes like these can lead to pitting, corrosion, or stubborn stains that are hard to fix. If you’re not sure whether a cleaner is safe, choose the gentlest option first.
Home Remedies Vs. Commercial Cleaners
Both home remedies and store-bought products can work on chemical stains. But which is better? Here’s a quick comparison:
| Method | Pros | Cons |
|---|---|---|
| Baking Soda & Vinegar | Safe, cheap, eco-friendly | May not work on severe stains |
| Lemon Juice | Natural, good for light stains | Less effective on mineral buildup |
| Commercial Cleaner | Fast, powerful, polishes surface | Can be harsh, more expensive |
For most people, starting with home remedies is best. If those don’t work, try a trusted commercial cleaner.
Non-obvious tip: Some commercial cleaners leave a residue that attracts fingerprints. After using them, wipe with a damp cloth to remove any leftover film and reduce smudging.
How To Prevent Chemical Stains In The Future
Keeping your sink clean is easier than fixing stains. Here are proven ways to protect your stainless steel:
- Wipe the sink dry after each use to avoid water spots. Even a quick pass with a towel can make a big difference.
- Rinse away food and spills quickly, especially acids or bleach. Don’t let these sit overnight.
- Use a sink grid or mat to stop scratches and stains. These protect the steel from sharp utensils or heavy pots.
- Clean weekly with mild soap and water. Regular light cleaning prevents buildup that leads to stains.
- Avoid harsh chemicals and stick to pH-neutral cleaners.
These habits will keep your sink shining and make future cleaning easier.
Hidden Risk: Tap Water Quality
Many people overlook their tap water. Hard water can leave white mineral stains, and some city water contains chlorine that can weaken the passive layer. Installing a water softener or using filtered water for rinsing can make a big difference.
If you notice a lot of white spots even after drying, your water is probably hard. Try keeping a small towel by the sink and wiping after every use.
Professional Tip: Regular Polishing
Polishing your sink every month keeps the protective film strong. Use a dedicated stainless steel polish or a tiny drop of olive oil on a soft cloth. Buff gently for a mirror-like finish.
Don’t overdo the oil—just a little is enough. Too much can feel greasy and attract dust.
Comparison Of Popular Stainless Steel Cleaners
With so many products on the market, it’s easy to get confused. Here’s a side-by-side look at some of the most popular stainless steel cleaners:
| Brand | Form | Main Benefit | Average Price |
|---|---|---|---|
| Bar Keepers Friend | Powder | Removes rust, stains, polishes | $4-$6 |
| Weiman Stainless Steel Cleaner | Spray | Shines, removes fingerprints | $6-$8 |
| 3M Stainless Steel Cleaner | Aerosol | Quick clean, streak-free | $12-$14 |
| Simple Green Stainless Steel Cleaner | Liquid | Eco-friendly, gentle | $5-$7 |
Always read reviews and check the label for compatibility with your sink’s finish. Some cleaners work better on brushed finishes, while others are made for polished steel.
Extra insight: Try to choose a cleaner with a pleasant scent if you’re sensitive to odors. Some commercial products can leave a strong chemical smell.
How To Restore Shine After Removing Stains
After stain removal, your sink might look clean but not shiny. To restore that mirror-like gleam, follow these steps:
- Wash the sink with mild dish soap and warm water.
- Dry completely with a microfiber towel.
- Apply a small amount of olive oil or mineral oil to a soft cloth.
- Buff the surface, moving with the grain.
- Wipe off any excess oil.
This technique works for most stainless steel sinks and helps protect against future stains.
Expert tip: For an extra-bright finish, use a second dry microfiber towel to polish after oiling. This removes any streaks and leaves the surface super smooth.
When To Call A Professional
Most stains can be removed at home, but sometimes professional help is best. Consider calling an expert if:
- The stain covers a large area or won’t budge after several tries.
- You notice deep pitting or severe corrosion.
- The finish looks damaged or uneven.
A professional can refinish or polish the sink, restoring its original look. In some cases, they can reseal or recoat the steel, giving you a fresh start.
Extra Tips For Long-lasting Results
- Always use clean, soft cloths to avoid scratching.
- Store cleaning products away from the sink area.
- Don’t let dish sponges or cleaning pads sit in the sink overnight.
- Check your sink’s manual for special care instructions.
Another good habit is to inspect your sink regularly for small stains or scratches. Early action keeps small problems from becoming big ones.
For more kitchen maintenance tips, see our guide on how to clean a kitchen sink properly.
Frequently Asked Questions
What Causes Chemical Stains On A Stainless Steel Sink?
Chemical stains are often caused by acidic or alkaline cleaners, hard water, or leaving foods like tomatoes, vinegar, or salt on the surface. These substances can break down the protective layer and create stains. Sometimes, even placing a hot pan directly in the sink can cause rainbow discoloration.
Can I Use Bleach To Clean A Stainless Steel Sink?
No, you should never use bleach on stainless steel. Bleach is too harsh and can cause pitting, corrosion, or discoloration. Stick to mild cleaners or those specifically made for stainless steel.
How Do I Remove Stubborn Rust Spots From My Sink?
Make a paste with baking soda and water, apply to the spot, and scrub gently with a soft brush. If needed, use a product like Bar Keepers Friend. Always rinse well and dry after cleaning. Avoid using vinegar for rust, as it can sometimes make the stain worse.
Is It Safe To Use Vinegar On Stainless Steel Every Day?
Vinegar is safe for occasional use but can be too acidic for daily cleaning. Over time, frequent use may weaken the sink’s protective layer. Use it only as needed for stains, not for regular cleaning.
What Should I Do If The Chemical Stain Won’t Come Off?
If home remedies and commercial cleaners don’t work, avoid scrubbing harder. You may need to call a professional to refinish the sink. Trying too many harsh methods can make the problem worse.
For more detailed information on stainless steel care, check out the Stainless Steel Wikipedia page.
A sparkling, stain-free sink is possible with the right steps. By understanding what causes chemical stains and knowing how to remove them safely, you can keep your stainless steel looking new for years. Don’t rush the process, and always use gentle methods first.
Your kitchen—and your sink—will thank you.

Credit: alphabuildinginspections.com