Removing the bowl from a KitchenAid mixer may seem easy, but if you’ve ever struggled with a stuck bowl or worried about damaging your machine, you’re not alone. Many home bakers and cooking enthusiasts face this challenge, especially with new mixers or after heavy use. Knowing the right method can protect your mixer, save time, and keep you baking without frustration.
This guide will walk you through every detail you need to confidently and safely remove the bowl from a KitchenAid stand mixer. We’ll also cover why bowls get stuck, how to prevent future issues, and what to do if things really won’t budge.
Whether you’re new to KitchenAid or a long-time user, you’ll find practical advice and expert tips to make this simple task truly effortless.
Understanding Your Kitchenaid Mixer Bowl
Before you start, it helps to know the type of bowl and mixer you have. KitchenAid mixers usually come with two main bowl types: tilt-head and bowl-lift.
Tilt-head Model
With this design, the motor head tilts back to give you access to the bowl. The bowl sits on the base and locks in place with a simple twist. The locking mechanism is usually intuitive, but if you’re new to the mixer, it’s easy to forget the direction to twist.
Most tilt-head bowls unlock with a counterclockwise turn. If you feel resistance, double-check the direction and ensure the head is fully lifted to avoid scraping the bowl rim.
Bowl-lift Model
This model uses a handle to raise and lower the bowl. The bowl attaches to two arms and is secured with side pins or clamps. The locking pins must be fully disengaged before removal. Sometimes, a small bit of dried dough can clog the pins, making it harder to unlock the bowl.
This model is favored for larger batches and thicker doughs due to its stability.
Knowing your model is key because the removal process is a bit different for each. If you’re unsure, check the model number on the bottom of your mixer or in the user manual. Understanding your specific mixer’s locking system can prevent accidental damage and make cleaning easier.
Why Bowls Get Stuck On Kitchenaid Mixers
Many people are surprised the first time their bowl refuses to budge. Here’s why it happens:
- Dried Ingredients: Flour, sugar, or dough can get trapped between the bowl and base. Even a small amount left behind after mixing can harden and act like glue, especially if it dries overnight.
- Temperature Changes: Mixing hot ingredients can cause metal bowls to expand and then contract, tightening the fit. This is especially common if you use your mixer for melting chocolate or mixing warm dough.
- Over-Tightening: Locking the bowl too tightly can make removal hard. Some people twist the bowl with extra force, thinking it will be more secure, but this can make it almost impossible to remove later.
- Wear and Tear: Over time, small deformations or scratches can make the bowl fit less smoothly. If you notice the bowl is getting harder to remove each time, check for tiny dents or scratches on the base.
Understanding these issues will help you avoid them later. For example, if your kitchen is humid, ingredients may dry more slowly, but in drier climates, dough can harden quickly and create problems.
Step-by-step Guide To Removing The Bowl
Let’s break down the process by mixer type. Follow the steps for your specific model.
Removing The Bowl From A Tilt-head Kitchenaid Mixer
- Unplug the Mixer
- Always unplug your mixer before any maintenance. This keeps you safe. It also prevents accidental starts, which can cause injuries or messes.
- Lift the Head
- Pull the lever on the side and tilt the mixer head back fully. This gives you space to work. Make sure the head clicks into the locked position so it doesn’t fall while you’re working.
- Remove Attachments
- Take off any beaters, whisks, or dough hooks. Press the attachment release button or twist (depending on your model), then pull straight down. If an attachment sticks, try gently wiggling while pulling.
- Unlock the Bowl
- Hold the base of the mixer with one hand. With the other, grip the bowl handles and turn the bowl counterclockwise (left). You’ll feel it loosen from the locking plate. If you feel resistance, try a gentle back-and-forth motion before continuing to twist.
- Lift the Bowl
- Once unlocked, lift the bowl straight up and out. Avoid tilting or forcing the bowl sideways, as this can scratch the base.
If The Bowl Feels Stuck
- Wiggle gently side to side.
- Use both hands for even pressure.
- If needed, tap the base gently with the palm of your hand (not a tool).
- For especially stubborn bowls, a soft towel wrapped around the base can help you get a better grip without slipping.
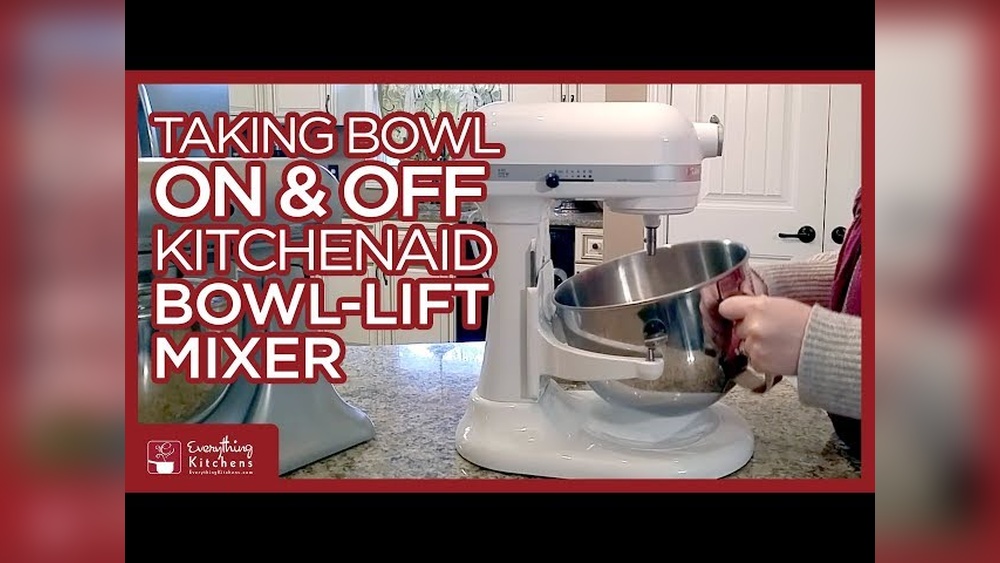
Removing The Bowl From A Bowl-lift Kitchenaid Mixer
- Unplug the Mixer
- Safety first: Always unplug! This is even more important for bowl-lift models, as the arms can move unexpectedly.
- Lower the Bowl
- Turn the handle to lower the bowl to its lowest position. Make sure the bowl is fully down and the arms are not engaged with the side pins.
- Remove Attachments
- Twist and pull down to remove any beaters or hooks. If the attachment is stuck, rotate it slightly while pulling.
- Release the Bowl
- Locate the bowl clamps on each side. Press or pull these outwards to unlock. You should hear a soft click when the clamps release. If they don’t move easily, check for dried batter or debris blocking the mechanism.
- Lift and Tilt
- Use both hands to lift the bowl up and slightly forward, then pull out. Sometimes, tilting the bowl just a little makes removal easier.
For Extra Stubborn Bowls
- Check for dried-on batter around the pins or arms.
- Gently rock the bowl as you pull.
- If needed, use a warm, damp cloth to soften any residue on the arms before trying again.
What To Do If Your Kitchenaid Bowl Is Really Stuck
Sometimes, even with the right method, the bowl won’t move. Here’s what to try next:
Use Warm Water
If dried dough or sugar is the problem, fill the bowl with warm (not hot) water. Let it sit for 10–15 minutes. The heat helps soften the residue. Dry the bowl, then try again. For extra stubborn spots, try soaking a cloth in warm water and placing it around the base for 5 minutes.
Lubricate The Base
A tiny drop of food-grade oil at the contact points can help. Wipe off any excess before using the mixer again. Avoid overusing oil, as it can attract dust or make the bowl slippery during mixing.
Try A Silicone Spatula
Slide a thin silicone spatula between the bowl and base to gently loosen any debris. Don’t use metal tools, which can scratch the bowl or base.
Use Gentle Tapping
With the mixer unplugged, tap around the base with the heel of your hand. This can break any stuck spots. Sometimes, alternating tapping with twisting helps loosen stubborn bowls.
When To Call For Help
If the bowl is still stuck after several tries, contact KitchenAid support. Forcing it with tools can damage both the bowl and mixer. Sometimes, a professional can spot a small alignment issue that’s not easy to see at home.

Credit: inspiringkitchen.com
Preventing A Stuck Bowl In The Future
A little care can save you from problems later. Here’s how to keep your bowl moving smoothly:
- Clean After Every Use: Always wash and dry the bowl and base right after using. Even small bits of dough can harden quickly.
- Avoid Over-Tightening: Lock the bowl securely, but don’t force it too tight. The bowl should feel snug, not jammed.
- Check for Build-Up: Look for dried batter or flour under the bowl and wipe it clean. Use a soft brush for hard-to-reach spots.
- Season Metal Bowls: Occasionally rub a small amount of cooking oil on the base of stainless steel bowls. This helps prevent sticking.
- Store Separately: If not using the mixer for a while, store the bowl off the base. This avoids any accidental locking from pressure or temperature changes.
These habits will keep your mixer in top shape and make bowl removal easy every time. Regular care also helps extend the life of both the bowl and the mixer.
Comparing Kitchenaid Mixer Bowl Types
Choosing the right bowl for your needs can prevent many issues. Here’s a side-by-side look at the main types:
| Feature | Tilt-Head | Bowl-Lift |
|---|---|---|
| Attachment | Twist to lock | Clamp and lift |
| Ease of Removal | Usually easy | Can stick if not cleaned |
| Bowl Sizes | 3.5–5 quarts | 5–7 quarts |
| Common Use | Home baking | Heavy dough, large batches |
Tilt-head models are best for everyday baking, while bowl-lift models are built for bigger recipes. If you mostly bake cookies or cakes, a tilt-head is usually simpler. For bread and pizza dough, the bowl-lift’s larger, heavier bowl is worth the extra effort.
Kitchenaid Bowl Materials: Which Is Easiest To Remove?
KitchenAid offers bowls in different materials. Each has its pros and cons when it comes to removal:
| Material | Stickiness | Care Tips |
|---|---|---|
| Stainless Steel | Rarely sticks if clean | Wipe base, oil occasionally |
| Glass | May stick if batter dries | Clean after use, avoid temperature shocks |
| Ceramic | Less common, can chip if forced | Handle with care, don’t pry |
Stainless steel bowls are the most forgiving, but all types benefit from careful cleaning and storage. Glass bowls can look beautiful and let you see your dough as it mixes, but temperature changes can make them stickier. Ceramic bowls are heavy and can chip if you use too much force, so always remove them gently.
Common Mistakes That Make Bowl Removal Hard
Many stuck bowls are the result of simple mistakes. Avoid these to keep things smooth:
- Leaving the Attachment In: Always remove the beater or hook before taking out the bowl. Attachments can block the bowl’s path or catch on the rim.
- Not Lowering the Bowl (Bowl-Lift Models): Trying to pull the bowl without lowering it can damage the arms. Always check the position before removal.
- Forcing the Bowl: If it won’t move, don’t use tools. This can warp or crack the bowl.
- Using Abrasive Cleaners: These scratch the base and create spots where batter can stick.
- Ignoring Build-Up: Even a little dried dough can glue the bowl in place over time.
Extra tip: Always check under the bowl for hidden batter or flour, especially after mixing thick doughs.
Extra Tips For Older Mixers
If your KitchenAid mixer is more than 10 years old, it may need a bit more care:
- Check the bowl pins and base for wear. If they’re bent or worn, consider replacing them.
- Clean with a soft brush to remove old residue. Sometimes, deep cleaning with a toothpick or cotton swab can reach hidden spots.
- If the bowl wobbles or feels loose, the locking mechanism may need adjustment—a local appliance repair shop can help.
Older models may have slightly different locking systems, so check your manual if unsure. Occasionally, older mixers develop alignment issues that a professional can fix in minutes.
Real User Experiences: Troubleshooting Stuck Bowls
Many users have shared creative solutions online. Some examples:
- One baker found that twisting a damp dishcloth around the bowl base and letting it sit for 10 minutes loosened dried sugar.
- Another used a hair dryer on low to gently warm the base—softening the dough enough for easy removal. Make sure not to overheat the metal, as this can damage the finish.
- Several people recommend a quarter turn back and forth (rather than one big twist) to free up stubborn bowls without force.
One more tip: placing a silicone jar opener under your hands can give you extra grip if your bowl or hands are slippery.
Always use gentle methods before trying anything more aggressive.
When To Replace Your Mixer Bowl
Sometimes, the problem isn’t you—it’s the bowl. Signs it’s time for a new one:
- Cracks or chips in glass or ceramic bowls
- Warped base on stainless steel bowls
- Bowl doesn’t lock or unlock smoothly even after cleaning
Replacement bowls are available from KitchenAid and authorized retailers. Make sure you buy the correct size and type for your mixer model. Using a bowl that isn’t made for your mixer can cause sticking, wobbling, or even damage the locking mechanism.
Safe Cleaning Practices For Easy Bowl Removal
Good cleaning habits prevent most bowl issues. Here’s a simple routine:
- Remove the bowl right after mixing.
- Wash with warm, soapy water. Avoid harsh scrubbers.
- Dry thoroughly, especially around the base and locking plate.
- Inspect the bowl base for stuck bits of dough. Even small crumbs can harden and cause sticking.
- Wipe the mixer base where the bowl connects.
For heavy build-up, soak the bowl for 10–15 minutes before scrubbing. For older bowls, a toothbrush can help clean grooves and hard-to-reach areas.
The Role Of Attachments In Bowl Removal
Attachments can get in the way of bowl removal. Here’s what to remember:
- Flat beater, whisk, and dough hook must be removed first. If left on, they can block the bowl’s path or scratch the inside.
- If an attachment is stuck, wiggle it gently or use a drop of oil at the connection point.
- Avoid using force, as this can bend the attachment shaft or bowl rim.
It’s also helpful to check the attachment shaft for dried batter, which can make it harder to remove both the tool and the bowl.
Advanced Troubleshooting: Persistent Sticking
If you’ve tried all the basic tips and your bowl is still hard to remove:
- Inspect for warping: Place the bowl on a flat surface. If it rocks, the base may be bent.
- Check for debris: Sometimes old dough or flour can hide in small cracks.
- Test with a different bowl: If another bowl fits easily, your original may be damaged.
- Contact KitchenAid support: They can advise on repairs or replacement.
In rare cases, the locking plate on the mixer base can become misaligned. This can be adjusted by a professional, but avoid DIY repairs unless you’re experienced.
Safety Precautions You Should Never Ignore
- Unplug the mixer before any cleaning or bowl removal.
- Never use metal tools to pry the bowl off.
- Avoid extreme temperatures: Hot water or direct heat can damage both bowl and mixer.
- Use only compatible accessories: Mismatched bowls or attachments can get stuck or cause damage.
Safety is key not just for your mixer, but for your fingers and hands as well.
How To Store Your Kitchenaid Mixer And Bowl
Proper storage prevents stuck bowls and keeps your mixer looking new:
- Keep the bowl off the mixer if you won’t use it for a while.
- Store attachments separately in a drawer or container.
- Cover the mixer with a cloth to prevent dust.
- Avoid stacking heavy items on top of the mixer or bowl.
If you have limited space, consider using a dedicated bin for all mixer parts. This keeps everything clean and easy to find.

Credit: www.reddit.com
Maintenance Schedule For Smooth Bowl Removal
A simple maintenance routine can make all the difference:
- Weekly: Wipe the mixer base and bowl contacts after use.
- Monthly: Deep clean the bowl and inspect for wear.
- Twice a year: Check the locking mechanism and apply a small amount of food-grade oil if needed.
Set reminders if needed so you don’t forget these steps. Regular checks help you catch small problems before they become big headaches.
When Professional Repair Is Needed
If you’ve tried all troubleshooting steps and your bowl is still stuck or the locking mechanism is damaged, it’s time to call a pro. KitchenAid has authorized service centers in most major cities. Repairs can often restore older mixers to perfect working order without needing a full replacement.
Professional repair is especially important if you hear grinding noises, see cracks in the base, or notice the bowl no longer sits level.

Credit: www.youtube.com
Kitchenaid Mixer Bowl Removal Vs. Other Brands
How does KitchenAid compare to other stand mixers? Here’s a quick look:
| Brand | Bowl Removal Process | Common Issues |
|---|---|---|
| KitchenAid | Twist or clamp release | Sticking from dried dough |
| Kenwood | Lift and slide | Attachment jams |
| Sunbeam | Lift only | Bowl slippage |
KitchenAid’s twist-lock design is robust but requires regular cleaning for the smoothest removal. Unlike some brands, KitchenAid bowls are made to last for years if cared for properly.
Internal Resources For More Kitchen Tips
If you want more advice on mixer maintenance or kitchen tools, check out our in-depth guide on [how to clean a KitchenAid mixer](https://yourwebsite.com/how-to-clean-kitchenaid-mixer) for step-by-step instructions and more expert tips.
Frequently Asked Questions
Why Does My Kitchenaid Mixer Bowl Get Stuck?
KitchenAid bowls often stick due to dried ingredients, over-tightening, or temperature changes. Regular cleaning and not forcing the bowl into place can prevent most problems. Sometimes, switching to a different bowl material (like stainless steel) can help if you have frequent sticking.
Can I Use Wd-40 To Loosen A Stuck Mixer Bowl?
No, you should never use WD-40 or non-food-safe lubricants on kitchen equipment. Instead, use a small amount of food-grade oil if needed, and wipe it off before use. Food-grade oils are safe and won’t leave harmful residues.
What Should I Do If My Glass Kitchenaid Bowl Is Stuck?
For glass bowls, avoid force. Fill with warm water, let it sit, then gently twist. If it’s still stuck, contact KitchenAid support to avoid breaking the bowl. Never tap glass bowls, as this can cause cracks.
Will Forcing The Bowl Off Damage My Mixer?
Yes, using tools or too much force can bend or crack the bowl or the mixer’s base. Always use gentle methods and consult the manual or support if stuck. Damaged bases may require expensive repairs.
How Often Should I Clean The Bowl Locking Area?
Clean the bowl base and locking area after every use. This prevents dried batter or dough from causing the bowl to stick. For best results, check for build-up after each mixing session, especially if you make bread or thick batters.
For more information on KitchenAid products and troubleshooting, visit the official KitchenAid Help Guide.
Getting the bowl out of your KitchenAid mixer shouldn’t be stressful. With the right method and a little routine care, it will always be a quick and easy step—so you can focus on what really matters: creating delicious food every time you bake.