How To Remove Delta Shower Handle With No Set Screw
If you find yourself staring at your Delta shower handle, searching for a set screw and not finding one, you’re not alone. Many homeowners and DIYers get stuck here. Set screws are common in older or generic shower handles, but Delta’s modern designs often hide their attachment methods. Removing a Delta shower handle with no visible set screw can be confusing, but you can do it safely and without damage if you know what to look for. This guide will walk you through every step, cover the tools you need, highlight common mistakes, and offer practical tips from real-world experience.
Why Delta Shower Handles Have No Set Screw
Delta is known for sleek, minimalist designs. On many models, the usual set screw is replaced by snap-on or hidden connections. This approach looks great but can confuse anyone expecting a standard screw. The absence of a visible screw doesn’t mean the handle is glued or impossible to remove—it just means you’ll need to find a hidden latch or remove a decorative cap first.
Some Delta shower handles use a cartridge-style connection, where the handle presses onto a cartridge stem. Others use a hidden screw under a cap or lever. Understanding these variations is crucial before you start prying or twisting, which could damage the handle or valve.
Safety First: Preparation Before Removal
Before you touch any plumbing fixture, safety comes first. Here’s what you should do:
- Turn Off the Water Supply: Even if you’re just removing the handle, you don’t want water spraying everywhere if you accidentally turn the valve. Shut off the shower’s water supply at the main valve or in your bathroom if available.
- Protect the Tub and Drain: Small parts can fall into the drain. Use a towel or cover the drain with tape.
- Gather the Right Tools: Using the wrong tool can scratch or break your handle. You’ll need:
- Flathead screwdriver (small)
- Phillips screwdriver
- Allen wrenches (various sizes, just in case)
- Adjustable wrench
- Needle-nose pliers
- Clean rag
- Flashlight (for dark bathrooms or hidden screws)
- Take Photos Before and During: Snap a picture before you start and at each step. It helps if you need to put things back together.
Identifying Your Delta Shower Handle Type
Not all Delta handles are the same. Here’s how to figure out which kind you have:
- Single Lever Handles: One lever you pull or rotate for temperature and flow.
- Knob Handles: Round knobs that twist.
- Pull-out or Push-in Handles: You pull or push for water, then rotate for temperature.
- Decorative or Designer Styles: Fancy shapes, sometimes with hidden seams.
Most Delta models with no set screw fall into the first or last category. If you’re unsure, look for your model number (often under the escutcheon plate or on the faucet trim). You can also match your handle visually with images on the Delta Faucet website.
Step-by-step Removal Process
Now, let’s get into the actual removal process. The steps below cover the most common Delta handles with no visible set screw. If you follow each step, you’ll avoid common mistakes and get your handle off safely.
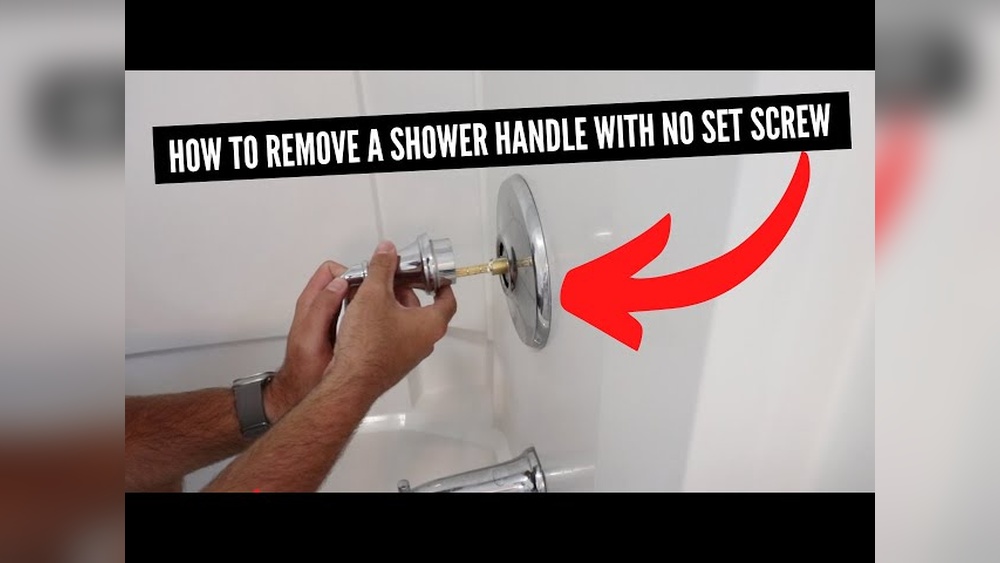
1. Inspect The Handle For A Cap Or Button
Look for a small decorative cap or button, often at the center or base of the handle. This cap hides the screw. Use your flashlight to check:
- Top of the handle
- Front face
- Underside or back
Caps might have a slight seam around the edge. They can be plastic or metal, and sometimes have a brand logo.
2. Pry Off The Cap Gently
Use a small flathead screwdriver or a plastic pry tool to lift the cap. Place a rag under the tool to avoid scratching the handle. Gently wiggle and lift until the cap pops off. Don’t force it—if it’s not moving, double-check for a seam or try a different spot.
3. Remove The Hidden Screw
With the cap off, you should see a screw head (usually Phillips or Allen). Use the correct screwdriver or Allen wrench to turn counterclockwise and remove the screw. Keep the screw and cap somewhere safe.
4. Pull Off The Handle
Once the screw is out, the handle should slide off the cartridge stem. If it doesn’t:
- Wiggle gently while pulling straight out.
- Don’t twist hard, which can damage the cartridge.
- If stuck, spray a little WD-40 or silicone spray at the base and wait 10 minutes.
5. If No Cap Is Present
Some handles have no cap, and the attachment is hidden another way:
- Check under the lever or at the bottom for a slot or latch.
- Some handles use a snap-on mechanism—firm pulling releases them.
- For designer handles, look for a set screw behind the escutcheon plate.
6. Escutcheon Plate Removal (if Needed)
If the handle won’t come off and you see no cap or hidden screw, the escutcheon plate (the decorative plate behind the handle) may need to come off. Pry gently around the edge, and look for hidden screws. Remove these, then try the handle again.
7. Final Steps
With the handle off, you can access the cartridge for repair or replacement. Clean any mineral buildup with vinegar before reassembly. When reinstalling, reverse the steps and ensure everything is tight but not over-torqued.
Common Delta Handle Types: Comparison
Below is a comparison of typical Delta shower handle types and their removal method:
| Handle Type | Attachment Method | Common Removal Step |
|---|---|---|
| Single Lever | Hidden screw under cap | Pry cap, remove screw |
| Knob | Snap-on, sometimes threaded | Pull straight out |
| Pull-out/Push-in | Hidden screw or snap-on | Check under handle, use Allen wrench |
| Designer/Decorative | Hidden screw, sometimes behind escutcheon | Remove plate if needed, then unscrew |
Non-obvious Insights Most Beginners Miss
- Mineral Buildup Can Lock Handles: In areas with hard water, mineral deposits can “glue” the handle to the stem. Spraying a small amount of vinegar around the base and waiting 15 minutes can help loosen it before you pull.
- Escutcheon Plate May Hide Screws: Some Delta models hide the set screw or attachment behind the escutcheon plate. If you can’t find any visible screw or cap, try removing the plate first.
- Model Numbers Matter: The removal method can vary even within the Delta range. If you can find your model number, searching Delta’s official manuals can save you a lot of guesswork.
Mistakes To Avoid
- Don’t Pry Aggressively: Handles and caps are often plastic or soft metal. Forcing them can crack the finish or break the part.
- Don’t Twist the Handle: Twisting the handle to loosen it can damage the internal cartridge, leading to leaks or expensive repairs.
- Don’t Use Harsh Chemicals: WD-40 or silicone spray is fine in small amounts, but avoid harsh drain cleaners or strong acids around the plumbing.
How To Identify Hidden Attachments
Some Delta handles feel like they’re stuck for a reason. If you’ve removed the visible screw and the handle still won’t come off, check for:
- Retaining clips: Some models use a metal clip at the base of the handle.
- Hidden set screws: Look for small holes under the lever or handle base.
- Threaded handles: Some handles are actually threaded onto the stem. Try unscrewing counterclockwise, but do so gently.
If you’re unsure, search your handle’s shape or model on the Delta Faucet support page or watch a video for your specific model.
When To Call A Professional
Some situations are better handled by a pro:
- If the handle is corroded solid and won’t budge.
- If you see leaks behind the wall, or the valve is stuck.
- If you’re replacing the shower cartridge and have never done plumbing repairs.
A plumber has special tools (like handle pullers) and experience to avoid damaging your shower or causing leaks.
Real-world Example: Removing A Delta Lahara Handle
The Delta Lahara is a popular single-lever handle with no visible set screw. Here’s how removal works in practice:
- Find the small round cap on the front.
- Pry the cap off with a flathead screwdriver wrapped in a rag.
- Use a 1/8” Allen wrench to remove the screw inside.
- Pull the handle straight out. If stuck, wiggle gently and use a drop of lubricant at the base.
- Once off, you can access the cartridge for repair.
This method works for most similar models, though always check for unique features on your specific handle.

Credit: www.reddit.com
Comparing Delta Shower Handles With And Without Set Screws
To help you see the difference, here’s a simple comparison:
| Feature | With Set Screw | No Set Screw |
|---|---|---|
| Removal Tool | Allen wrench | Flathead screwdriver/pry tool |
| Attachment Type | Visible screw | Hidden cap or snap-on |
| Removal Difficulty | Simple, direct | Requires careful inspection |
| Risk of Damage | Low | Medium (if pried incorrectly) |
What To Do If The Handle Is Stuck
Even after following every step, sometimes the handle just won’t come off. Here’s what you can do:
- Apply Lubricant: Spray a small amount of WD-40 or silicone spray at the base. Wait 10-15 minutes.
- Tap Gently: Use the handle of your screwdriver to tap around the base. This can break mineral bonds.
- Use a Handle Puller: A handle puller is a special tool that grips the handle and pulls it off evenly. You can rent one from a hardware store.
- Try Heat: Use a hair dryer to warm the handle. Heat can expand the metal slightly and help break the bond.
- Don’t Force It: If the handle won’t move with moderate force, stop and reassess. You might be missing a hidden screw or attachment.
Cleaning And Maintenance After Removal
Once the handle is off, you have a good chance to clean the area:
- Soak the handle in a vinegar solution to dissolve mineral deposits.
- Wipe down the cartridge stem and escutcheon plate.
- Check for cracks or signs of wear on the handle.
This maintenance can help your Delta shower handle last longer and operate smoothly when you reinstall it.
Reinstalling The Delta Shower Handle
Putting the handle back on is simple if you follow these tips:
- Align Properly: Make sure the handle aligns with the cartridge stem. Don’t force it on at an angle.
- Tighten Screws Evenly: Don’t overtighten—the handle should be snug but not hard to move.
- Replace Decorative Cap: Press the cap back in place until it clicks.
- Test Operation: Turn the water back on and operate the handle. Check for leaks or loose movement.

Credit: www.reddit.com
Upgrading Or Replacing The Handle
If you’re removing the handle to upgrade or replace it, choose a compatible Delta handle. Not all handles fit all cartridges, so match the model number or bring the old handle to the hardware store. Some universal handles work, but genuine Delta parts fit best and last longer.
When choosing a new handle:
- Consider the finish (chrome, brushed nickel, etc. ).
- Match the style to your bathroom decor.
- Check for ADA-compliant handles if accessibility is important.
If you want more information on Delta handle options, see the official Delta Faucet Showering Collection.
Troubleshooting Unusual Problems
Sometimes, you’ll encounter unique issues:
- Handle spins but doesn’t turn water: The cartridge stem may be stripped. You’ll need to replace the cartridge.
- Handle moves but is loose: The screw may be stripped or not tightened enough.
- Handle leaks at base: The O-ring inside may be worn out. Replace or lubricate it.
Credit: diy.stackexchange.com
Popular Delta Shower Handle Models Without Set Screws
Here are some Delta handles that use hidden or snap-on attachments:
- Delta Lahara
- Delta Trinsic
- Delta Cassidy
- Delta Classic 1300/1400 Series
- Delta Linden
- Delta Dryden
- Delta Vero
Each of these uses a variation of the methods described above. The removal process is very similar, but always look up your specific model if unsure.
Additional Tips For Safe Removal
- Use a Plastic Pry Tool: If you have one, a plastic trim tool (like those used for car panels) is less likely to scratch than a metal screwdriver.
- Work Slowly: If something doesn’t move, reassess before applying more force.
- Lay Out Parts in Order: As you remove screws and caps, line them up in the order you took them off. This helps during reassembly.
- Have a Helper: If possible, have someone hold a flashlight or hand you tools, especially in tight spaces.
Essential Tools For The Job
Here’s a quick reference of recommended tools:
| Tool | Purpose |
|---|---|
| Flathead screwdriver | Prying off caps, popping clips |
| Phillips screwdriver | Removing screws |
| Allen wrench set | Hidden set screws |
| Needle-nose pliers | Removing clips, grabbing small parts |
| Adjustable wrench | Loosening nuts if needed |
| Plastic trim tool | Non-scratch prying |
| Flashlight | Finding hidden screws or seams |
Where To Find Help And More Information
If you get stuck, there are many resources:
- Delta Faucet’s official manuals: Search by model number for step-by-step guides.
- YouTube tutorials: Many handymen post videos for specific Delta handles.
- Hardware store staff: Bring your handle and ask for advice.
- Professional plumber: For stubborn or complex cases.
For more about shower handle types and repairs, the [Wikipedia page on Shower Faucets](https://en.wikipedia.org/wiki/Shower) gives a helpful overview.
Frequently Asked Questions
What If My Delta Shower Handle Has Neither A Set Screw Nor A Visible Cap?
If there’s no set screw or cap, look for a snap-on connection. Gently pull the handle straight out—if it doesn’t move, check for a hidden screw under the escutcheon plate. Sometimes the handle threads onto the cartridge stem. If in doubt, check your model number on Delta’s website for specific instructions.
Can I Remove A Delta Shower Handle Without Turning Off The Water?
It’s possible, but not recommended. Accidentally turning the valve while removing the handle can cause water to spray out. Always turn off the water supply before starting any plumbing work for safety.
What Should I Do If The Handle Is Stuck Due To Mineral Buildup?
Apply a small amount of vinegar around the base and wait 10–15 minutes to dissolve minerals. If it’s still stuck, use a handle puller or gentle tapping to break the bond. Avoid using excessive force, which can damage the cartridge.
How Do I Know If My New Handle Will Fit My Delta Shower?
Check the model number of your faucet and buy a handle designed for that series. Universal handles may fit, but genuine Delta parts are more reliable. When possible, bring the old handle to the hardware store for comparison.
Is It Safe To Use Wd-40 Or Lubricant On My Shower Handle?
Yes, small amounts of WD-40 or silicone spray are safe for loosening a stuck handle. Avoid getting lubricant inside the valve or cartridge, as it can affect the seals. Always wipe off excess before reassembly.
Removing a Delta shower handle with no set screw can feel tricky at first, but with patience and the right approach, it’s a straightforward DIY task. Remember to be gentle, use the proper tools, and refer to your faucet’s model for the best results. If you ever feel unsure, don’t hesitate to ask a professional or consult Delta’s official resources for help.