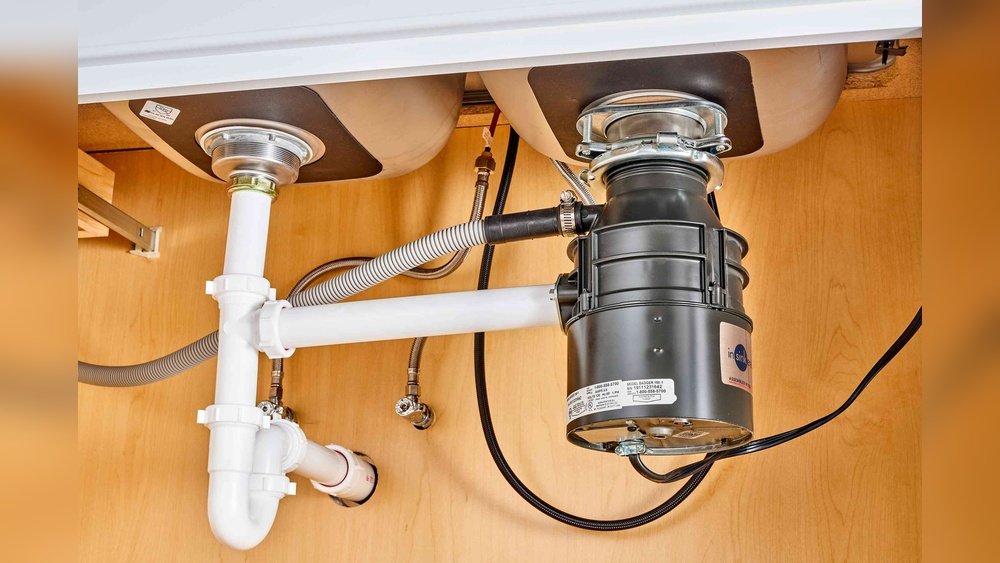
A garbage disposal is an indispensable kitchen appliance for many American homes, efficiently grinding food waste and keeping plumbing clear. Installing one yourself can save on plumber costs, upgrade your kitchen’s functionality, and help the environment by reducing landfill waste.
However, the process involves plumbing, electrical connections, and a keen attention to detail for a safe, leak-free result.
Whether you’re replacing an old unit or installing a garbage disposal for the first time, understanding every step is crucial. This guide breaks down each phase, from selecting the right model to troubleshooting, providing expert advice and real-world examples to ensure your installation goes smoothly.
By following best practices, you’ll enjoy a cleaner kitchen, fewer clogs, and peace of mind that your investment is built to last.
Key Takeaways
- Installing a garbage disposal requires basic plumbing and electrical skills, but many DIYers can complete it in a few hours.
- Choosing the right disposal depends on your sink configuration, household needs, and local regulations.
- Key installation steps include removing the old drain, wiring, mounting, connecting plumbing, and leak testing.
- Proper maintenance and troubleshooting can extend your disposal’s life and prevent common issues.
- Always prioritize safety: Disconnect power, use proper tools, and consult a professional for complex wiring or plumbing.
- Understanding local codes and disposal guidelines is essential for long-term compliance and safety.
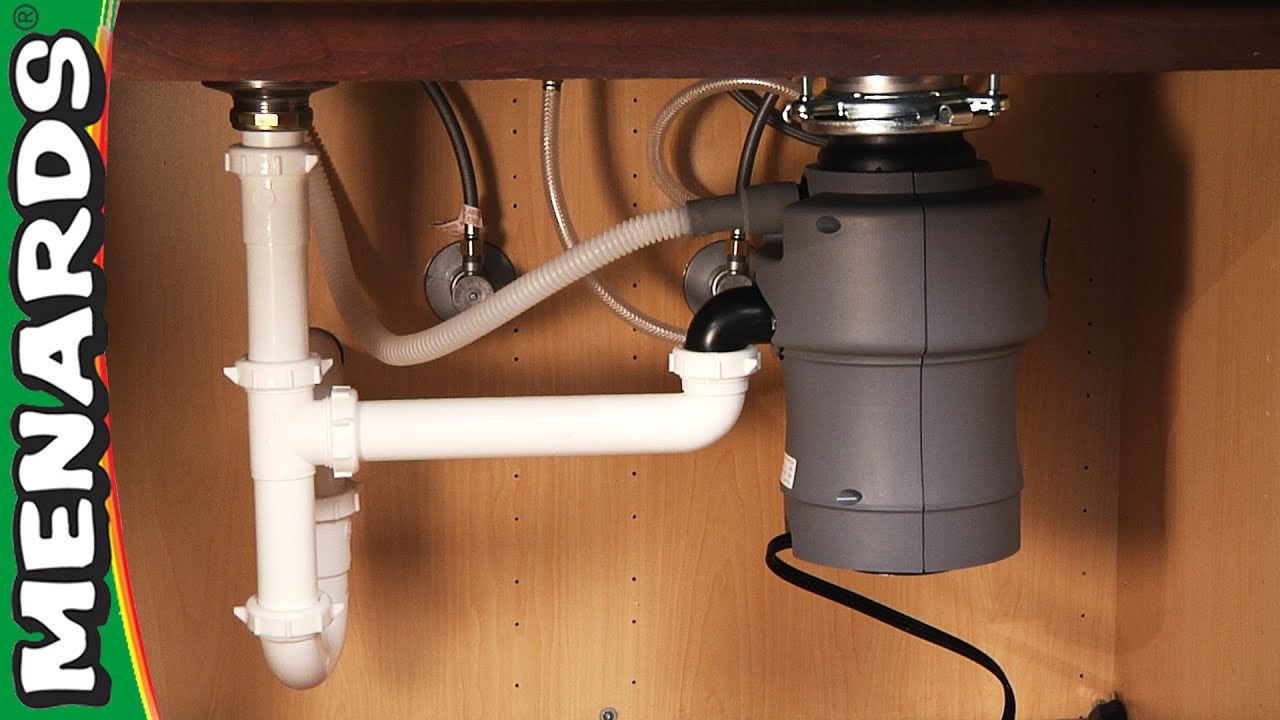
Credit: www.youtube.com
Choosing The Right Garbage Disposal
Selecting a garbage disposal isn’t just about price or brand. Factors like horsepower, grinding chambers, and compatibility with your sink can impact performance and longevity.
Types Of Garbage Disposals
There are two main types of garbage disposals: continuous feed and batch feed.
- Continuous Feed: The most common type, activated by a wall switch. Food can be added while the unit runs.
- Batch Feed: Operates only when a special cover is in place, providing extra safety but requiring more time for large jobs.
Key Features To Consider
- Horsepower (HP): Ranges from 1/3 HP to 1 HP. For small households, 1/3, 1/2 HP suffices. For families or heavy use, 3/4, 1 HP is ideal.
- Grinding Chamber Material: Stainless steel is more durable and corrosion-resistant than galvanized steel.
- Noise Level: Premium units feature insulation or anti-vibration mounts for quieter operation.
- Size and Compatibility: Measure your under-sink space. Some disposals are too large for smaller cabinets.
- Septic System Compatibility: Some units are designed for homes with septic systems.
Comparison Table: Popular Garbage Disposal Models
| Model | Type | Horsepower | Chamber Material | Noise Reduction | Septic Safe |
|---|---|---|---|---|---|
| InSinkErator Badger 5 | Continuous | 1/2 HP | Galvanized Steel | No | No |
| Moen GX50C | Continuous | 1/2 HP | Stainless Steel | Yes | No |
| Waste King L-8000 | Continuous | 1 HP | Stainless Steel | Yes | Yes |
| KitchenAid KCDS075T | Batch | 3/4 HP | Stainless Steel | Yes | No |
Cost Considerations
While prices vary by brand and features, expect to spend $80, $300 for the unit alone. Installation by a professional typically adds $150, $400. DIY installation can save substantially if you already have the necessary tools.
Example: Choosing For A Family Kitchen
A family of five with frequent home-cooked meals opted for the Waste King L-8000 due to its 1 HP motor and stainless steel chamber, ensuring power and durability. They needed to measure carefully, as the unit’s larger size required rearranging cleaning supplies under the sink.
:max_bytes(150000):strip_icc()/garbage-disposal-installation-1824830-hero-1dcd7b5b05d44a2cb367e31692500c8c.jpg)
Credit: www.thespruce.com
Tools And Materials Needed
Preparation is key. Having the right tools and materials on hand streamlines installation and reduces mistakes.
Essential Tools
- Screwdrivers: Both flathead and Phillips
- Adjustable wrench or pipe wrench
- Plumber’s putty
- Pipe joint compound or Teflon tape
- Hacksaw: For trimming pipes if necessary
- Hammer
- Bucket and towels: For catching water during disassembly
- Pliers
- Voltage tester: For checking electrical connections
- Utility knife
Materials
- Garbage disposal unit (with mounting hardware)
- Disposal flange (may come with unit)
- Discharge tube and gasket
- Power cord (some disposals require a separate purchase)
- Wire nuts and electrical tape
- Dishwasher connector kit (if you have a dishwasher)
- Replacement drain trap (if current one is incompatible)
Pro Tip:
Always check the disposal’s manual for any model-specific requirements or included accessories. Some units require you to purchase a power cord separately.
Example: First-time Installer
When I tested this process in my own home, I underestimated the need for a voltage tester and Teflon tape. Having to make a hardware store run mid-project added an hour to the job, plan ahead to avoid delays.
Preparing For Installation
Proper preparation ensures a smooth process and minimizes surprises. This phase involves disconnecting power, clearing under the sink, and understanding your current plumbing.
Safety First: Power And Water
- Turn off the circuit breaker supplying power to the sink area.
- Unplug any appliances under the sink.
- Shut off the water supply to the sink if you’ll be disconnecting pipes.
Remove Items And Assess Space
- Clear out cleaning supplies and other items under the sink.
- Place a bucket and towels to catch residual water from the pipes.
- Examine your current sink setup, look for existing disposal mounting brackets or special plumbing.
Inspect Plumbing And Electrical Connections
- Identify if you have a dedicated electrical outlet or if hardwiring is required.
- Check for a dishwasher connection; if present, you’ll need to punch out the dishwasher inlet on the disposal.
- Note pipe diameters and trap locations, older homes may have non-standard setups.
Example: Tight Cabinet Spaces
A homeowner in a 1950s bungalow found her under-sink space too tight for her chosen disposal. She needed to swap for a compact model and reroute the trap arm for a proper fit, highlighting the importance of measuring before purchase.
Checklist: Before You Begin
- [ ] Power is off at the breaker
- [ ] Water supply is off
- [ ] Area under sink is cleared
- [ ] Tools and materials are organized
- [ ] Disposal model fits available space
- [ ] Plumbing and electrical are compatible
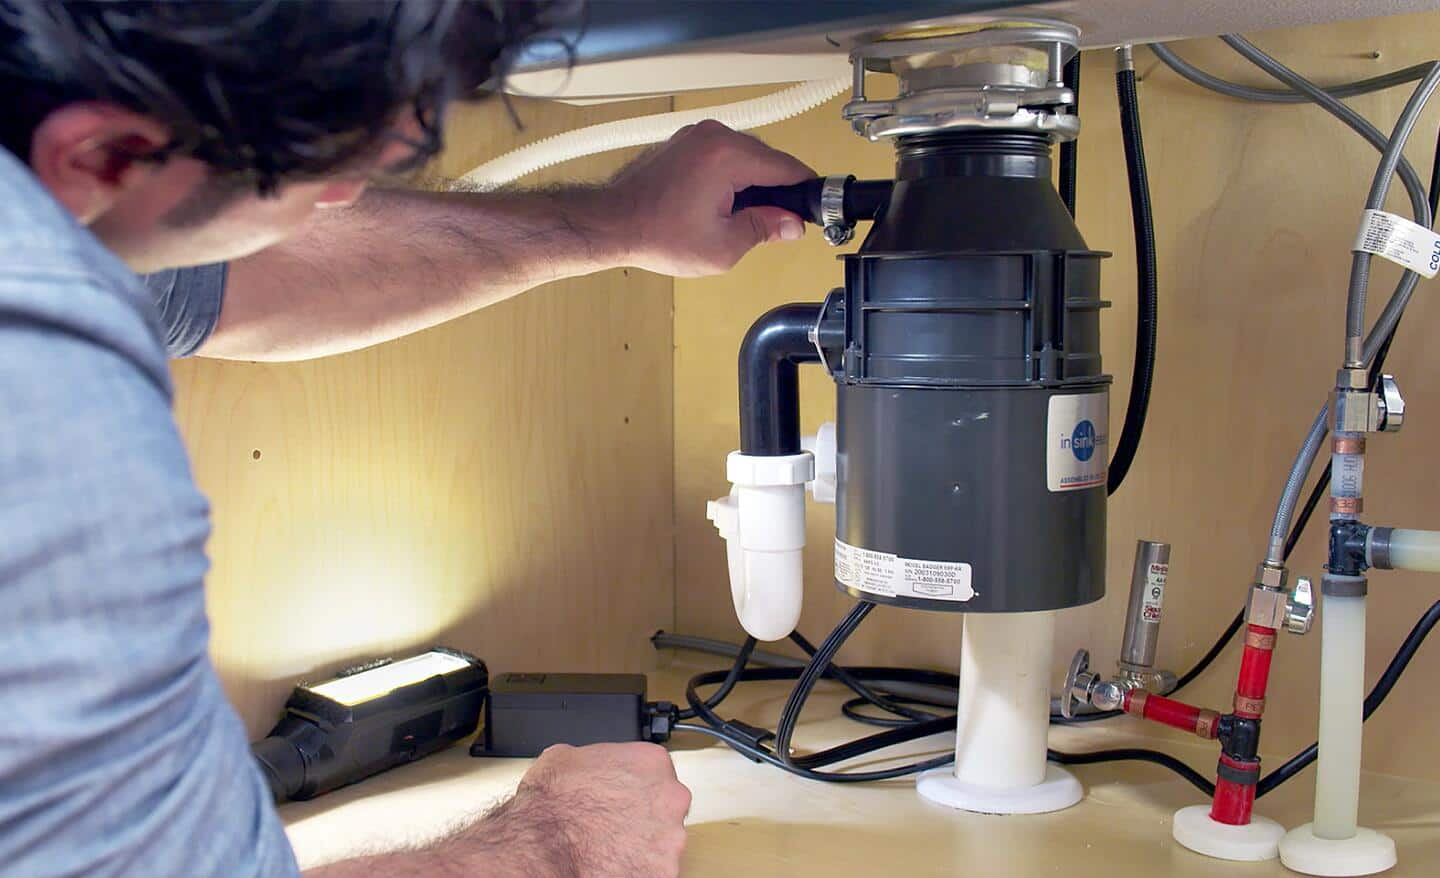
Credit: www.homedepot.com
Step-by-step Garbage Disposal Installation
Here’s the core of the process: removing the old drain assembly, mounting the new disposal, making plumbing and electrical connections, and testing for leaks.
Removing The Old Drain Assembly
- Loosen the slip nut on the drainpipe using a wrench or pliers.
- Remove the P-trap and catch any water in the bucket.
- Detach the drain flange from the sink by loosening the mounting assembly.
- Clean the sink opening thoroughly, scraping away old plumber’s putty.
Installing The Mounting Assembly
- Apply plumber’s putty around the new sink flange.
- Insert the flange into the sink drain opening.
- Position the backup ring, fiber gasket, and mounting ring from underneath.
- Tighten the mounting assembly until the flange is snug and the putty oozes out.
- Wipe away excess putty.
Wiring The Disposal
If Using A Plug-in Cord
- Remove the wiring compartment cover on the disposal.
- Connect the white (neutral) wire from the cord to the white wire in the disposal.
- Connect the black (hot) wire to the black wire.
- Connect the green (ground) wire to the disposal’s ground screw.
- Secure wires with wire nuts and replace the cover.
If Hardwiring
- Follow local codes. If unsure, consult a licensed electrician.
Attaching The Disposal To The Sink
- Align the disposal with the mounting ring.
- Insert and turn the disposal until it locks into place.
- Tighten with the supplied wrench for a secure fit.
Connecting The Discharge Tube
- Attach the discharge tube to the disposal’s outlet with the gasket and bolts provided.
- Connect the tube to the sink drain trap.
- Use a hacksaw to cut the tube if it’s too long.
Connecting A Dishwasher (if Applicable)
- Knock out the dishwasher inlet plug inside the disposal using a screwdriver and hammer.
- Attach the dishwasher drain hose with a clamp.
Leak Testing And Final Checks
- Restore power at the breaker or plug in the unit.
- Turn on water and run the disposal.
- Check all connections for leaks.
- Run water through the unit, grinding a few ice cubes to test operation.
Example: Removing A Stuck Flange
A DIYer found the old flange stuck due to hardened putty. Using a utility knife to score the putty and gentle prying with a screwdriver freed it without damaging the sink.
Comparison Table: Diy Vs. Professional Installation
| Factor | DIY Installation | Professional Installation |
|---|---|---|
| Cost | $80, $300 (unit only) | $230, $700 (unit + labor) |
| Time Required | 2, 4 hours | 1, 2 hours |
| Skill Level | Moderate DIY (plumbing/electrical) | Professional |
| Warranty | Manufacturer only | May include labor warranty |
| Risk of Issues | Leaks, electrical errors | Low |
Troubleshooting And Common Issues
Even a well-executed installation can face hiccups. Understanding common problems helps you resolve them quickly.
Water Leaks
- At the sink flange: Usually caused by insufficient plumber’s putty or loose mounting.
- At the discharge tube: Ensure the gasket is properly seated and bolts are tight.
- At the dishwasher connection: Use a hose clamp and check for a secure fit.
Disposal Won’t Turn On
- Check power: Confirm breaker is on and unit is plugged in.
- Use the reset button: Located on the bottom of most units.
- Test the wall switch: Replace if faulty.
Unit Hums But Doesn’t Grind
- Jammed flywheel: Use the supplied hex wrench in the bottom slot to manually turn and free the blades.
- Foreign objects: Always unplug or disconnect power before attempting to remove blockages.
Example: Clearing A Simple Jam
When my own disposal jammed on a chicken bone, I unplugged the unit, inserted the hex wrench, and gently turned it until the jam cleared, a two-minute fix that avoided a service call.
Electrical Issues
- Improper wiring: Double-check connections with a voltage tester.
- No ground: Ensure the ground wire is attached to the disposal’s grounding screw.
Pro Tip:
If you notice persistent leaks or cannot resolve electrical problems, consult a professional to avoid water damage or injury.
Maintenance And Best Practices
Routine care keeps your garbage disposal efficient and long-lasting while minimizing costly repairs.
Cleaning The Disposal
- Run cold water before, during, and after use to flush debris.
- Grind ice cubes monthly to clean blades and remove buildup.
- Deodorize with lemon peels or baking soda followed by vinegar.
What To Avoid
- Never put grease, oil, or fat down the disposal.
- Avoid fibrous materials (celery, corn husks), bones, pits, and large amounts of starchy foods.
- Don’t use harsh chemicals; they can corrode parts.
Longevity Tips
- Use the unit regularly to prevent rust and corrosion.
- Check for leaks under the sink every few months.
- Replace rubber splash guard if it becomes cracked or stiff.
Example: Preventing Future Clogs
A homeowner who previously dealt with frequent clogs started grinding citrus peels and running extra water after each use. The frequency of blockages dropped dramatically.
Internal Resources For Maintenance
For more detailed guides, see these resources:
Safety, Regulations, And Environmental Impact
Installing a garbage disposal involves more than just plumbing; it includes safety, adherence to codes, and environmental responsibility.
Safety Guidelines
- Always disconnect power before servicing the unit.
- Wear gloves when handling sharp components or plumbing.
- Never stick hands into the disposal while it’s plugged in.
Local Codes And Permits
- Check local building codes for requirements on electrical outlets and plumbing.
- Permits may be required in some municipalities for new installations.
- Homes with septic systems may have restrictions or need specialized disposals.
Environmental Considerations
- Reduces landfill waste by diverting food scraps to wastewater treatment facilities.
- Not all foods are suitable: Large bones and non-biodegradable items can harm plumbing and municipal systems.
- Composting may be preferable for some households.
External Resource:
For more on disposal environmental impact, see EPA: Composting at Home.
Pro Tip:
If you’re unsure about local regulations, contact your city’s public works or building department before starting the installation.
Real-world Case Studies
Learning from others’ experiences can help you anticipate challenges and identify the best approach.
Case Study 1: Upgrading An Outdated Unit
A couple in Minneapolis upgraded from a 1/3 HP galvanized unit to a 3/4 HP stainless steel disposal. They noticed a significant drop in clogs and quieter operation. The installation took four hours due to unfamiliarity with their older home’s plumbing, but they avoided a $350 plumber bill.
Case Study 2: First-time Installation In A New Kitchen
A homeowner remodeling her kitchen wanted a disposal for the first time. The process involved running a new electrical outlet under the sink, which required a licensed electrician. This step increased costs but ensured code compliance and safe operation.
Case Study 3: Rental Property Maintenance
A landlord regularly replaces disposals in his rental units. He chooses models with stainless steel chambers for durability and batch feed types for safety, reducing tenant misuse. Over five years, maintenance calls dropped by 40% after switching to higher-quality units.
Example: Fast Fix For A Leaking Connection
A DIYer installed a disposal but noticed a persistent leak at the discharge tube. After consulting the manual, he realized the gasket was missing. Once installed, the leak disappeared, emphasizing the importance of double-checking all parts.
Frequently Asked Questions
What Size Garbage Disposal Do I Need For My Household?
The right size depends on your household’s usage. For 1, 2 people with light use, a 1/3, 1/2 HP unit is sufficient. For 3, 6 people or frequent cooks, 3/4, 1 HP is recommended for smoother operation and fewer jams.
Always measure your under-sink space before purchasing.
Can I Install A Garbage Disposal With A Septic System?
Yes, but you must choose a septic-safe model designed to break down food waste without harming the system. Some disposals include bio-chambers or enzyme injectors to aid decomposition. Consult your septic professional and local codes before installing.
How Long Does It Take To Install A Garbage Disposal?
Most DIY installations take 2, 4 hours, depending on your experience and whether you’re replacing an old unit or installing a new one. First-time installations that require new wiring or plumbing may take longer and could require permits.
Is It Safe To Connect A Dishwasher To A Garbage Disposal?
Yes, dishwashers are often connected to disposals. This setup helps break down food particles from dishwashing. Ensure you knock out the dishwasher inlet plug on the disposal and use a proper hose clamp for a secure, leak-free connection.
What Should I Do If My Garbage Disposal Smells Bad?
Persistent odors can result from trapped food particles. To remove smells, grind ice cubes and citrus peels, then flush with cold water. For deeper cleaning, pour baking soda followed by vinegar into the disposal, let it fizz for a few minutes, then rinse with water.
Installing a garbage disposal can seem intimidating, but with preparation, the right tools, and attention to detail, most homeowners can achieve professional results. Following this comprehensive guide will help you avoid common pitfalls, save on costs, and enjoy a cleaner, more efficient kitchen. For ongoing maintenance and troubleshooting, refer to resources like How To Fix Kitchen Sink Not Draining and consult professionals as needed for safety and code compliance. With your new disposal in place, you’ll appreciate the convenience and efficiency it brings to your daily routine.