A clogged garbage disposal can disrupt your daily kitchen routine and even create unpleasant odors if not addressed promptly. Many homeowners dread dealing with a jammed disposal, fearing complex repairs or costly service calls. However, with the right knowledge and safe techniques, most clogs can be cleared efficiently, restoring full function to your disposal and preventing future blockages.
Understanding the causes, tools, and safe procedures for clearing a clogged garbage disposal is essential for both novice and experienced homeowners. This comprehensive guide covers step-by-step methods, preventive strategies, real-world examples, and expert tips to help you clear clogs effectively, protect your appliance, and maintain a fresh, functional kitchen environment.
Key Takeaways
- Most disposal clogs can be safely cleared without professional help by following proper safety and troubleshooting steps.
- Common causes include fibrous foods, grease buildup, and improper items going down the drain.
- Essential tools like a hex key, plunger, and tongs can be invaluable for unclogging your unit.
- Preventative maintenance and correct usage habits reduce the risk of future clogs and extend the appliance’s lifespan.
- Knowing when to call a professional is crucial if DIY methods fail or safety is at risk.
Credit: www.libertyhomeguard.com
Understanding Garbage Disposal Clogs
Clogged garbage disposals are a frequent issue in American households, with improper usage being the leading cause. According to the Plumbing Manufacturers International, more than 50% of kitchen plumbing service calls are related to disposal or drain issues. Understanding what leads to these clogs helps you both resolve and prevent them.
What Causes Garbage Disposal Clogs?
A garbage disposal is designed to handle small food scraps, but certain items can quickly create blockages:
- Fibrous foods: Celery, corn husks, and artichokes can wrap around the blades.
- Grease and fats: These solidify and stick to internal components.
- Coffee grounds and eggshells: They accumulate like sand, forming sludgy blockages.
- Large food pieces: Overloading the unit can jam the blades.
- Non-food materials: Items like bones, glass, or plastic can halt the mechanism.
How A Garbage Disposal Works
Inside a garbage disposal, impellers spin rapidly to break down food. Water flushes particles through a grinding chamber, then out the drainpipe. When inappropriate materials enter, or food particles accumulate, the flow is restricted, causing water to back up and the unit to jam.
Symptoms Of A Clogged Disposal
Recognizing the signs of a clog is crucial for quick action:
- Standing water in the sink or slow drainage
- Humming sound but no grinding motion
- Foul odors from trapped food
- Manual reset button tripping frequently
By identifying these symptoms early, you can avoid more severe plumbing problems and protect your disposal from costly damage.

Credit: www.wikihow.life
Safety First: What To Do Before Clearing A Clog
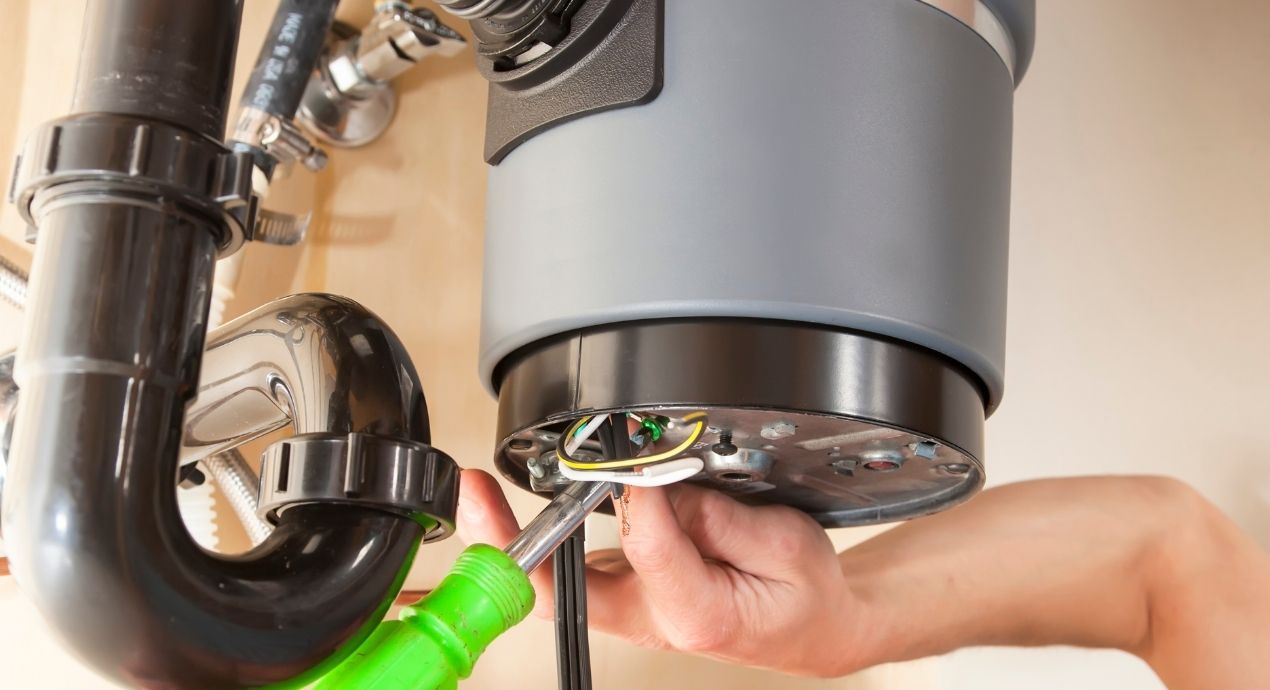
Safety is paramount when working with any electrical appliance, especially one with sharp blades and powerful motors. Even when switched off, the disposal can start unexpectedly, posing a risk of injury.
Step 1: Disconnect Power
Always unplug the disposal from its outlet under the sink. If you can’t access the plug, turn off the corresponding circuit breaker. Never rely solely on the wall switch.
Step 2: Gather Essential Tools
Having the right tools on hand can make the job safer and easier:
- Hex (Allen) wrench for manual blade rotation
- Long-handled tongs or pliers to remove obstructions
- Plunger for stubborn blockages
- Flashlight for visibility
- Protective gloves to shield your hands
Step 3: Assess The Situation
Check if the unit is completely jammed or if water is simply not draining. Look for visible objects near the top of the disposal. Never reach in with bare hands, even if the power is off.
Step 4: Prepare The Area
Clear the sink area, place a bucket or towels under the sink to catch spills, and ensure adequate lighting. This preparation prevents messes and allows safe, efficient work.
Step-by-step Guide: Clearing A Clogged Garbage Disposal
Clearing a clogged garbage disposal can be straightforward if you follow a systematic approach. Below are proven steps, from the easiest fixes to more involved solutions.
Step 1: Manual Removal Of Obstructions
- Shine a flashlight into the disposal to look for visible blockages.
- Use tongs or pliers to extract any objects, never your fingers.
- Rotate the impeller plate gently with a wooden spoon to check for freedom of movement.
Step 2: Use The Reset Button
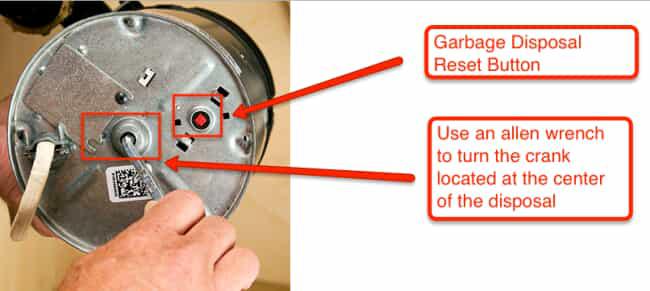
- Locate the red reset button on the underside of the disposal.
- If tripped, press it firmly until you hear a click.
- Restore power and test the unit briefly. If it hums but doesn’t grind, proceed to the next step.
Step 3: Free The Blades With A Hex Key
Many disposals have a hex hole underneath for manual turning:
- Insert the hex (Allen) wrench into the center hole at the bottom.
- Wiggle the wrench back and forth to loosen any internal jam.
- Remove the wrench, restore power, and test the unit.
Step 4: Plunge The Sink
If the disposal runs but water won’t drain:
- Fill the sink with a few inches of water.
- Place a cup plunger over the drain and plunge vigorously for 20, 30 seconds.
- Remove the plunger and check for improved drainage.
Step 5: Use A Baking Soda And Vinegar Flush
This natural method can help break up minor blockages:
- Pour 1/2 cup of baking soda into the disposal.
- Follow with 1 cup of white vinegar.
- Let the mixture fizz for 5, 10 minutes.
- Rinse with hot water while running the disposal.
Step 6: Inspect The Drain Trap
If water still backs up, the clog may be in the P-trap:
- Place a bucket beneath the trap under the sink.
- Loosen the slip nuts and remove the trap.
- Clear out debris, rinse with water, and reattach.
Step 7: Test And Restore Function
After each step, briefly restore power and run the disposal with cold water. Only proceed to the next method if the previous one fails.
Example: Clearing A Tough Clog
A homeowner noticed their disposal humming but not spinning. After unplugging the unit, they used a hex wrench to manually rotate the blades, dislodging a stuck chicken bone. Power was restored, the reset button pressed, and the disposal worked perfectly, no plumber required.
Credit: www.benjaminfranklinplumbing.com
Tools And Products For Clearing Disposal Clogs
Selecting the right tools and products is key for both clearing clogs and ongoing maintenance. Some tools are essential for every household, while others are specialized for severe blockages.
Essential Tools Comparison Table
| Tool | Purpose | Estimated Cost | Ease of Use |
|---|---|---|---|
| Hex (Allen) Wrench | Manual blade rotation | $2, $10 | Very easy |
| Long Tongs/Pliers | Remove debris | $8, $20 | Easy |
| Cup Plunger | Dislodge sink blockages | $5, $15 | Moderate |
| Flashlight | Improve visibility | $5, $20 | Very easy |
| Bucket | Catch water during trap cleaning | $3, $10 | Very easy |
Safe Cleaning Products
- Baking soda and vinegar: Effective for mild clogs; safe for pipes.
- Enzyme-based drain cleaners: Break down organic material without damaging plumbing.
- Avoid caustic chemicals: Products with lye or acid can damage both the disposal and your pipes.
Specialty Tools
- Disposal cleaning brushes: Designed to reach and scrub the grinding chamber.
- Drain snakes: For severe clogs beyond the disposal or deep in the drain line.
Pro Tip:
Always keep a dedicated hex key in a labeled spot under your sink, it’s the most useful tool for jammed disposals.
Preventing Future Garbage Disposal Clogs
Prevention is the most effective way to keep your garbage disposal running smoothly. By adopting proper usage habits and regular maintenance, you can significantly reduce the risk of clogs.
What Not To Put Down Your Garbage Disposal
Avoid putting the following items into your disposal:
- Fibrous vegetables: Celery, corn husks, asparagus
- Grease, oil, and fat
- Bones, pits, and hard shells
- Coffee grounds and tea leaves
- Large quantities of starchy foods (rice, pasta, potato peels)
Best Practices For Everyday Use
- Run cold water before, during, and after use to solidify fats and flush debris.
- Feed scraps slowly: Avoid overloading the unit with too much food at once.
- Cut large items into smaller pieces before disposal.
Regular Maintenance Schedule
| Maintenance Task | Frequency | Purpose |
|---|---|---|
| Flush with cold water | After every use | Removes debris |
| Baking soda & vinegar rinse | Weekly | Breaks up buildup |
| Check for leaks | Monthly | Detects early damage |
| Deep clean with brush | Quarterly | Removes grime |
Case Study: Preventive Success
A family who experienced repeated clogs adopted a weekly baking soda and vinegar routine and stopped disposing of fibrous vegetables. Over the next year, they reported no further clogs and a notable reduction in unpleasant odors.
When To Replace Your Garbage Disposal
If you find that clogs are frequent despite following best practices, your unit may be nearing the end of its lifespan. Most disposals last 8, 15 years. Persistent motor failures, leaks, or poor grinding performance are signs it’s time for a replacement.
For tips on maintaining other kitchen appliances for optimal performance, check out our guide to the best non toxic toaster ovens.
Real-world Examples And Troubleshooting Scenarios
Learning from actual cases can help you troubleshoot more effectively. Here are three scenarios homeowners commonly encounter, each with a tailored solution.
Example 1: The Humming Disposal
Situation: The disposal hums when switched on but doesn’t grind.
Solution: After unplugging the unit, use the hex wrench to turn the blades manually. Often, this clears a stuck object. If the motor is still stuck, the unit may have overheated, let it cool, press the reset button, and try again.
Example 2: Slow Draining Despite Clear Blades
Situation: Water drains slowly, but the disposal blades are free and unobstructed.
Solution: The clog is likely in the drain trap or farther down the pipe. Remove and clean the P-trap. If necessary, use a small drain snake to clear blockages further along the line.
Example 3: Persistent Odors After Clearing Clog
Situation: Disposal works, but odors linger even after a clog is cleared.
Solution: Deep clean with a disposal brush and a mixture of baking soda and vinegar. Grinding citrus peels (lemon or orange) can also neutralize odors. If the smell persists, check for food particles caught under the splash guard.
Example: A First-person Experience
In my experience, a persistent humming noise was due to a peach pit stuck between the impeller and side wall. After safely disconnecting the power and using tongs to remove the pit, the unit resumed normal function. This reinforced the importance of never putting fruit pits in the disposal.
When To Call A Professional
While most garbage disposal clogs are DIY-friendly, certain situations require the expertise of a licensed plumber or appliance technician. Attempting advanced repairs without proper training can risk injury or further damage.
Warning Signs You Need A Professional
- Repeated tripping of the reset button after clearing the clog
- Leaking from the unit or under the sink
- Electrical issues: Sparks, burning smells, or non-responsive switches
- Unit does not turn on after all troubleshooting steps
Cost Comparison: Diy Vs. Professional Service
| Service | DIY Cost Estimate | Professional Cost Estimate | Time Required |
|---|---|---|---|
| Basic Clog Removal | $10, $30 (tools/supplies) | $100, $250 | 30, 60 minutes |
| P-trap Cleaning | $0, $10 | $75, $150 | 15, 45 minutes |
| Disposal Replacement | $75, $200 (unit only) | $250, $500 (parts & labor) | 2, 3 hours |
Finding A Qualified Plumber
Seek a licensed, insured plumber with positive reviews. Always request a written estimate before work begins. For more guidance on appliance repair and selection, see our roundup of the best ovens for baking bread.
Pro Tip:
If your disposal is still under warranty, contact the manufacturer before attempting repairs that could void coverage.
Frequently Asked Questions
How Can I Tell If My Garbage Disposal Is Clogged Or Broken?
A clogged disposal usually emits a humming sound but doesn’t grind, while a broken disposal may not respond at all or may leak water. If your unit is silent and the reset button doesn’t restore function, the motor or wiring may be damaged, requiring professional assessment.
Is It Safe To Use Chemical Drain Cleaners In My Garbage Disposal?
No, most chemical drain cleaners contain harsh acids or lye that can corrode disposal parts and pipes. Instead, use natural solutions such as baking soda and vinegar, or enzyme-based cleaners that are safer for your plumbing system.
How Do I Remove A Foreign Object From The Disposal Safely?
Always disconnect power first. Use long-handled tongs or pliers to retrieve the item, never reach in with your hands, even if the disposal is unplugged. If you can’t see or reach the object, a flashlight and a flexible grabber tool may help.
If unsuccessful, consult a professional.
What Should I Do If My Garbage Disposal Leaks After Clearing A Clog?
Leaks can result from loose connections, worn gaskets, or cracked housings. Tighten all visible connections and check the rubber gasket under the sink flange. If leaks persist, the unit may need a replacement or resealing by a plumber.
Can Frequent Clogs Damage My Garbage Disposal Permanently?
Yes, repeated clogs can strain the motor, dull the impellers, and cause overheating or leaks over time. Persistent issues may indicate improper use or an aging unit. Regular maintenance and mindful usage help prolong your disposal’s life.
Clearing a clogged garbage disposal doesn’t have to be stressful or hazardous. By understanding the most common causes, using the right tools, and following safe, step-by-step procedures, you can restore your disposal’s performance with confidence. Preventive habits and regular maintenance not only minimize the risk of future clogs but also keep your kitchen running smoothly.
If problems persist or you encounter electrical or plumbing concerns, don’t hesitate to seek professional help, your safety and appliance longevity are worth it.