
If your Moen single handle kitchen faucet feels wobbly or loose, it’s more than just an annoyance. Left unchecked, a loose faucet can lead to leaks, water damage, and even breakage over time. The good news is, tightening a loose Moen faucet is a task most homeowners can handle with basic tools, a little patience, and the right guidance. This guide walks you through every detail, from identifying the problem to securing the handle and base like new. Along the way, you’ll learn smart tips and avoid common mistakes that trip up beginners. Let’s get your faucet solid and secure again.
Why Does A Moen Single Handle Kitchen Faucet Get Loose?
Over time, daily use puts stress on your kitchen faucet. Repeated swiveling, pulling, or even the vibrations from running water can gradually loosen the handle or the base of your Moen faucet. Sometimes, improper installation or skipped maintenance accelerates this process. Hard water, mineral buildup, or even a small leak inside can cause internal parts to shift as well.
A loose faucet isn’t just cosmetic. It can allow water to seep under your sink, making it damp and potentially encouraging mold. If you notice your faucet moving or wiggling when you use it, it’s important to address it sooner rather than later.
Tools And Materials You’ll Need
Before you start, gather the right tools to make the process smooth:
- Adjustable wrench: For tightening nuts under the sink.
- Phillips and flathead screwdrivers: For removing the handle and other parts.
- Allen (hex) wrench: Usually 3/32” or 1/8” for set screws.
- Flashlight or headlamp: To see clearly under the sink.
- Small bucket or towel: To catch any drips.
- Plumber’s grease (optional): For lubricating moving parts.
- Cleaning cloth: To wipe away debris or mineral buildup.
Tip: Not all Moen models use the same screw sizes. Check your model’s manual if possible, or bring your tools under the sink for a quick test.
Identifying The Source Of Looseness
The first step is to figure out exactly where the faucet is loose. In Moen single handle faucets, you’ll typically have movement in one of two places:
- The handle: The lever you use to turn water on/off and adjust temperature.
- The base/escutcheon: The bottom part of the faucet where it meets the sink.
Gently move each part and watch for wiggle or shifting. If the handle rocks back and forth, you likely need to tighten the set screw. If the entire faucet body moves on the sink, the mounting nut underneath is probably loose.
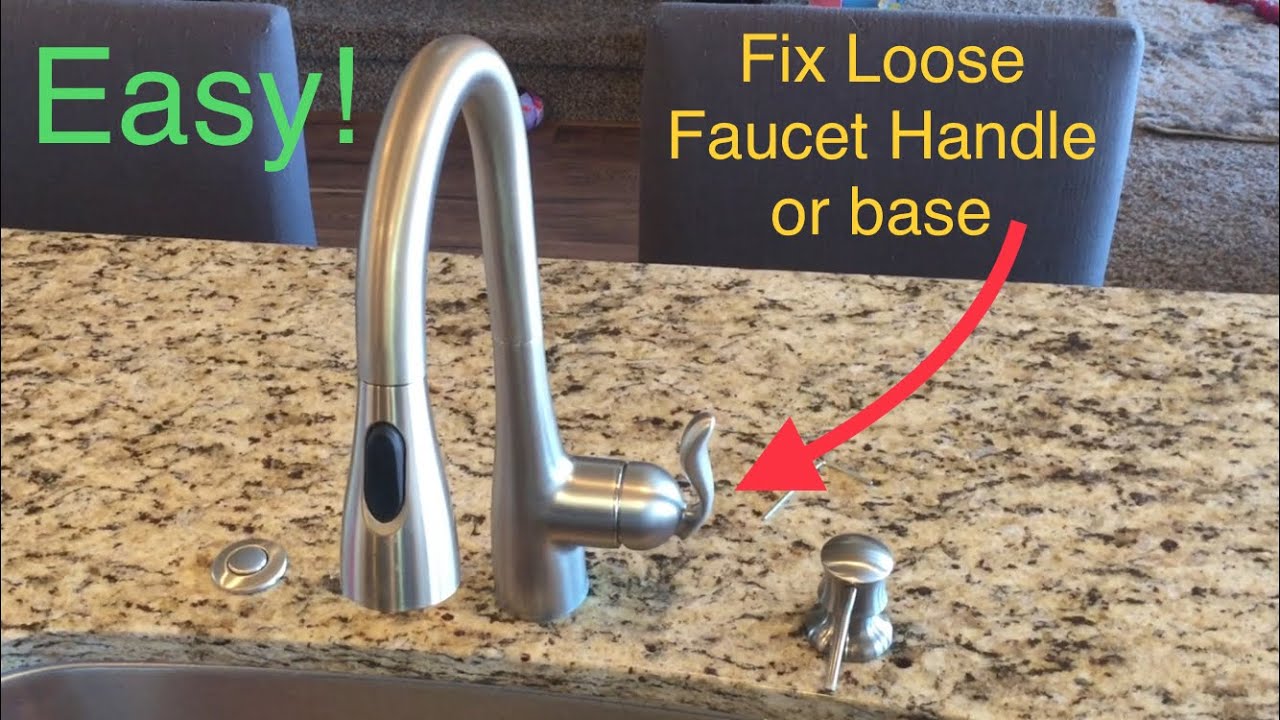
How To Tighten A Loose Moen Faucet Handle
Step 1: Turn Off The Water Supply
Before any repairs, always shut off the water. Look under your sink for two small valves (hot and cold). Turn them clockwise until snug. Open the faucet to relieve pressure and drain any remaining water.
Step 2: Remove The Handle
Most Moen handles are held in place by a small set screw, usually hidden. Here’s how to access it:
- Look for a small plug or plastic cap on the handle. Use a flathead screwdriver to gently pry it off.
- Under the cap, you’ll see a set screw. Use the correct size Allen wrench to loosen (not remove) the screw.
- Gently pull the handle off the cartridge stem.
Step 3: Tighten The Set Screw
With the handle removed, check the set screw:
- If it’s loose, tighten it with the Allen wrench until snug.
- Do not overtighten, as this can strip the screw or damage the stem.
If the screw is missing or stripped, you’ll need a replacement. Most hardware stores carry Moen-compatible screws.
Step 4: Reassemble And Test
Slide the handle back onto the stem and tighten the set screw. Replace the plastic cap. Turn the water supply back on and test the handle’s stability. It should feel firm with no play.
Credit: www.youtube.com
How To Tighten A Loose Moen Faucet Base
If the entire faucet body moves when you try to use it, the problem is likely under the sink.
Step 1: Clear The Space
Remove any cleaning supplies or objects from under your sink. Place a towel or bucket underneath to catch any water drips.
Step 2: Locate The Mounting Nut
Shine your flashlight up to the underside of the sink, right where the faucet comes through. You’ll see a large mounting nut (sometimes called a lock nut or bracket) holding the faucet in place.
Step 3: Tighten The Mounting Nut
Use your adjustable wrench to turn the mounting nut clockwise. It should be snug, but don’t overtighten or you may crack the sink or damage the faucet.
Some Moen models use a special mounting tool or a Phillips screw instead. If you see screws instead of a nut, tighten those with your screwdriver.
Step 4: Check The Faucet
Move the faucet gently. If it still wobbles, tighten the nut a bit more. Once secure, run the water and check for leaks.
Special Tips For Popular Moen Models
Moen makes several single handle kitchen faucet designs, each with small differences. Here’s what you should know about common types:
Moen Arbor
The Moen Arbor often uses a Duralock quick connect under the sink. Be careful not to over-tighten the mounting nut near plastic parts. The handle set screw is usually 3/32” Allen.
Moen Adler
The Adler’s handle is secured with a Phillips screw under the lever, not an Allen. You’ll need to remove the lever cap for access.
Moen Align
The Align series uses a mounting bracket with screws and often includes a deck plate. Ensure all screws are evenly tight, especially if you have a three-hole sink.
Moen Sleek
Sleek models sometimes use a cartridge retaining nut inside the handle. Tighten only the exterior set screw unless the movement comes from inside the handle assembly.
Common Mistakes To Avoid
Many DIYers make the same errors when tightening a loose Moen faucet. Here are the top ones to watch out for:
- Forgetting to turn off the water: Even a small amount of water pressure can cause a mess when you remove parts.
- Overtightening nuts or screws: This can strip threads or crack your sink/faucet.
- Using the wrong size tool: This can damage screws or make the job harder than it should be.
- Not checking for leaks after tightening: A secure faucet isn’t helpful if water is dripping below.
- Ignoring signs of wear: If you see rust, corrosion, or broken parts, replace them rather than just tightening.
When To Replace Instead Of Tighten
Sometimes tightening isn’t enough. If your faucet remains loose after tightening, or if you see damaged parts, it may be time for a replacement. Signs you need new parts:
- Stripped set screw or mounting nut
- Cracked or warped faucet body
- Persistent leaks
- Corroded or rusted parts
Replacing worn hardware is usually more cost-effective than dealing with water damage later.
Maintaining A Firm Faucet
Once your Moen faucet is tight again, a little regular care keeps it that way.
- Check for looseness every few months, especially if you use the faucet heavily.
- Wipe away mineral deposits and grime from the handle and base.
- Avoid swinging or yanking the faucet with excessive force.
- If you notice the faucet getting loose again, address it quickly before it worsens.
Table: Typical Moen Faucet Handle Set Screw Sizes
Here’s a quick reference for the most common set screw sizes used in Moen single handle kitchen faucets.
| Moen Faucet Series | Set Screw Type | Size |
|---|---|---|
| Arbor | Allen (Hex) | 3/32” |
| Adler | Phillips Head | #2 Phillips |
| Align | Allen (Hex) | 1/8” |
| Sleek | Allen (Hex) | 3/32” |
| Chateau | Allen (Hex) | 7/64” |

Credit: diy.stackexchange.com
Table: Comparing Tightening The Handle Vs. Base
Understanding where your faucet is loose helps you focus your repair effort.
| Loose Part | Usual Cause | Fixing Method | Time Needed |
|---|---|---|---|
| Handle | Set screw loose | Tighten set screw with Allen/Phillips wrench | 5–10 minutes |
| Base | Mounting nut loose | Tighten mounting nut under sink | 10–20 minutes |
Table: Signs You Need More Than Just Tightening
Sometimes a loose faucet is a sign of deeper problems.
| Sign | What It Means | Action |
|---|---|---|
| Faucet wobbles after tightening | Worn or stripped hardware | Replace mounting hardware |
| Water leaks under sink | Loose or damaged seals | Inspect and replace gaskets |
| Handle feels rough or grinds | Cartridge or stem worn | Replace cartridge |
| Visible corrosion | Water damage, age | Replace faucet or affected parts |

Credit: www.reddit.com
Practical Insights Most Beginners Miss
1. Hidden Handle Screws
Not all Moen handles have visible screws. Some use a plug that matches the handle finish so well, it’s easy to miss. Always check for a small round or square cap, and use a soft tool (like a plastic pry tool) to avoid scratching your faucet.
2. Multiple Mounting Points
On some sinks, especially three-hole designs, the faucet base may have more than one mounting nut or screw. If you only tighten one, the faucet can still move. Always check for extra nuts or brackets under the sink, especially if your faucet still feels loose after the first adjustment.
3. Mineral Deposits Hide Problems
If your faucet is old or you have hard water, mineral deposits can build up around the base or under the handle. This buildup sometimes masks the real source of movement. Clean the area with vinegar and a toothbrush before starting repairs for the best results.
Troubleshooting: What If Your Faucet Is Still Loose?
If you’ve tightened both the handle and the base and your faucet is still loose, here are some possible causes:
- Mounting holes are too large: Sometimes, the hole in the sink is bigger than the mounting hardware. In this case, you may need a larger washer or a mounting plate to stabilize the faucet.
- Plastic nuts stripped: Many new Moen faucets use plastic mounting nuts, which can strip easily. If you cannot get them tight, replace with a metal version.
- Sink material is thin or flexible: Stainless steel sinks can flex, making it hard to get a tight fit. Add a support bracket or use a wooden block as a backing plate for extra stability.
If you need replacement parts, Moen’s official website has diagrams and part numbers for every model. You can also find help from professional plumbers or hardware stores.
Preventing Future Faucet Looseness
Once your Moen faucet is tight, a few habits can keep it that way:
- Avoid using the faucet to support heavy objects or lean on it.
- Teach children not to swing or hang from the handle.
- Every six months, check under the sink for moisture or looseness.
- Clean around the base and handle to prevent buildup that could interfere with hardware.
Regular checks and gentle use can help your faucet last for many years without becoming loose.
Safety Tips During Faucet Repair
- Always turn off water before disassembling the faucet.
- Wear gloves if you have sensitive skin or are working in tight spaces.
- If you have poor lighting under your sink, use a headlamp.
- Keep all removed parts in a small container so you don’t lose screws or caps.
When To Call A Professional
Most loose faucet problems are simple to fix. However, if you see signs of water damage, major leaks, or can’t access the mounting hardware, it’s best to call a plumber. Sometimes, especially in older homes, the water lines or shutoff valves are corroded or stuck.
Forcing them can cause a bigger problem.
Professional help is also a good idea if you need to cut new holes in your sink or replace the entire faucet assembly.
Where To Find Official Moen Support
Moen provides excellent diagrams, videos, and troubleshooting guides for their products. You can find your faucet’s manual or part number at the official Moen Customer Support page. This resource is especially helpful if you’re unsure which model you have or need to order replacement parts.
Frequently Asked Questions
How Do I Find The Set Screw On My Moen Faucet Handle?
Most Moen faucet handles hide the set screw under a small decorative cap or plug. This cap is usually at the base of the handle or on the side. Use a flathead screwdriver or a plastic pry tool to gently remove the cap, and you’ll see the set screw beneath.
What Should I Do If The Mounting Nut Under The Sink Won’t Tighten?
If the mounting nut is spinning but not tightening, it may be stripped or the mounting hole may be too large. Try using a larger washer or mounting plate for support. If the nut is damaged, replace it with a new one.
Sometimes, adding plumber’s tape to the threads can also help grip.
Can I Use Plumber’s Putty To Stabilize A Loose Faucet Base?
Plumber’s putty is not a substitute for tightening the mounting nut, but it can help seal and cushion the base. Apply a thin ring of putty under the faucet base before tightening the nut. This can prevent leaks and help make a better seal, but always tighten the hardware properly.
Will Tightening The Handle Fix A Leaking Moen Faucet?
Tightening the handle will not fix leaks. A leaky faucet is usually caused by a worn cartridge or O-rings. If your faucet leaks, you’ll need to replace these parts. Tightening the handle only improves stability, not the water seal.
Where Can I Find Moen Replacement Parts?
You can find official Moen replacement parts online at Moen’s website, at major hardware stores, or at plumbing supply shops. Bring your old part or know your faucet model number to ensure you get the correct replacement.
Securing your Moen single handle kitchen faucet is not just about comfort—it’s about protecting your kitchen from water damage and extending the life of your plumbing fixtures. With the right tools, a little know-how, and the tips above, you can keep your faucet tight and trouble-free for years to come.